Manufaktur industri
Industri Internet of Things | bahan industri | Pemeliharaan dan Perbaikan Peralatan | Pemrograman industri |
home  MfgRobots >> Manufaktur industri >  >> Manufacturing Technology >> Proses manufaktur

Kendalikan TV Anda dengan Alexa melalui Arduino IoT Cloud – Panduan Langkah demi Langkah

Komponen dan Perlengkapan

Kendalikan TV Anda dengan Alexa melalui Arduino IoT Cloud – Panduan Langkah demi Langkah
Arduino Nano 33 IoT
×1
Kendalikan TV Anda dengan Alexa melalui Arduino IoT Cloud – Panduan Langkah demi Langkah
Resistor 330 ohm
×1
IR receiver (generic)
ex. VS1838B
×1
IR transmitter (generic)
×1
Kendalikan TV Anda dengan Alexa melalui Arduino IoT Cloud – Panduan Langkah demi Langkah
Jumper wires (generic)
×1
Kendalikan TV Anda dengan Alexa melalui Arduino IoT Cloud – Panduan Langkah demi Langkah
Breadboard (generic)
×1

Aplikasi dan Layanan Online

Kendalikan TV Anda dengan Alexa melalui Arduino IoT Cloud – Panduan Langkah demi Langkah
Arduino Web Editor
Kendalikan TV Anda dengan Alexa melalui Arduino IoT Cloud – Panduan Langkah demi Langkah
Arduino IoT Cloud
Kendalikan TV Anda dengan Alexa melalui Arduino IoT Cloud – Panduan Langkah demi Langkah
Arduino Amazon Alexa Official Arduino Skill

Tentang Proyek Ini

Note: This tutorial could be outdated, please go here for a more current version.

Intro: Arduino IoT Cloud

Arduino IoT Cloud is a platform that enables anyone to build IoT connected object with ease. In order to control our TV using Alexa, we'll also be using the Official Arduino Alexa Skill.

If you are new to Arduino IoT Cloud, we advise to first take a look at this introductory project, which will give you an overview and guide you through the process of setting up one of the supported boards, IoT Cloud Things and Properties and get you onboard.

Part 1: How to Control a TV Set

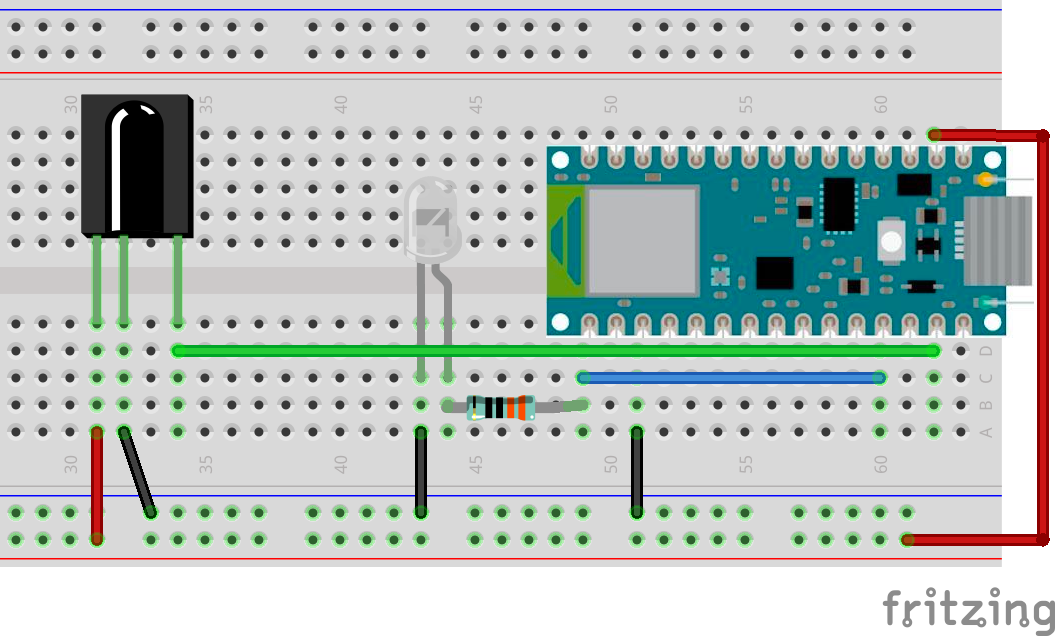
The easiest way to control any kind of television, is to act as if we were its very own remote infrared controller. In order to do so, we'll have to listen for the signals the remote will send, capture the data and mimick it with our Arduino board. Once the circuit is assembled, we'll upload this sketch to our board. It will traslate the IR signal bursts generated by remote button presses into an array of unsigned integers. Let's point the remote at the Arduino IR Receiver we built and press the following buttons:

  • POWER/STANDBY
  • CHANNELS FROM 1 TO 9
  • VOLUME UP
  • VOLUME DOWN
  • MUTE
  • CHANNEL UP
  • CHANNEL DOWN

We'll see the values coming through the Serial Monitor, reported as rawData. Let's take note of them into a text file for now, and assign each list its own array name (chan1, chan2 and so on). The following values are just for reference, and are generated by a Samsung's TV remote.

CHANNEL 1 unsigned int chan1[67] = {4450,4500, 550,1700, 500,1700, 550,1700, 550,550, 550,600, 500,600, 550,550, 550,600, 500,1700, 550,1700, 550,1700, 500,600, 500,600, 550,550, 550,600, 500,600, 550,550, 550,600, 500,1700, 550,600, 500,600, 550,550, 550,600, 500,600, 550,1700, 500,1700, 550,600, 500,1700, 550,1700, 550,1700, 500,1700, 550,1700, 500}; CHANNEL 2 unsigned int chan2[67] = {4500,4500, 550,1700, 500,1700, 550,1700, 550,550, 550,550, 550,600, 500,600, 550,600, 500,1700, 550,1700, 500,1700, 550,600, 500,600, 550,550, 550,600, 500,600, 550,1700, 500,600, 550,1700, 500,600, 550,550, 550,600, 500,600, 550,550, 550,650, 450,1700, 550,600, 500,1700, 550,1700, 500,1700, 550,1700, 550,1700, 500}; CHANNEL 3 unsigned int chan3[67] = {4500,4500, 500,1700, 550,1700, 550,1700, 500,600, 550,550, 550,600, 500,600, 550,550, 550,1700, 500,1700, 550,1700, 550,550, 550,600, 500,600, 550,550, 550,600, 500,600, 550,1700, 500,1700, 550,600, 550,550, 550,550, 550,600, 550,550, 550,1700, 500,600, 550,550, 550,1700, 550,1650, 550,1700, 550,1700, 500,1700, 600}; CHANNEL 4 unsigned int chan4[67] = {4450,4450, 550,1700, 550,1700, 500,1700, 550,600, 500,600, 550,550, 600,550, 500,600, 550,1700, 500,1700, 550,1700, 550,550, 550,600, 500,600, 550,550, 550,600, 500,600, 550,550, 550,600, 500,1700, 550,600, 500,600, 550,550, 550,600, 500,1700, 550,1700, 550,1700, 500,600, 550,1700, 500,1700, 550,1700, 550,1700, 500}; CHANNEL 5 unsigned int chan5[67] = {4500,4500, 500,1700, 550,1700, 550,1700, 550,550, 550,550, 550,550, 600,550, 550,550, 550,1700, 550,1650, 550,1700, 550,550, 550,600, 500,600, 550,550, 550,600, 500,1700, 550,600, 500,600, 550,1700, 500,600, 550,550, 550,600, 550,550, 550,550, 550,1700, 550,1700, 500,600, 550,1700, 500,1700, 550,1700, 550,1700, 500}; CHANNEL 6 unsigned int chan6[67] = {4500,4500, 550,1650, 550,1700, 550,1700, 500,600, 550,550, 550,600, 500,600, 500,600, 550,1700, 500,1700, 550,1700, 550,550, 600,550, 500,600, 550,550, 600,550, 550,550, 550,1700, 500,600, 550,1700, 500,600, 550,550, 550,600, 500,600, 550,1700, 500,600, 550,1700, 500,600, 550,1650, 600,1650, 550,1700, 550,1650, 600}; CHANNEL 7 unsigned int chan7[67] = {4500,4500, 550,1700, 500,1700, 550,1750, 500,550, 550,600, 500,650, 500,550, 550,550, 550,1750, 500,1700, 500,1700, 550,650, 450,650, 500,550, 550,600, 500,650, 500,550, 550,600, 500,1700, 550,1750, 500,600, 500,550, 550,600, 500,650, 500,1750, 450,1700, 550,600, 500,650, 500,1700, 500,1700, 550,1750, 500,1700, 500}; CHANNEL 8 unsigned int chan8[67] = {4450,4550, 500,1700, 550,1700, 550,1650, 550,600, 500,600, 550,550, 550,600, 500,600, 550,1700, 500,1700, 550,1700, 550,550, 550,600, 500,600, 550,550, 550,600, 500,1700, 550,600, 500,1700, 550,1700, 500,600, 550,550, 550,650, 450,600, 550,550, 550,1700, 550,550, 550,600, 500,1700, 550,1700, 550,1700, 500,1700, 550}; CHANNEL 9 unsigned int chan9[67] = {4450,4500, 550,1700, 550,1700, 500,1700, 550,600, 500,600, 550,550, 550,600, 500,600, 550,1700, 500,1700, 550,1700, 500,600, 550,550, 550,600, 500,600, 550,550, 550,600, 500,1700, 550,1700, 550,1700, 500,600, 550,550, 550,550, 550,600, 500,1700, 550,600, 500,600, 550,550, 550,1700, 550,1700, 500,1700, 550,1700, 550}; VOLUME UP unsigned int volUp[67] = {4500,4500, 550,1700, 500,1750, 500,1700, 550,600, 500,600, 500,600, 550,550, 550,600, 500,1700, 550,1700, 550,1700, 500,650, 450,600, 550,600, 500,650, 450,650, 500,1700, 500,1750, 500,1750, 500,550, 550,600, 500,650, 500,550, 550,600, 500,650, 500,600, 500,600, 500,1700, 550,1750, 450,1750, 500,1700, 550,1700, 500}; VOLUME DOWN unsigned int volDown[67] = {4450,4550, 500,1700, 550,1700, 550,1650, 550,600, 550,550, 550,600, 500,600, 500,600, 550,1700, 500,1700, 550,1700, 550,550, 550,600, 500,600, 550,550, 550,600, 500,1700, 550,1700, 550,600, 500,1700, 550,600, 500,600, 500,600, 550,550, 550,600, 500,650, 500,1700, 500,650, 500,1700, 500,1750, 500,1700, 550,1700, 500}; CHANNEL UP unsigned int chanUp[67] = {4500,4450, 550,1700, 550,1650, 550,1700, 550,550, 550,600, 550,550, 550,550, 600,550, 550,1650, 550,1700, 550,1650, 600,550, 550,550, 550,600, 500,600, 550,550, 550,550, 550,1700, 550,550, 600,550, 550,1650, 550,600, 550,550, 550,550, 550,1700, 550,550, 550,1700, 550,1700, 550,550, 550,1650, 600,1650, 550,1700, 550}; CHANNEL DOWN unsigned int chanDown[67] = {4500,4450, 600,1650, 550,1700, 550,1650, 550,600, 550,550, 550,550, 550,600, 500,600, 550,1700, 500,1700, 550,1700, 550,550, 550,600, 550,550, 550,550, 550,550, 600,550, 550,550, 550,600, 500,600, 550,1650, 600,550, 550,550, 550,550, 600,1650, 550,1700, 500,1700, 600,1650, 550,550, 600,1650, 550,1700, 500,1700, 550}; 

Part 2: Arduino IoT Cloud

From the main Arduino IoT Cloud page, we'll create a new Thing and assign it a meaningful name. Let's call it TVRemoteController. We'll then select the board we are going to use. For this tutorial we used an Arduino Nano 33 IoT, but if you have another compatible board it will also be fine, just keep in mind that the pinout and the behavior of the IR library might change. If at this point you cannot see your board, you might have skipped the Getting Started procedure we mentioned above, if this is the case, go back through that process.

Once done, we'll add one Property to our Thing, it will represent our TV set. Under the Smart Home category, select "TV" as Property Type, set it as "Read & Write", and under "Update" select "When the value changes".

Here it is what the Properties view of our Thing should look like at this point:

Kendalikan TV Anda dengan Alexa melalui Arduino IoT Cloud – Panduan Langkah demi Langkah

Part 3: Arduino Web Editor

The time has come to click on the "EDIT SKETCH" button, which will take us the Web Editor, where we can add some custom code to the Sketch automatically generated by IoT Cloud.

The first thing we have to include is the IR Remote library, by Ken Shirriff.

#include <IRremote.h> 

We then have to setup one two-dimensional array for our channels, and 6 arrays for the commands we need. If you remember, in Part 1 we captured some IR data which we'll now use to fill our arrays

const unsigned int chan[9][67] = { {chan1}, {chan2}, {chan3}, {chan4}, {chan5}, {chan6}, {chan7}, {chan8}, {chan9} }; const unsigned int volUp[67] = {...}; const unsigned int volDown[67] = {...}; const unsigned int chanUp[67] = {...}; const unsigned int chanDown[67] = {...}; const unsigned int onoff[67] = {...}; const unsigned int mute[67] = {...}; 

Let's then setup the IR library and the required frequency (for this kind of application it will always be 38KHz)

IRsend irsend; const int freq = 38; 

We'll also need a function to send out IR commands and blink the built-in LED (at this stage mostly for debugging purposes). The delay value used will depend on the make and model of your television, so feel free to tweak it if things aren't working as expected (wrong commands or no commands received).

void sendIR(const unsigned int buf[]) { digitalWrite(LED_BUILTIN, HIGH); irsend.sendRaw(buf, 67, freq); delay(300); digitalWrite(LED_BUILTIN, LOW); } 

The final step is to complete the generated callback onTvChange() with some custom code in order to send IR commands when the TV property is changed by Alexa commands. For example, if the volume is increased, we have to virtually press the button Volume Up, if the channel is set to 7, we have to send the sequence for the channel 7 button, and so on.

void onTvChange() { Serial.println("=================="); Serial.println("Switch:"+String(tv.getSwitch())); Serial.println("Volume:"+String(tv.getVolume())); Serial.println("Channel:"+String(tv.getChannel())); Serial.println("Mute:"+String(tv.getMute())); Serial.println("=================="); if (first){ prevSwitch = tv.getSwitch(); prevVolume = tv.getVolume(); prevChannel = tv.getChannel(); prevMute = tv.getMute(); first = false; return; } // Volume changed if (tv.getVolume() > prevVolume) { tv.setMute(false); prevMute = false; for (int k = prevVolume + 1 ; k<=tv.getVolume(); k++) { sendIR(volUp); Serial.println("Volume requested:"+String(tv.getVolume())+" Set:"+String(k)); } prevVolume = tv.getVolume(); } else if (tv.getVolume() < prevVolume) { tv.setMute(false); prevMute = false; for (int k = prevVolume - 1; k>=tv.getVolume(); k--) { sendIR(volDown); Serial.println("Volume changed:"+String(tv.getVolume())+" Set:"+String(k)); } prevVolume = tv.getVolume(); } // Mute changed if (tv.getMute() != prevMute && tv.getMute()) { prevMute = tv.getMute(); sendIR(mute); Serial.println("Mute changed:"+String(tv.getMute())); } else if (tv.getMute() != prevMute && !tv.getMute()) { prevMute = tv.getMute(); sendIR(mute); Serial.println("Mute changed:"+String(tv.getMute())); } // Channel changed if (tv.getChannel() != prevChannel) { int newChannel = tv.getChannel(); if (newChannel > 0 && newChannel < 10) { sendIR(chan[newChannel-1]); } else if (newChannel > 9) { if (newChannel > prevChannel) { for (int ch = prevChannel; ch < newChannel; ch++) { sendIR(chanUp); Serial.println("Chan requested:"+String(newChannel)+" Set:"+String(ch)); } } else if (newChannel < prevChannel) { for (int ch = prevChannel; ch > newChannel; ch--) { sendIR(chanDown); Serial.println("Chan requested:"+String(newChannel)+" Set:"+String(ch)); } } } prevChannel = newChannel; Serial.println("Channel changed:"+String(tv.getChannel())); } // On/Off changed if (tv.getSwitch() != prevSwitch) { prevSwitch = tv.getSwitch(); if (tv.getSwitch()) { sendIR(chan[6]); } else { sendIR(onoff); } Serial.println("Switch changed:"+String(tv.getSwitch())); } 

Part 4: Amazon Alexa

We will now need the Amazon Alexa app which can be downloaded from the Apple App Store or the Google Play Store. Once installed, login with your existing account or create a new one.

Let's go through the steps necessary to install the Arduino Alexa Skill and configure it to access and control our TV. We'll follow the sequence of images below to see all the required steps.

Kendalikan TV Anda dengan Alexa melalui Arduino IoT Cloud – Panduan Langkah demi Langkah

We're done, it's now time to voice control our TV asking things like

  • ”Alexa, turn the volume up on TV.”
  • ”Alexa, mute TV" or “Alexa, unmute TV.”
  • ”Alexa, next channel on TV.”

Have fun playing with Alexa and IoT Cloud. If you have questions and/or build this project let us know in the comments below.


Thank you,

The Arduino Team

Kode

Arduino

Skematik

Kendalikan TV Anda dengan Alexa melalui Arduino IoT Cloud – Panduan Langkah demi Langkah

Proses manufaktur

  1. Kontrol Kipas Angin Langit-langit Anda dengan Alexa: Panduan Langkah demi Langkah
  2. Buat Alat Levitasi Ultrasonik dengan Arduino – Panduan Langkah demi Langkah
  3. Membuat Remote Android Universal dengan Arduino, 1Sheeld & Kontrol IR
  4. Buat Voltmeter Cerdas dengan Arduino & Smartphone – Proyek DIY Mudah
  5. Pemantau Detak Jantung IoT Real-Time dengan Arduino & MAX30100
  6. Kontrol Robotik Arm Custom Secara Jarak Jauh melalui IoT
  7. Buat Kotak Pintar IoT dengan ESP8266, Arduino & Sensor Ultrasonik – Pemantauan Real-Time
  8. Pantau Suhu Rumah Anda dari Mana Saja dengan Integrasi Arduino Cloud
  9. Kendalikan Rover Arduino dengan Mulus menggunakan Firmata dan Gamepad Xbox One
  10. Pengontrol Kelembapan Arduino DIY dengan Relay – Pengaturan Tegangan Tinggi yang Aman