Tentang proyek ini
PERNYATAAN MASALAH
Di Asia, akibat cuaca panas dan merebaknya sindrom pernafasan akut parah (SARS) pada tahun 2003, siswa sekolah dasar dan menengah perlu melakukan pengukuran suhu setiap triwulan untuk memastikan kesehatan para siswa. Setiap kali ada latihan pengukuran suhu yang dijadwalkan oleh sekolah, siswa wajib membawa termometer digital sendiri untuk latihan ini. Namun, beberapa siswa mungkin tidak dapat berpartisipasi selama latihan karena alasan seperti termometer yang salah tempat atau rusak dan lupa untuk membawa perangkat. Karena kebersihan pribadi, siswa tidak diperbolehkan berbagi termometer dan mereka mungkin tidak memiliki cukup uang untuk membeli termometer baru. Oleh karena itu, mempengaruhi tingkat keberhasilan latihan pengukuran suhu. Setelah latihan pengukuran suhu, staf harus secara manual memasukkan semua data suhu siswa dan siswa tertentu ke database. Tugas ini sangat membosankan dan memakan waktu karena setiap guru formulir harus melakukan entri untuk sekitar 40 siswa.
Apa Solusinya?
Tema untuk proyek kami adalah Dampak Sosial oleh SqwidNet, dan di bidang Kesehatan dan kesejahteraan yang baik dalam Tujuan Pembangunan Berkelanjutan (SDG). Alasannya adalah karena sistem kami dapat digunakan untuk mengukur suhu pengguna yang valid secara otomatis sehingga suhu mereka dapat dipantau dan peringatan akan dikirim setiap kali melebihi tingkat ambang batas tertentu.
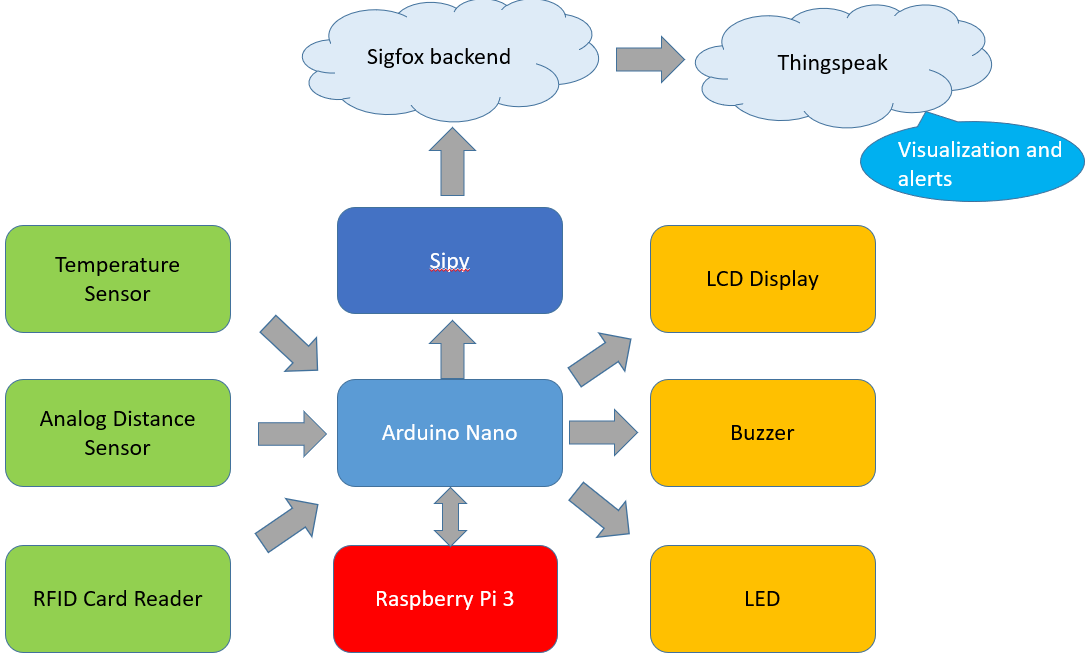
CARA KERJANYA:RaspberryPi &Arduino
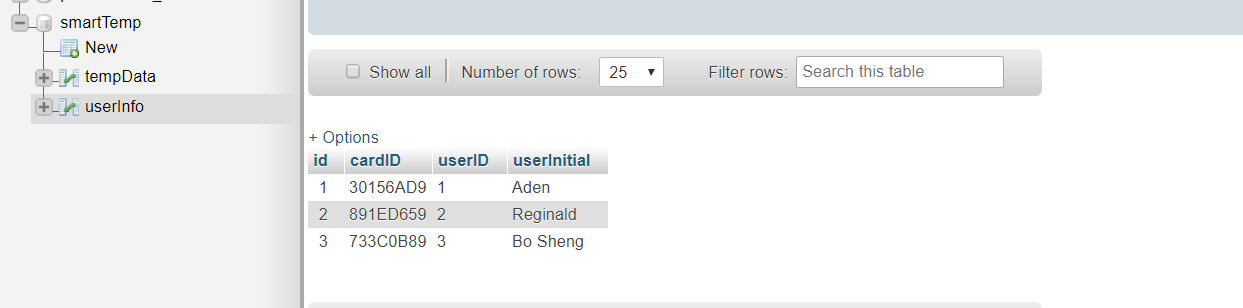
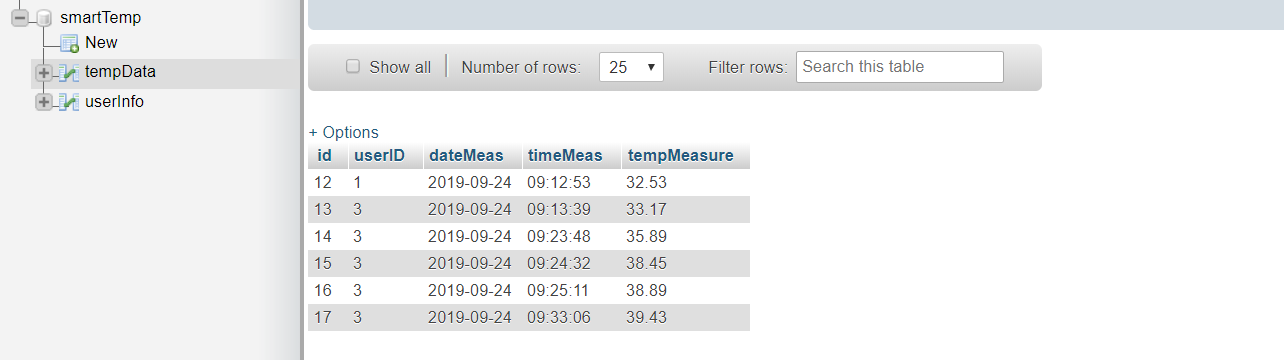
RaspberryPi menyimpan Program Python &database MySQL.
Setelah meluncurkan Program Python, secara otomatis memeriksa apakah database sudah dibuat, jika belum, akan dibuat secara otomatis. Tabel di dalamnya juga akan diperiksa &dibuat secara otomatis jika diperlukan. Hal ini mengurangi pekerjaan manual guru/staf administrasi di sekolah.
Kemudian, itu membuat koneksi kueri untuk memeriksa database dan menunggu Arduino untuk mengirim informasi yang relevan melalui port Komunikasi Serial.
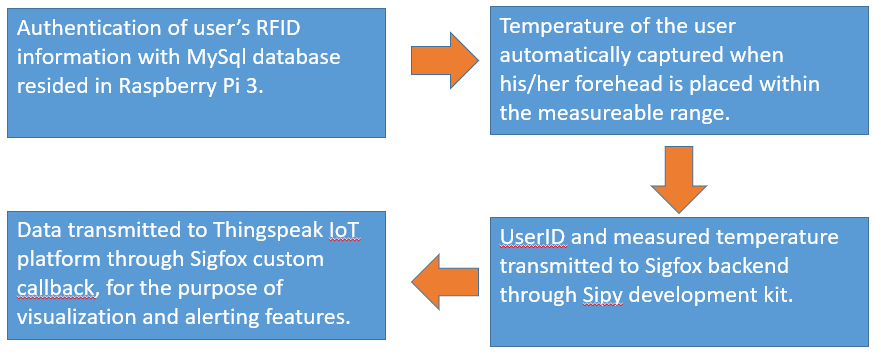
Setelah memiliki ketukan kartu RFID di Arduino, informasi kartu disimpan di Arduino, dikirim ke RaspberryPi melalui Komunikasi Serial. Setelah itu, RaspberryPi mengkonfirmasi dengan database bahwa kartu tersebut adalah pengguna yang valid, dan jika ya, ia mengirim ke Arduino untuk mengonfirmasinya dan Arduino mengeluarkan "Selamat datang, nama" di layar LCD. Jika itu bukan pengguna yang valid, itu hanya akan mengatakan "Error! Pengguna Tidak Valid!".
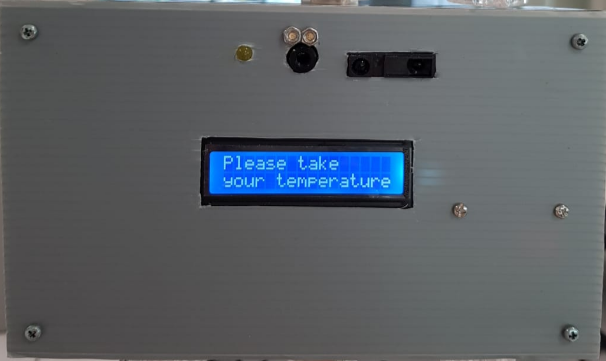
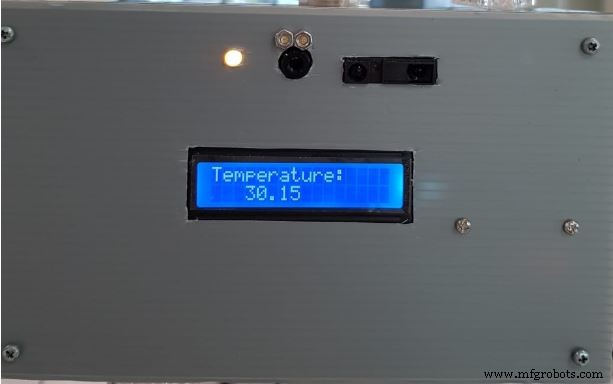
Katakanlah, sekarang, kami memiliki pengguna yang valid yang baru saja mengetuk. Selanjutnya, Arduino akan meminta pengguna untuk mengukur suhu mereka. Sebuah sensor jarak kemudian akan merasakan jika pengguna siap untuk mengukur suhu mereka. Jika ya, itu akan mengambil suhu mereka dan menampilkan suhu mereka di layar LCD. Jika suhunya valid (28*C - 42*C), informasi ini akan dikirim ke RaspberryPi (MySQL) dan Sigfox (ThingSpeak) untuk penyimpanan data. Basis data MySQL akan menyimpan ID pengguna, tanggal, stempel waktu, dan suhu setiap pengambilan.
Saat menerima data suhu dari Arduino, RaspberryPi akan terus memeriksa apakah suhu dikirimkan dengan benar sebelum melanjutkan dengan hal lain. Ini karena, jika Program Python hanya memeriksa sekali untuk data suhu, itu mungkin belum dikirim oleh Arduino, karena kedua kode dieksekusi pada waktu yang berbeda. Jadi untuk menyinkronkan, kami terus-menerus memeriksa data suhu pada kode Python sebelum melanjutkan dengan sisa program.
CATATAN: Baik kode Python RaspberryPi &kode Arduino menggunakan metode sinkronisasi yang disebut Handshaking. Jika RaspberryPi tidak siap untuk menerima informasi suhu/pengguna lain, Arduino tidak akan mengizinkan pengguna untuk mengetuk kartu, sebaliknya .
Cara sederhana yang saya lakukan adalah dengan terus-menerus mengirim sinyal "SIAP" sampai pihak lain mengirimkan kembali sinyal "TERIMA" sehingga mereka tahu bahwa mereka berdua sudah siap.
Arduino -
boolean readySignal =Serial.readString() =="READY";


if(readySignal)
{

disadap =true;

Serial.println("DITERIMA");

}
Python -
sementara(readySignal ==True):

ser.write(b'' + "READY")


 diterimaSignal =ser.readline().strip() =="DITERIMA"


if(receivedSignal ==Benar):

readySignal =Salah
Ingatlah untuk menutup koneksi kueri Anda setiap kali Anda selesai dengan kueri! Ini untuk menghilangkan kemungkinan kebocoran memori dan ini adalah praktik yang baik secara keseluruhan.
CARA KERJANYA:Sigfox (SiPy)
Setelah menerima data suhu dari Arduino, SiPy akan memisahkan userID, dan suhu menjadi bilangan bulat dan desimal. Setelah melakukan ini, semua data dikirim ke backend Sigfox melalui byte (sehingga dapat dikirim ke Ubidots dan juga ThingSpeak) dan akan terlihat seperti gambar berikut.

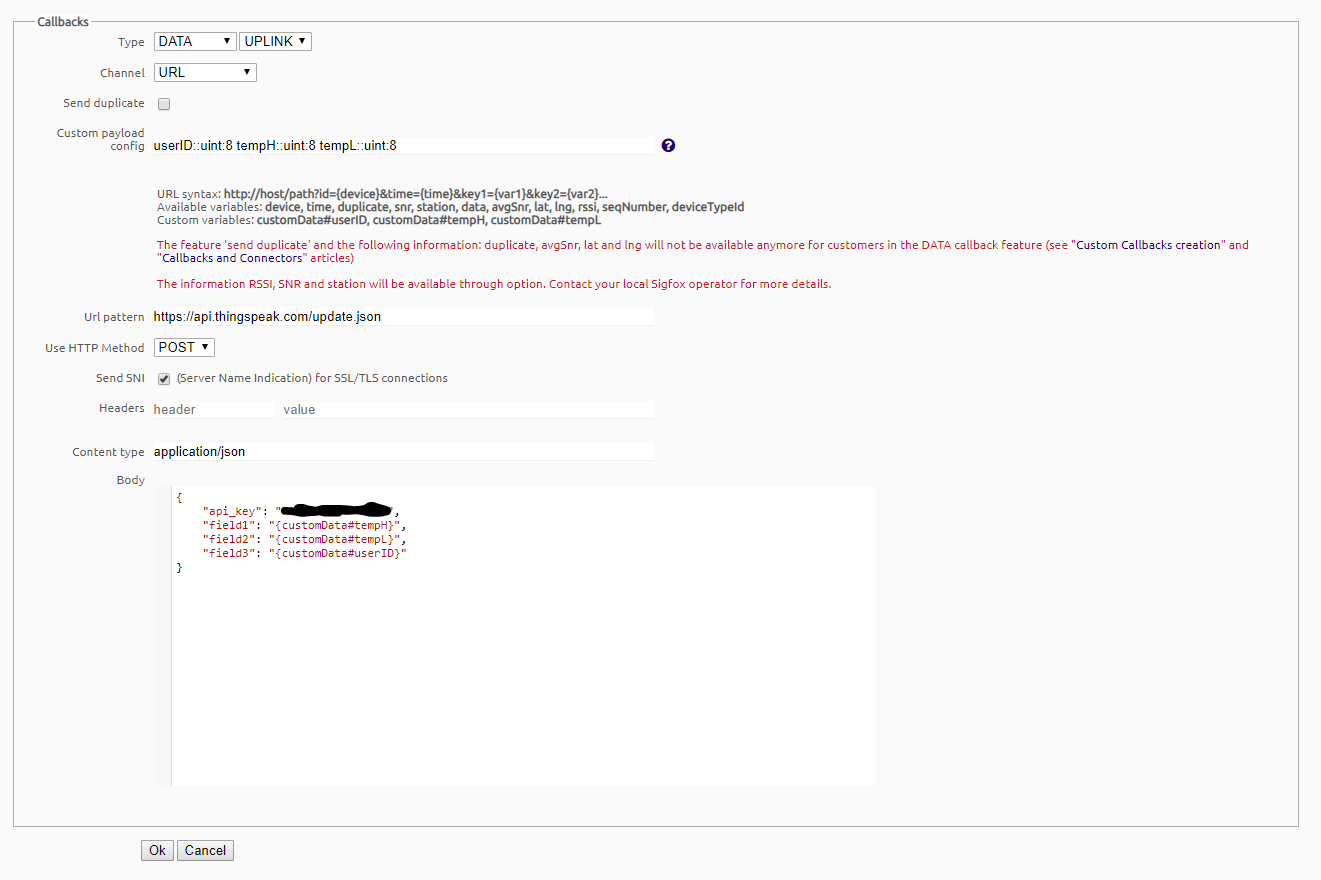
Setelah menerima ini, backend Sigfox akan mengkode ulang data ini untuk dikirim ke ThingSpeak untuk disimpan. Berikut ini akan menunjukkan cara membuat kode backend untuk mengirim data ke thingspeak.
Di Sigfox Backend di bawah device type> Device Name> CALLBACKS, Anda harus memasukkan payload khusus persis seperti itu adalah kecuali Anda telah mengubah pengkodean di SiPy karena beban pembayaran khusus akan mengatur apa yang diterima terlebih dahulu sebagai ID pengguna, jadi misalnya jika Anda mengirim suhu terlebih dahulu, di backend itu akan mengubah suhu itu ke ID pengguna alih-alih suhu. Di dalam isi, kunci api tulis harus berada di atas, sedangkan bidang dapat ditempatkan dengan data khusus apa pun yang telah Anda buat di muatan khusus.
BAGAIMANA CARA KERJANYA:Awan
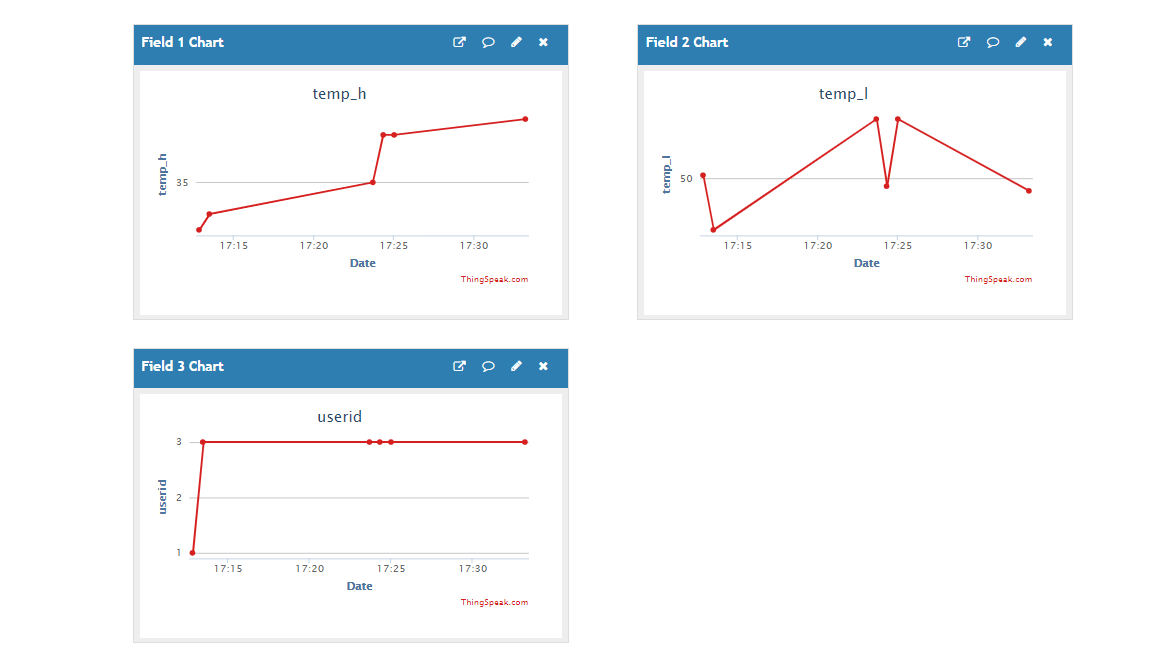
Setelah data berhasil dikirim ke ThingSpeak, pertama kali menerimanya di saluran tontonan pribadi di mana skrip Analisis MATLAB menganalisis data dan menggabungkan data suhu menjadi satu nilai alih-alih pemisahan nilai bilangan bulat &nilai desimal.
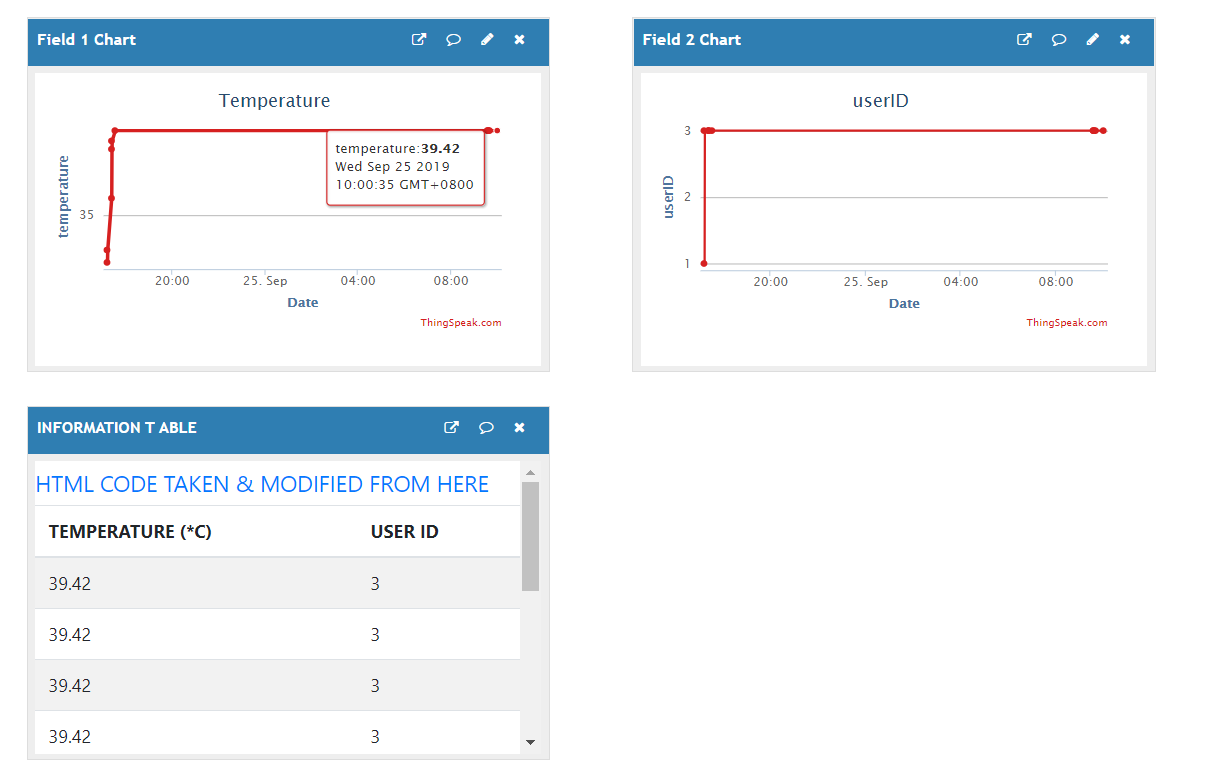
Kode tabel diambil dari proyek open source dan dimodifikasi agar sesuai dengan kebutuhan kita. Ini sangat berguna karena tabel diperbarui secara otomatis setiap kali data baru dikirim, cocok untuk penggunaan kami.
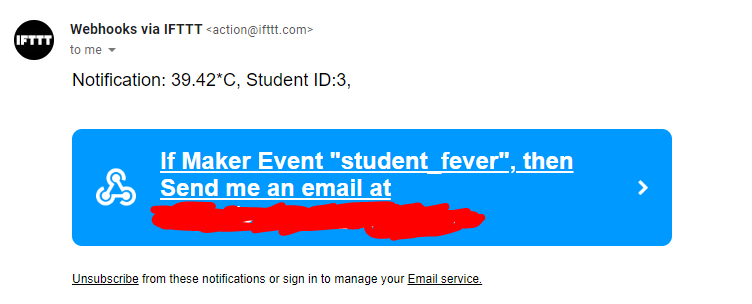
Pada saat yang sama, ia memeriksa apakah suhu berada pada tingkat yang berbahaya (demam), jika demikian, email akan dikirim untuk memberi tahu staf/guru.
Singkatnya, saluran pertama yang memiliki nilai suhu yang dipisahkan dalam bilangan bulat &angka desimal adalah saluran backend, tidak benar-benar untuk dilihat. Untuk saluran kedua, nilai suhu telah digabungkan dan dibuat bagus untuk dilihat oleh staf/manajemen/administrator dan memiliki tabel seperti Excel untuk analisis data yang mudah.
1. Pengaturan Koneksi Arduino Nano
Untuk Arduino Nano, berikut adalah koneksi yang kami buat dengan modul kami.
Nano dan Uno memiliki Pinout yang sama.
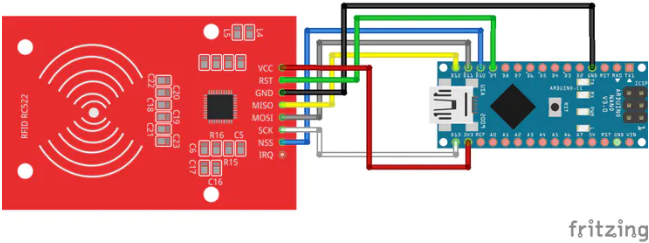
RFID - RC522

SDA D10
SCK D13
MOSI D11
MISO D12
IRQ TIDAK TERHUBUNG
GND GND
RST D9
3.3V 3.3V
Cara menguji RFID
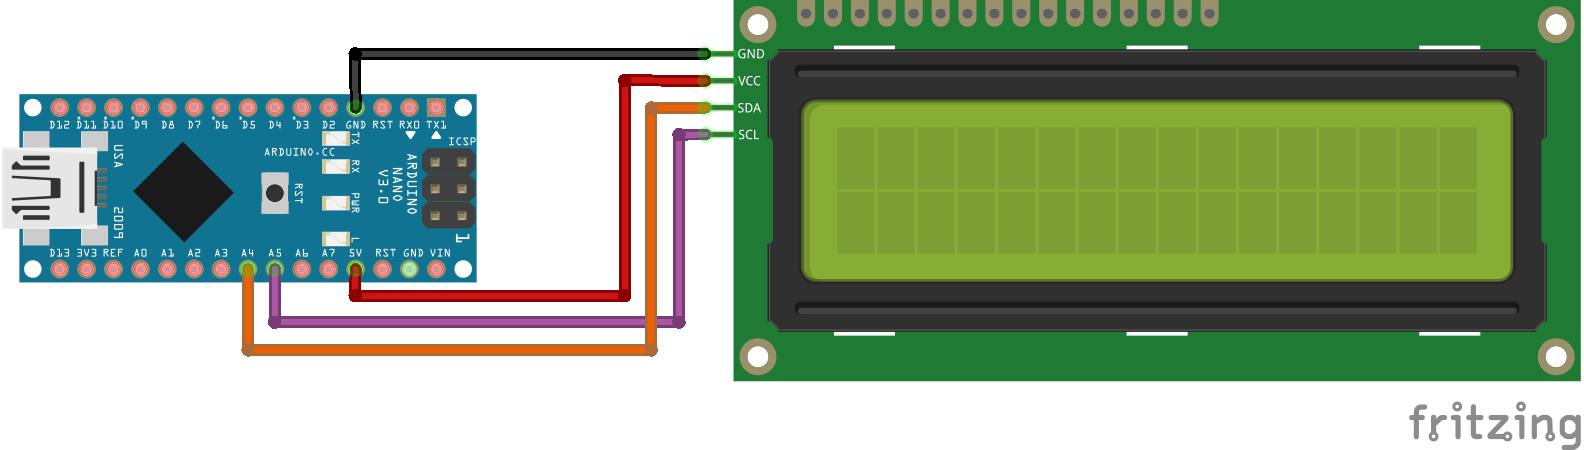
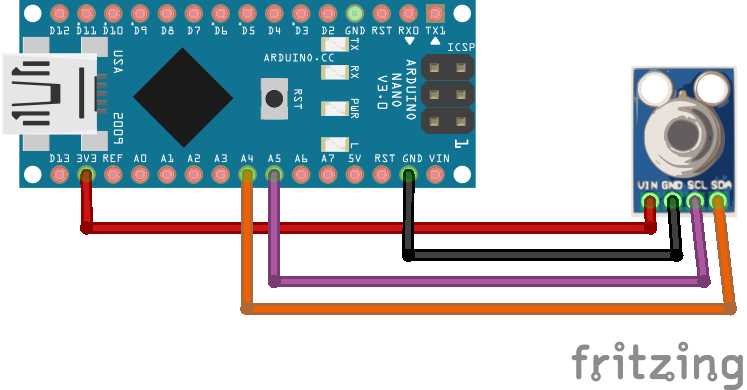
LCD

SDA A4
SCL A5
GND GND
5V 5V
Cara mengetes LCD I2C
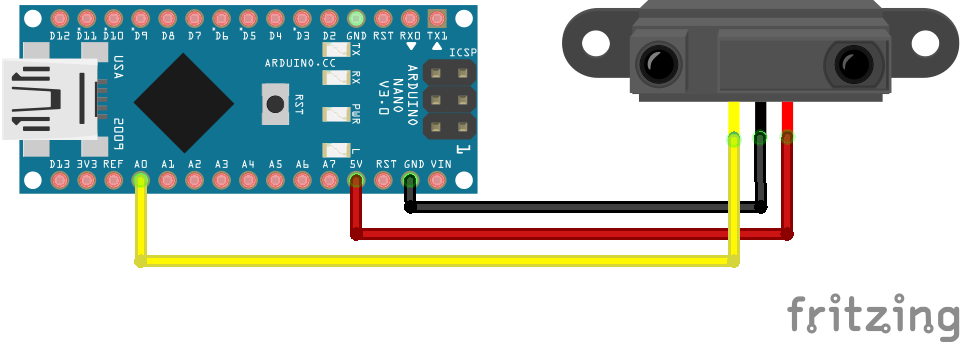
Sensor Jarak

5V 5V
GND GND
Input A0
Cara menguji Sensor Jarak IR Tajam
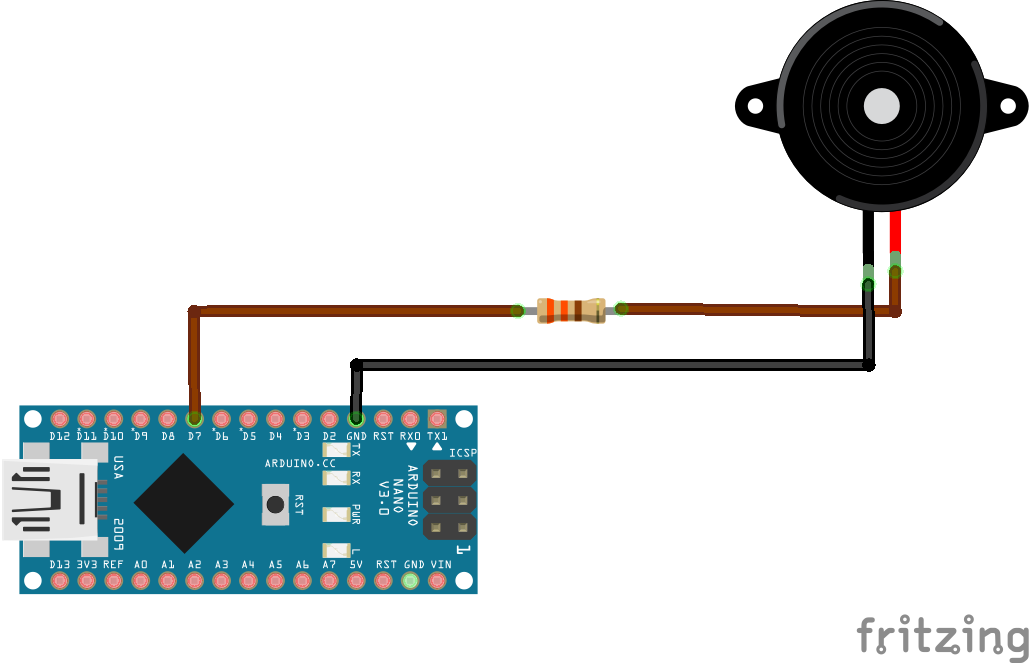
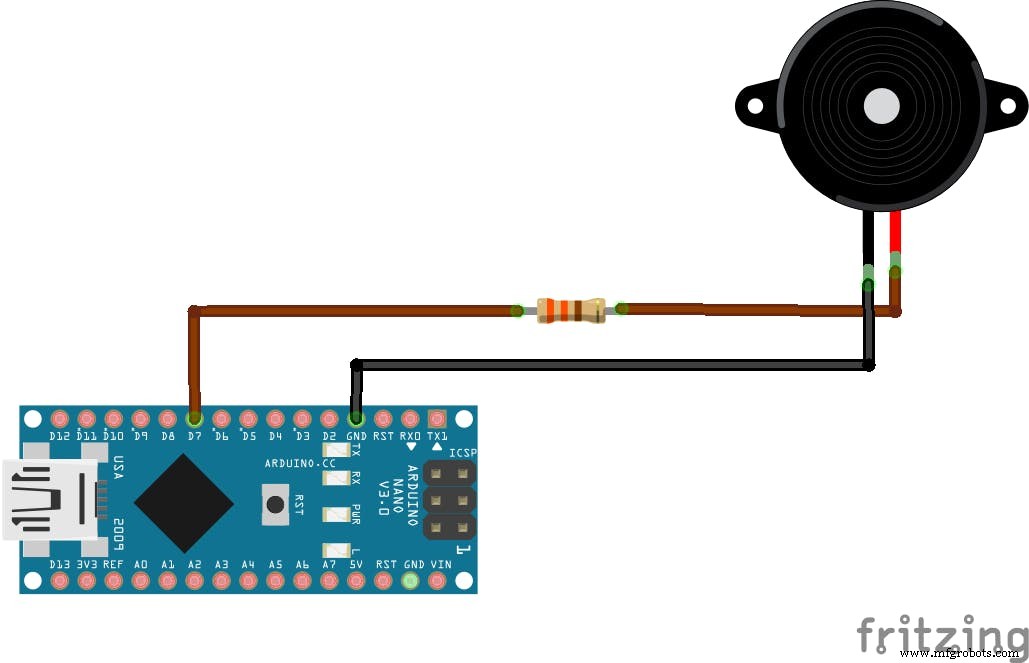
Buzzer

GND GND
Keluaran D6
Cara menguji Buzzer
Sensor Suhu IR

SDA A4
SCL A5
GND GND
5V 5V
Cara menguji Sensor Suhu IR,
LED

Sisi Datar (katoda) GND
Sisi Non-datar (Anoda) D7
Bagus! Untuk koneksi Arduino, Anda harus melakukannya sekarang.
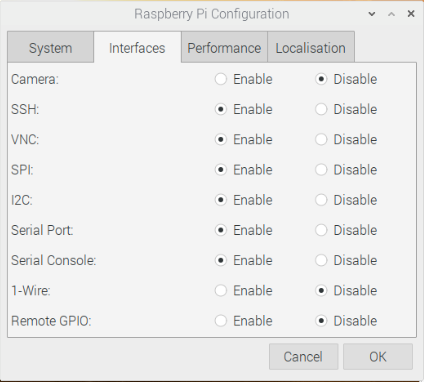
2. Pengaturan RaspberryPi
Terutama ada dua hal yang perlu diinstal ke mesin Raspberry Pi 3 Anda,
1. Pengoperasian Raspbian Sistem -
Instalasi Sistem Operasi Raspbian dianggap cukup mudah.
Jawaban singkat tentang cara melakukannya adalah dengan mem-flash (menulis) file gambar ke kartu SD dan memasukkan kartu SD ini ke dalam Raspberry Pi 3.
Namun, jika Anda mencari tutorial jawaban panjang selangkah demi selangkah, berikut cara melakukannya -
Pertama, Anda harus mengunduh perangkat lunak yang memungkinkan Anda mem-flash.img file ke drive penyimpanan. Anda dapat menggunakan perangkat lunak yang disebut balenaEtcher.
Setelah itu, buka halaman Raspberry Pi - Raspbian dan pilih yang sesuai dengan kebutuhan Anda. Saya memilih "Raspbian Buster dengan Desktop dan perangkat lunak yang direkomendasikan" karena seperti namanya, ia hadir dengan perangkat lunak yang direkomendasikan dan menghemat kerumitan ekstra untuk mengunduh perangkat lunak.
Setelah selesai dengan langkah-langkah di atas, cukup luncurkan perangkat lunak balenaEtcher. Langkah ini cukup jelas:Pilih gambar (file Raspbian.img Anda), lalu pilih kartu SD Anda, dan tekan flash. Sekarang, Anda hanya perlu menunggu. Setelah selesai, Anda akan diminta dan sekarang Anda dapat memasukkan kartu SD yang baru di-flash ke Raspberry Pi Anda.

Setelah ini, sambungkan mesin Raspberry Pi Anda melalui HDMI ke monitor dan lakukan pengaturan awal Anda. Terakhir, buka Preferensi -> Konfigurasi Raspberry Pi dan Anda harus berada di menu ini -
Ikuti opsinya, langkah ini mengaktifkan antarmuka seperti SSH, VNC yang memungkinkan Anda terhubung ke alamat ip melalui eth0 atau wlan0 (Jadi Anda tidak perlu kabel HDMI lagi, Anda bisa melakukan semuanya melalui SSH).
(langkah opsional) - Saya membuka terminal dan mengedit file dhcpcd.conf (sudo nano /etc/dhcpcd.conf) dan saya menambahkan baris perintah ini,
antarmuka eth0
ip_address statis=192.168.0.11/24
Di atas memungkinkan saya untuk terhubung ke Raspberry Pi melalui Kabel Ethernet dengan alamat statis, 192.168.0.11, jadi saya tahu setiap saat itu, itu adalah alamat Raspberry Pi saya.
Ini adalah langkah pilihan karena, setelah Anda terhubung ke WiFi, Anda akan mendapatkan alamat ip wlan0 yang memungkinkan Anda untuk terhubung ke Raspberry Pi tanpa Kabel Ethernet dan di mana saja di lokasi selama Anda terhubung ke yang sama Wifi. Untuk melihat apa ALAMAT IP wlan0 Anda, cukup arahkan mouse ke simbol WiFI yang terletak di kanan atas dan itu akan menunjukkan.
Bagus! Anda selesai dengan pengaturan awal Raspberry Pi Anda!
3. Pengaturan Basis Data MySQL
Saya akan menganggap langkah ini sedikit sulit, terutama bagian di mana Anda harus mengatur pengguna root MySQL, ikuti dengan hati-hati karena sangat sulit untuk memperbaiki kesalahan.
Pertama, Anda harus memastikan sistem Anda ditingkatkan dan diperbarui ke firmware terbaru. Anda dapat memastikan dengan memasukkan perintah ini,
sudo apt update
sudo apt upgrade
Setelah ini selesai, Anda akan menginstal apache2.
sudo apt install apache2
Apache2 akan memungkinkan Anda membuat server web sehingga Anda dapat mengakses situs web yang Anda buat nanti.
Setelah apache2 diinstal, Anda perlu menginstal PHP.
sudo apt install php php-mbstring
PHP akan memungkinkan Anda membuat dan melihat situs web PHP Anda sendiri.
Mari kita berhenti dan melihat apakah semua yang baru saja Anda instal berfungsi, cukup ketikkan IP Raspberry Pi Anda di browser web atau "localhost" jika Anda masih terhubung melalui HDMI, dan Anda akan melihat halaman indeks Apache.

Sekarang, Anda perlu menginstal database. Untuk ini, Anda akan menggunakan MySQL dan mariadb.
sudo apt install mariadb-server php-mysql
PENTING - Pastikan Anda membaca apa yang ada di bawah ini dengan cermat.
Sekarang, Anda akan membuat pengguna root MySQL sehingga Anda dapat menggunakannya untuk mengakses database.
sudo mysql --user=root
Anda sekarang akan memasuki sesi MySQL di mana Anda dapat mengetik kode MySQL, ketik baris demi baris, (Anda dapat mengganti kata sandi dengan kata sandi Anda sendiri)
DROP USER 'root'@'localhost';
BUAT USER 'root'@'localhost' DIIDENTIFIKASI DENGAN 'password';
BERIKAN SEMUA HAK ISTIMEWA DI *.* UNTUK 'root' @'localhost' DENGAN PILIHAN HIBAH;
HAK ISTIMEWA FLUSH;
keluar;
Anda sekarang dapat menguji pengguna root MySQL Anda dengan masuk;
mysql --user=root --password=yourmysqlpassword
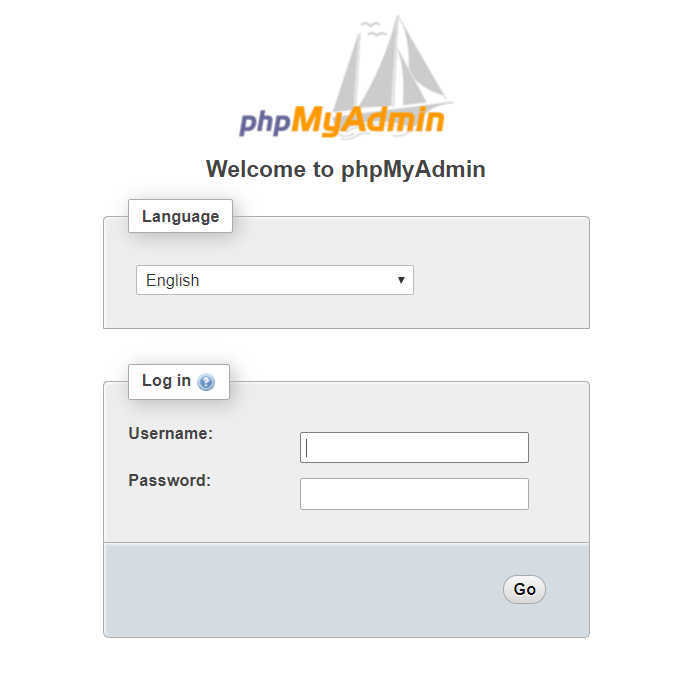
Jika semuanya berhasil, sekarang Anda dapat menginstal PHPMyAdmin, Panel Kontrol Administrator untuk Anda mengakses (melihat) dan memodifikasi database MySQL.
sudo apt install phpmyadmin

(setelah instalasi)
sudo phpenmod mysqli
sudo /etc/init.d/apache2 restart
Selamat! Sekarang Anda dapat mengakses database yang baru dibuat menggunakan http://your_raspberrypi_ip_address/phpmyadmin.
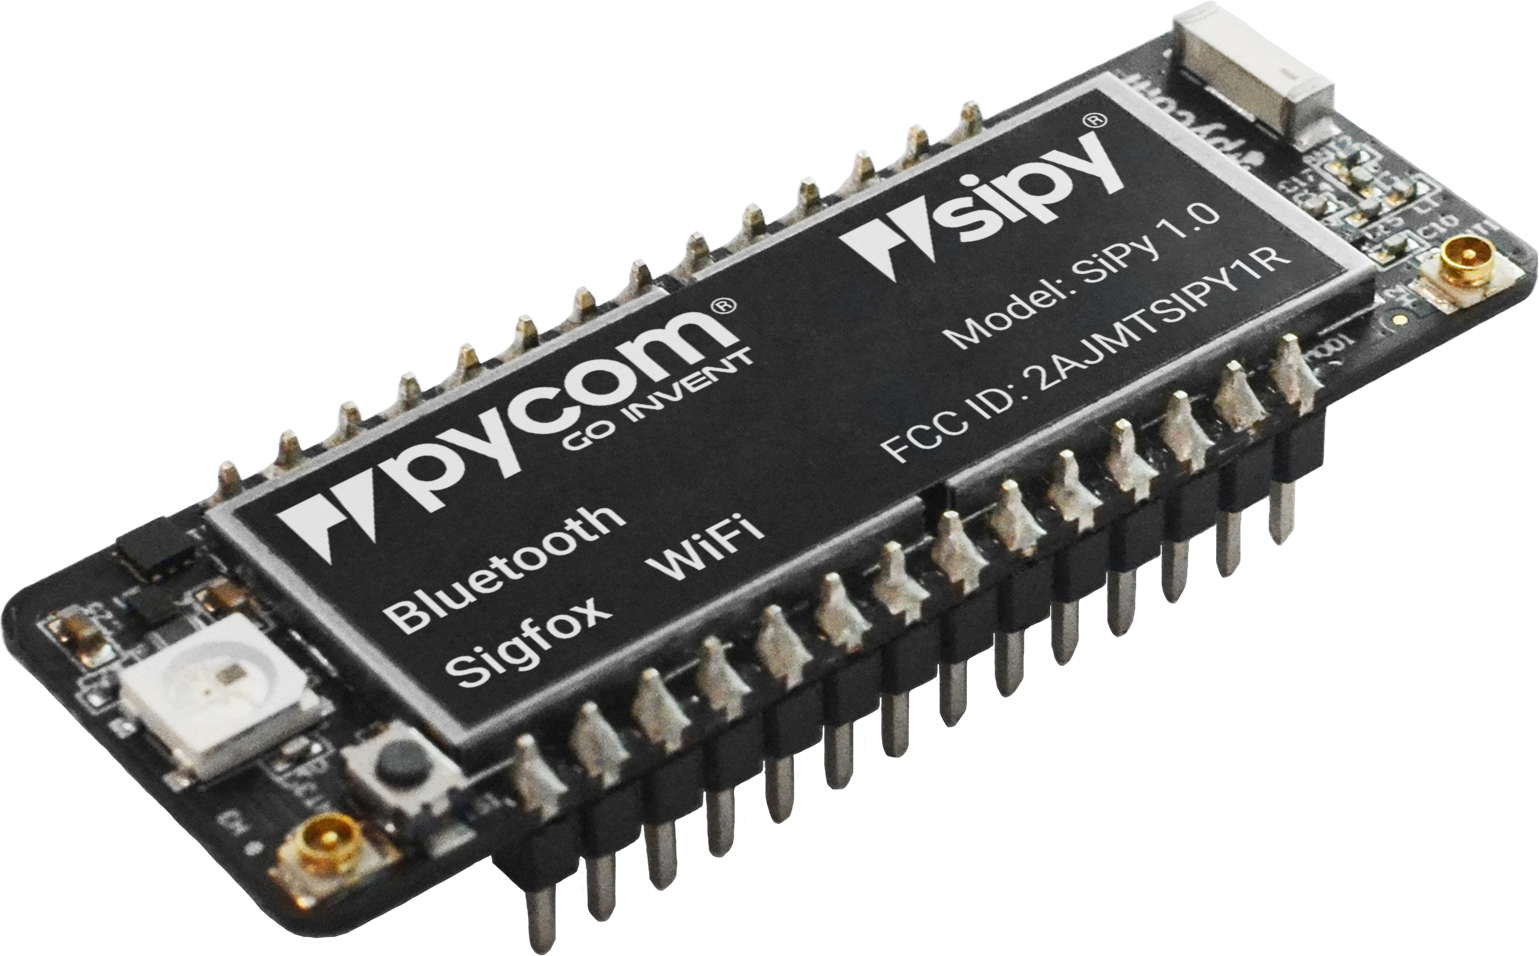
4. Panduan Penyiapan dan Perangkat Lunak SiPy Expansion Board 2.0
Pertama, Anda harus memasukkan Modul SiPy ke Papan Ekspansi dengan tombol reset menghadap Konektor USB dan harus mengklik dengan kuat pada tempatnya dengan pin tidak lagi terlihat.
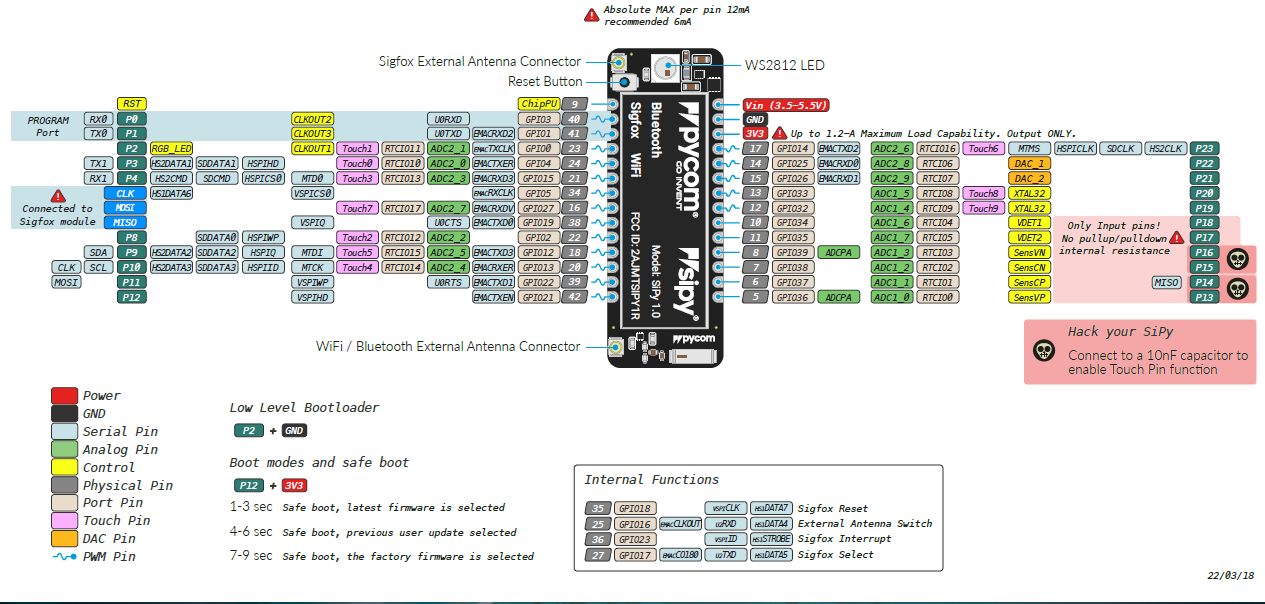
Sumber:Dokumentasi Pycom
Setelah melakukan itu, Anda perlu memperbarui firmware pada SiPy, sehingga Anda dapat mengunggah dan menjalankan program serta mendapatkan ID Perangkat Sigfox dan nomor PAC yang akan digunakan untuk mendaftar ke backend Sigfox. Download firmware updater sesuai dengan OS (sistem operasi) yang Anda gunakan.
- Windows
- macOS (10.11 atau Lebih Tinggi)
- Linux (memerlukan
dialog dan python-serial paket)
Setelah mengunduh pemutakhiran firmware pycom, saat Anda memulai pembaru untuk pertama kalinya, gambar berikut hanya akan muncul sekali jadi pastikan Anda memilih Wilayah, Papan Sigfox yang benar.

Ikuti petunjuk pada pembaruan firmware dengan hati-hati karena dapat menyebabkan Sigfox Anda tidak berfungsi dengan baik seperti ID Perangkat Sigfox dan nomor PAC menjadi "F" (seperti di bawah), bukan campuran antara angka dan huruf.
b 'FFFFFFFF'
b 'FFFFFFFFFFFFFF'
Setelah firmware diperbarui, Anda perlu mengunduh Visual Studio Code dan menginstal ekstensi Pymkr serta nodejs sebelum Anda dapat mulai mengunggah dan menjalankan program di SiPy.
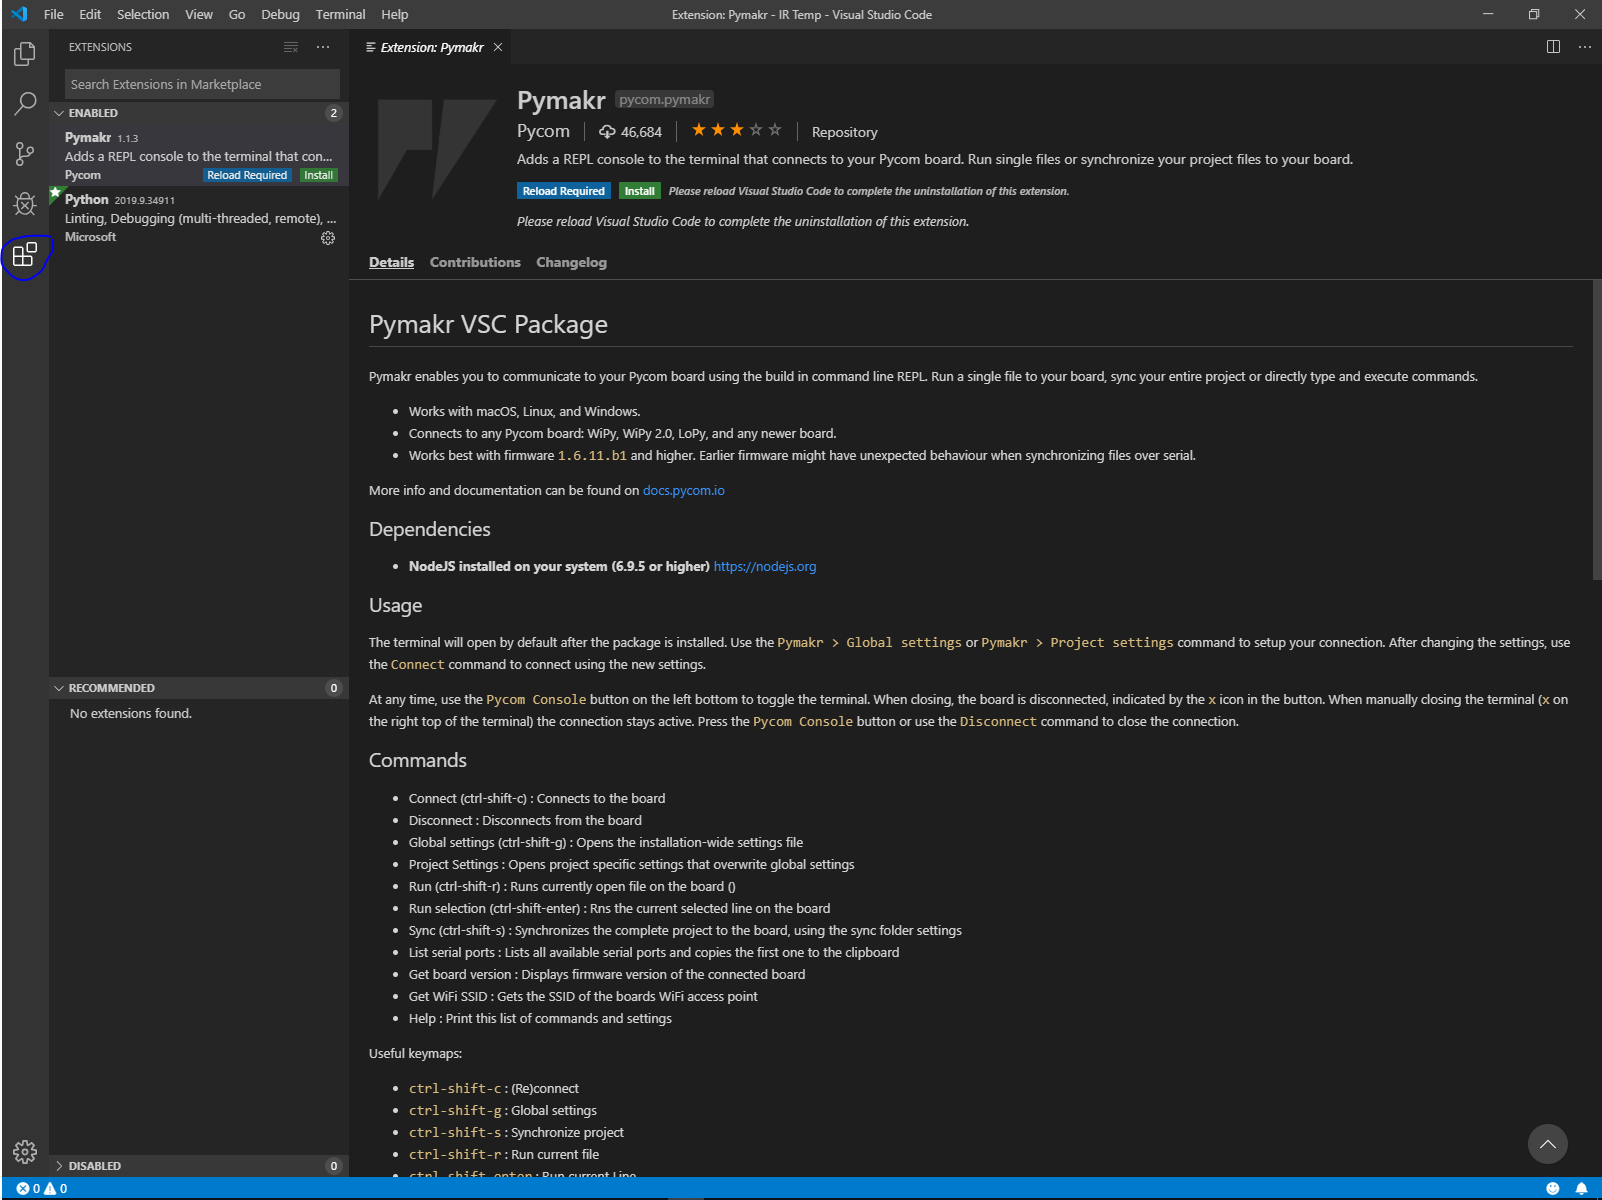
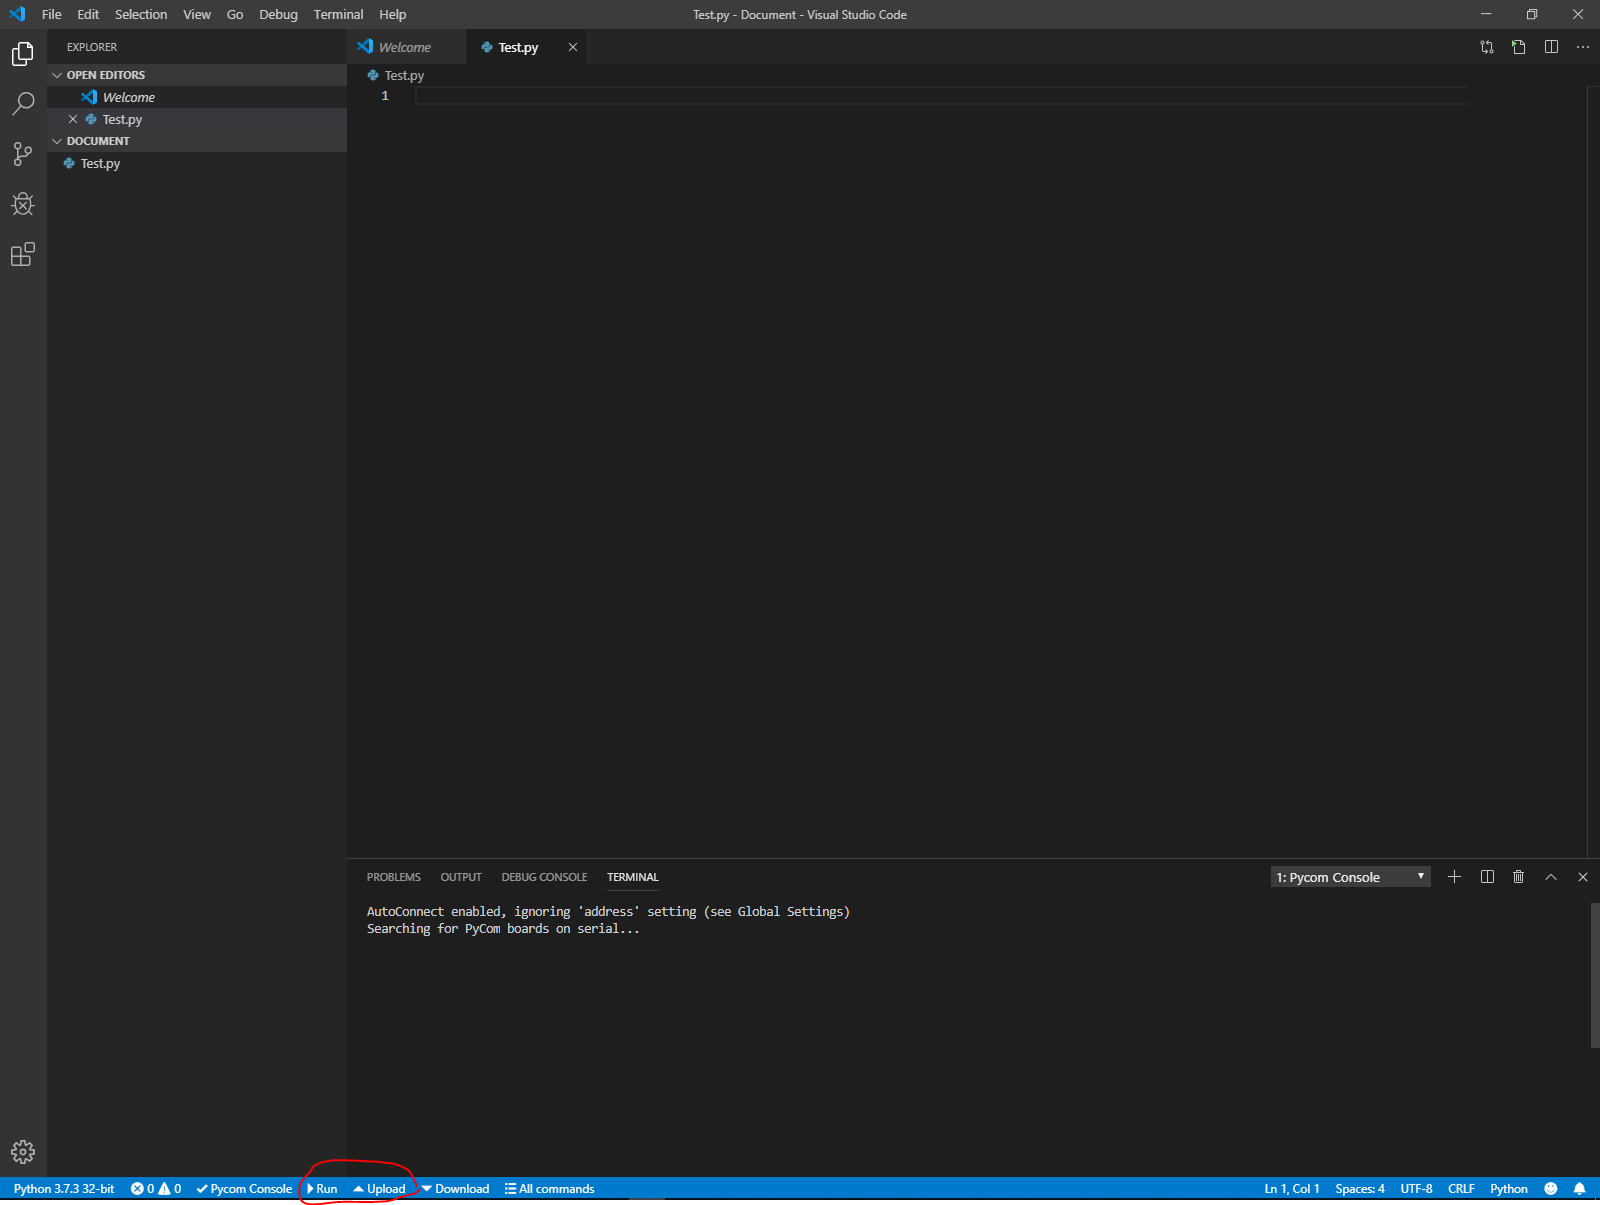
Pertama, Anda perlu membuat folder baru untuk menyimpan semua file yang akan Anda unggah ke SiPy nanti atau hanya untuk menyimpan semua program yang akan Anda jalankan. Tekan file di pojok kiri atas dan tekan Buka Folder atau Ctrl+K+O, lalu pilih di mana Anda ingin meletakkan folder ini dan klik kanan untuk membuat folder baru. Setelah itu, buat file baru atau Ctrl+N untuk membuka file baru. Setelah membuat file baru, Anda perlu menyimpan file baru sebagai python dan mengubah save as type menjadi file python sehingga kode dapat dijalankan di SiPy nanti dan menyimpannya ke folder baru yang Anda buat.
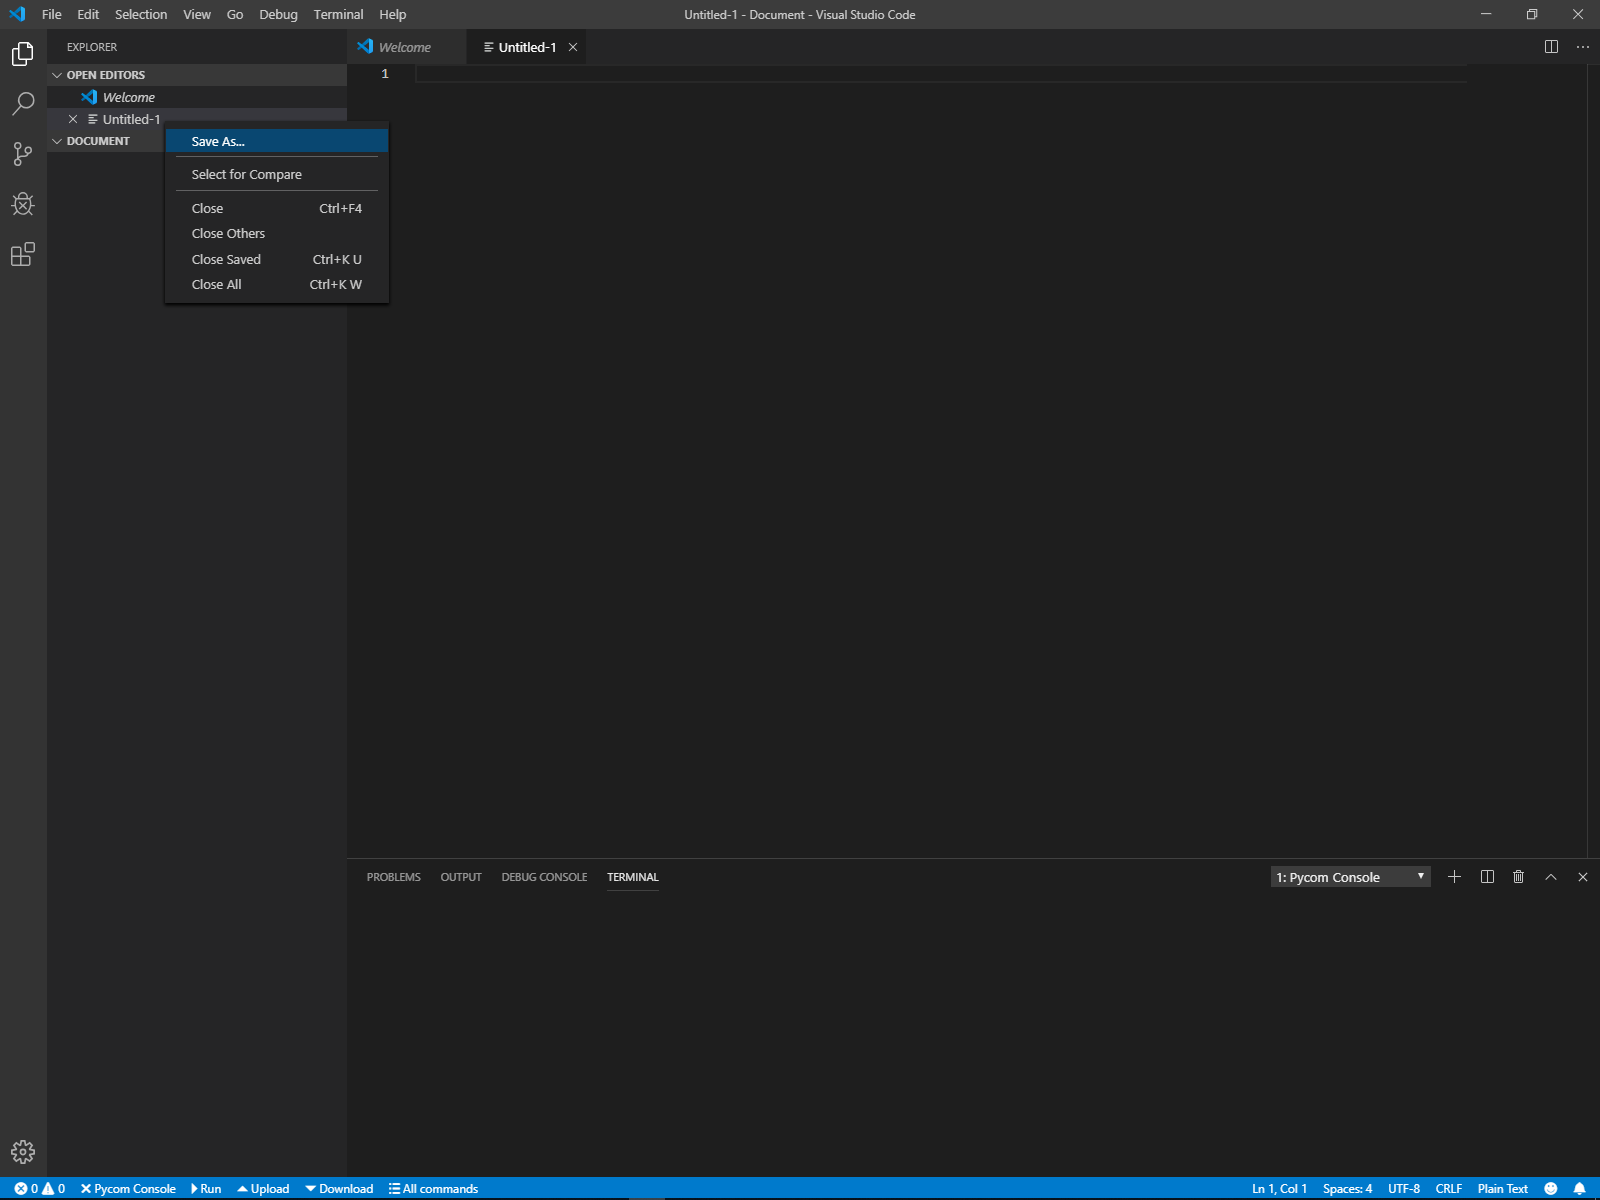
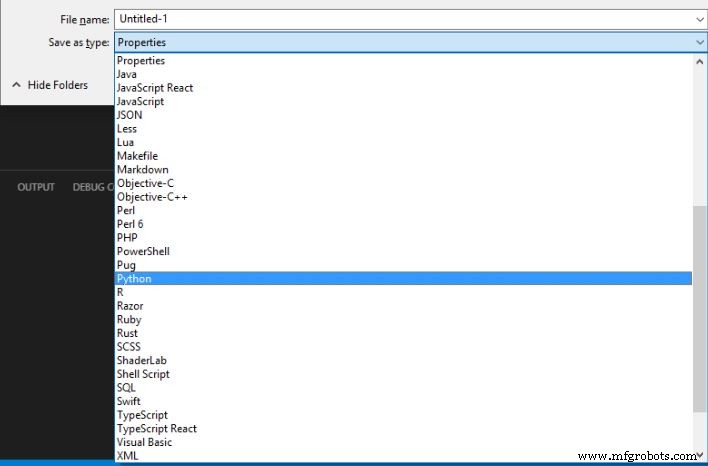
Catatan: Nama File bisa apa saja seperti Test, Trial, Dll. Tapi kalau upload ke SiPy nama filenya harus dipanggil main .
Untuk menjalankan kode Anda tanpa mengunggahnya ke Modul Sipy yang harus Anda lakukan adalah menekan tombol run yang terletak di bagian bawah program. Unggahan di sebelahnya mengunggah folder saat ini ke Modul SiPy. Hati-hati saat menggunakan while 1 loop karena setelah ini diunggah ke Modul SiPy, satu-satunya cara untuk mengakses Modul SiPy lagi adalah dengan FTP ke flashdisk dan menghapus file main.py dari SiPy Modul.
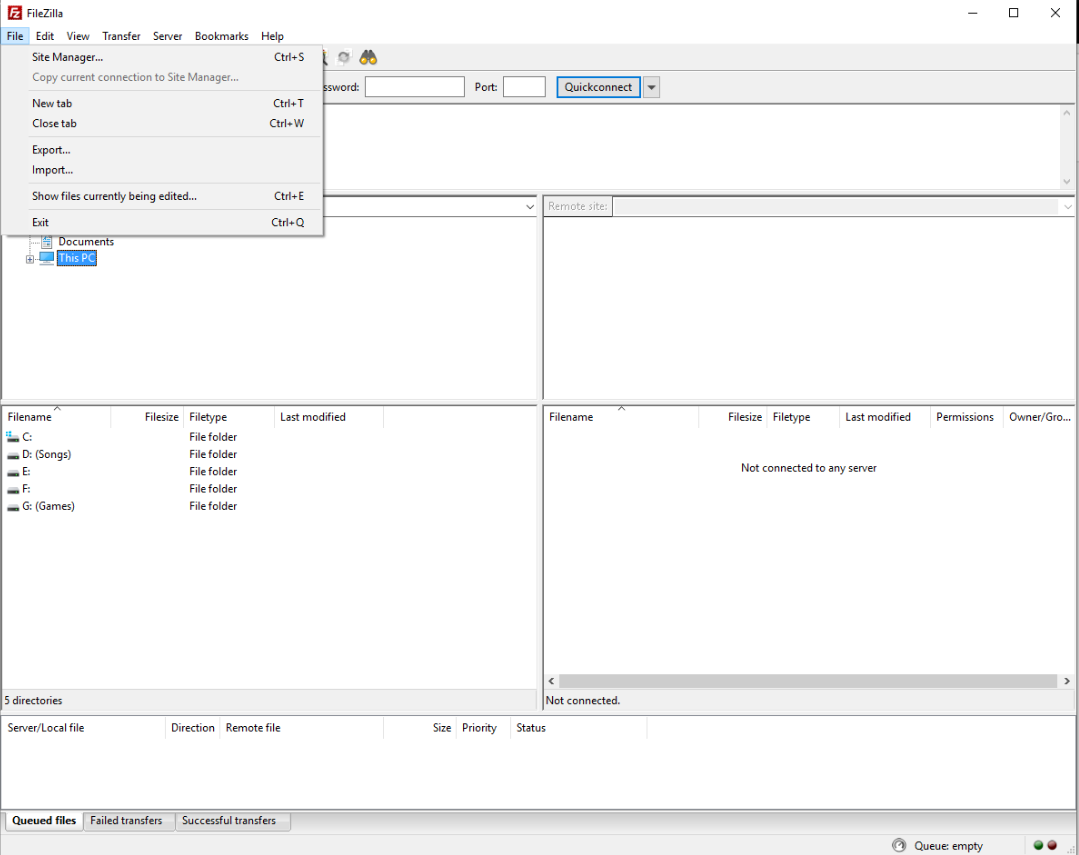
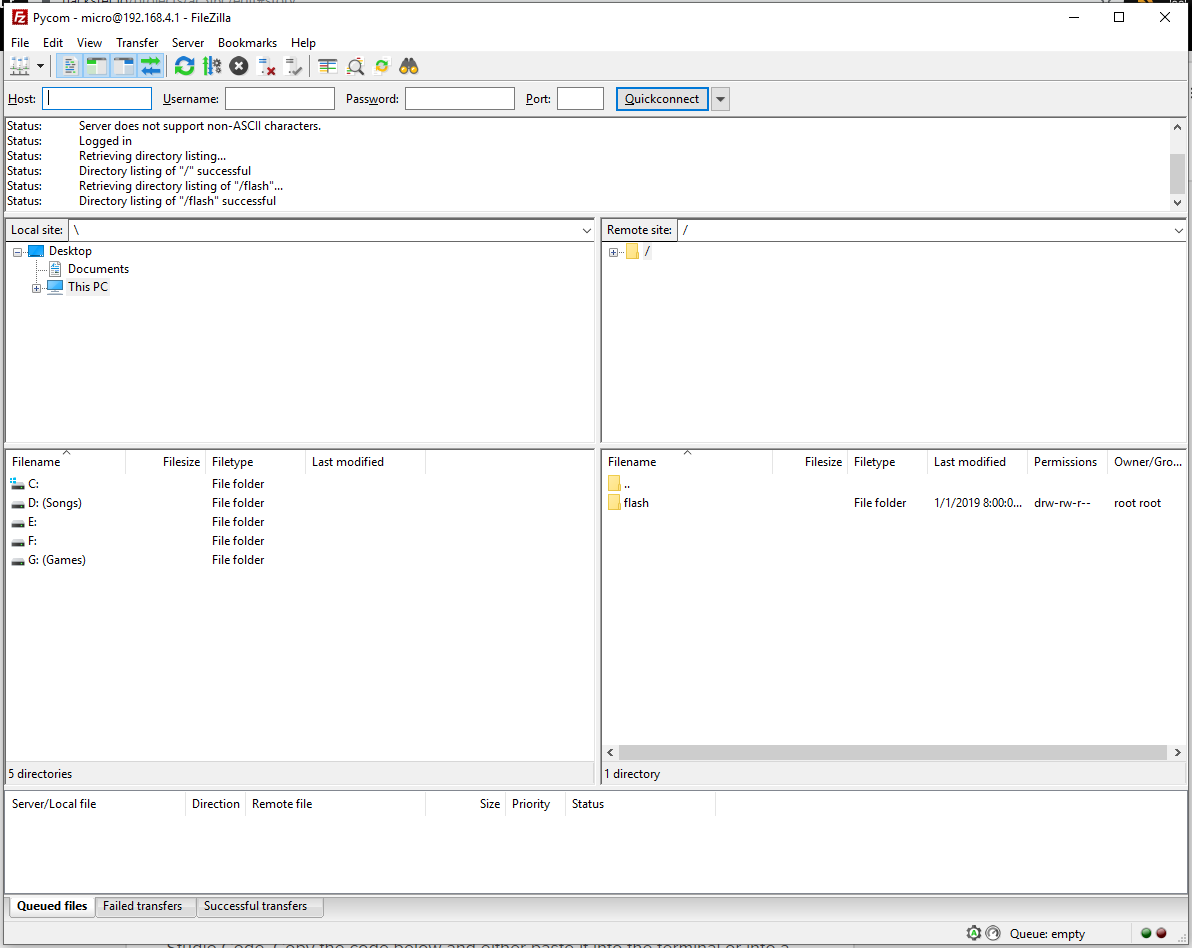
Jika Anda secara tidak sengaja menambahkan loop while tak terbatas, tidak perlu khawatir karena Anda masih dapat mengunggah program atau menghapus program sebelumnya melalui FTP. Pertama, buka dan unduh filezilla versi gratis dan instal.
Setelah menginstal, Anda perlu mengatur koneksi. Pertama buka filezilla dan buka pengelola situs yang ada di bawah file atau tekan Ctrl+S dan tekan situs baru.
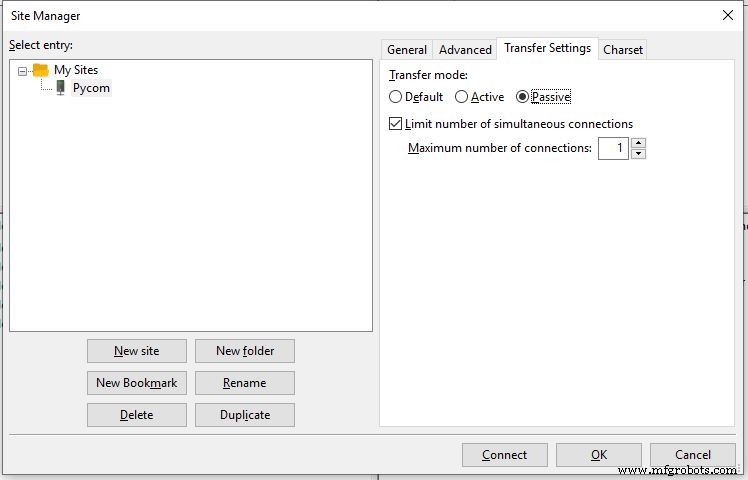
Anda dapat mengganti nama situs menjadi SiPy atau apa pun yang Anda inginkan untuk memanggil koneksi ini dan mengubah pengaturan enkripsi menjadi Hanya gunakan FTP biasa (tidak aman) dan transfer setelan ke pasif dan batasi jumlah koneksi aktif menjadi 1
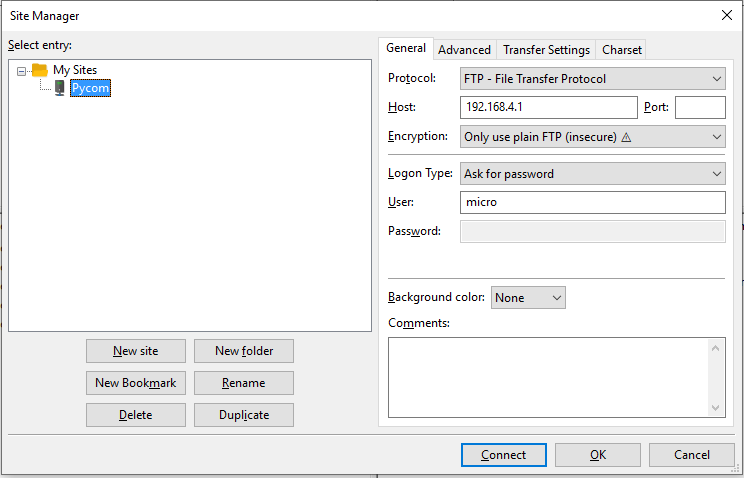
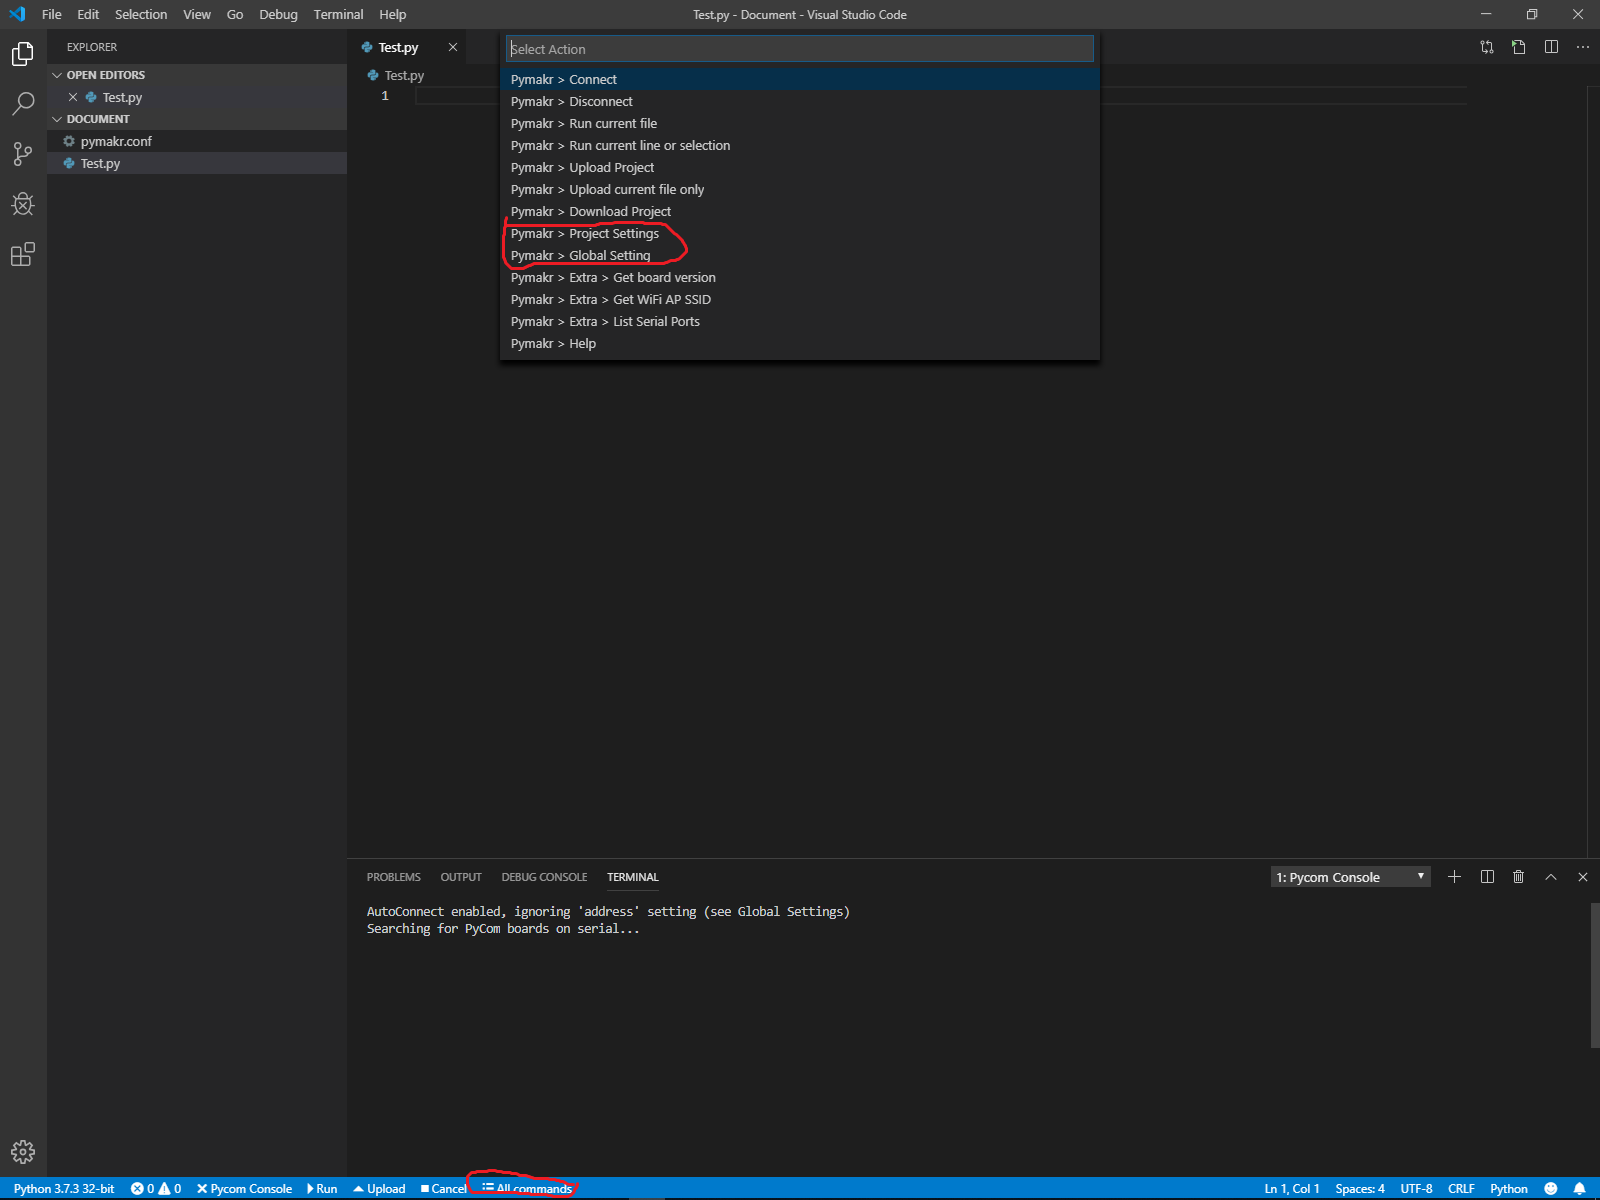
Anda dapat menemukan Host (alamat), User dan Password melalui Visual Studio Code dengan menekan semua perintah dan memilih pengaturan global. Ini akan menunjukkan kepada Anda pengaturan default untuk Host (alamat), Pengguna (nama pengguna) dan kata sandi. Ini dapat diubah dengan menekan setelan proyek di semua perintah.
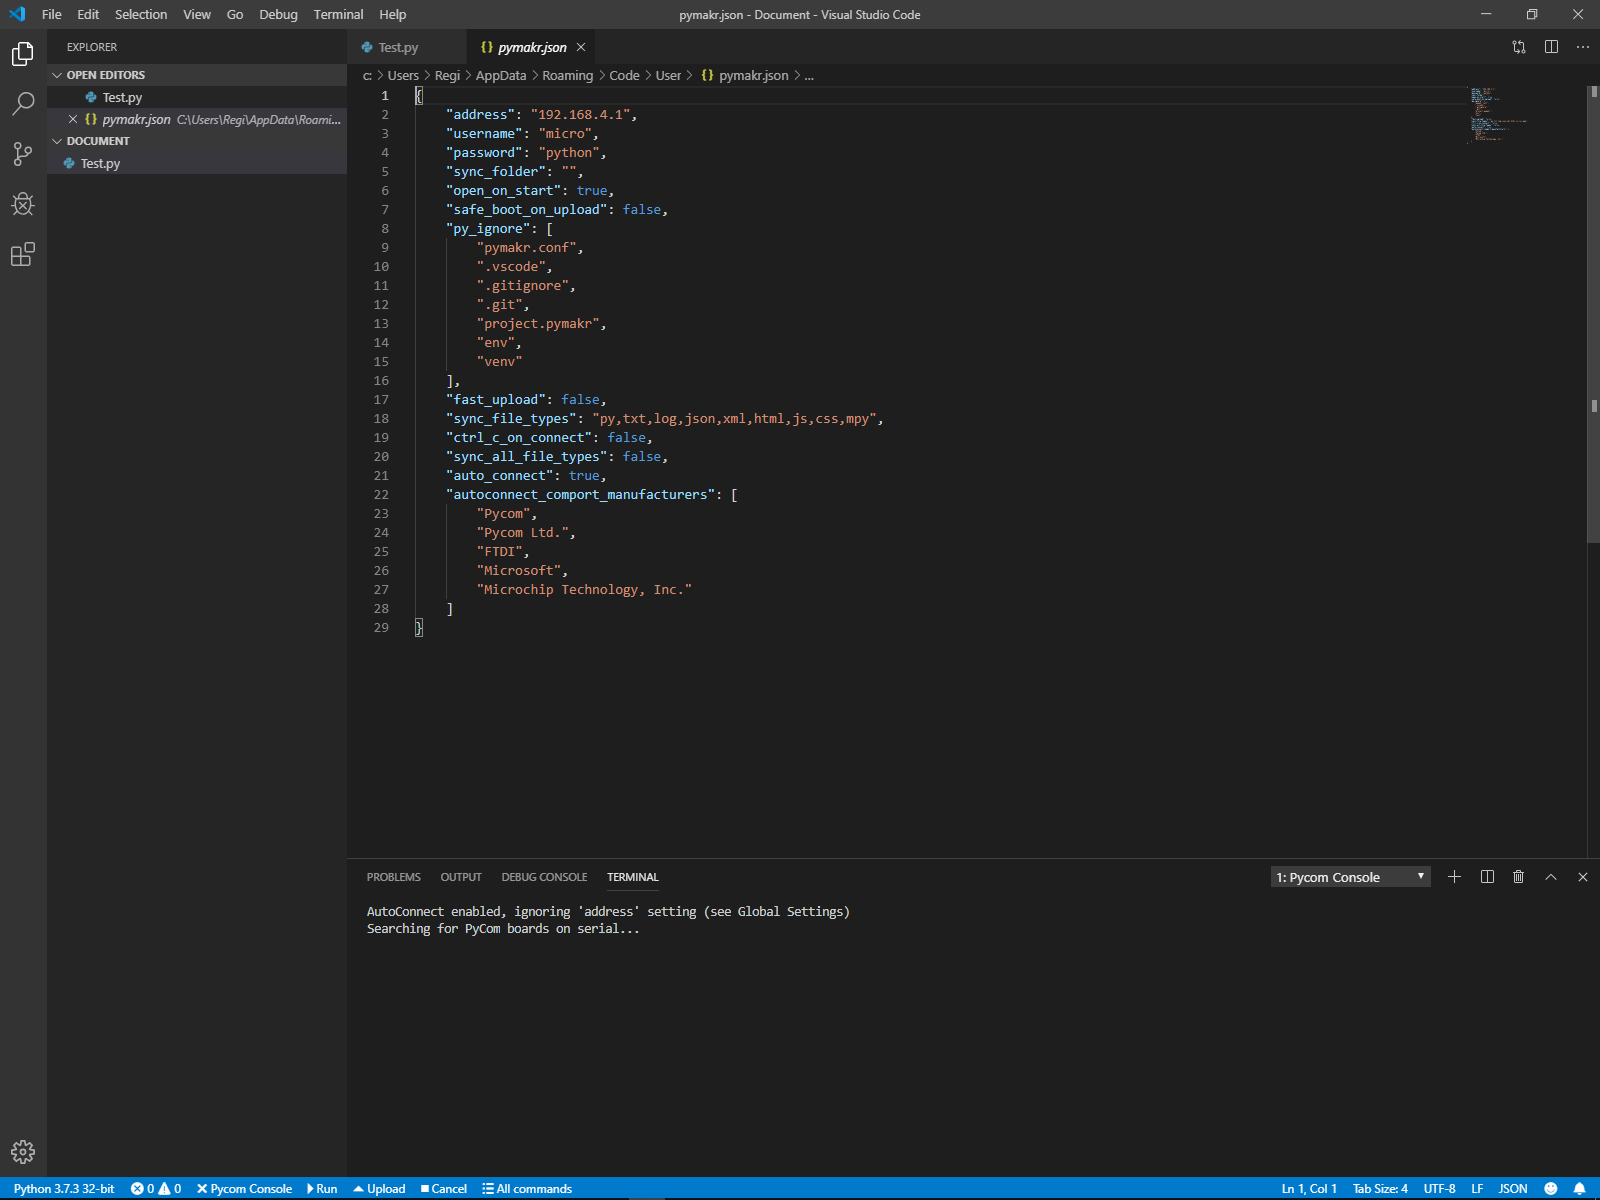

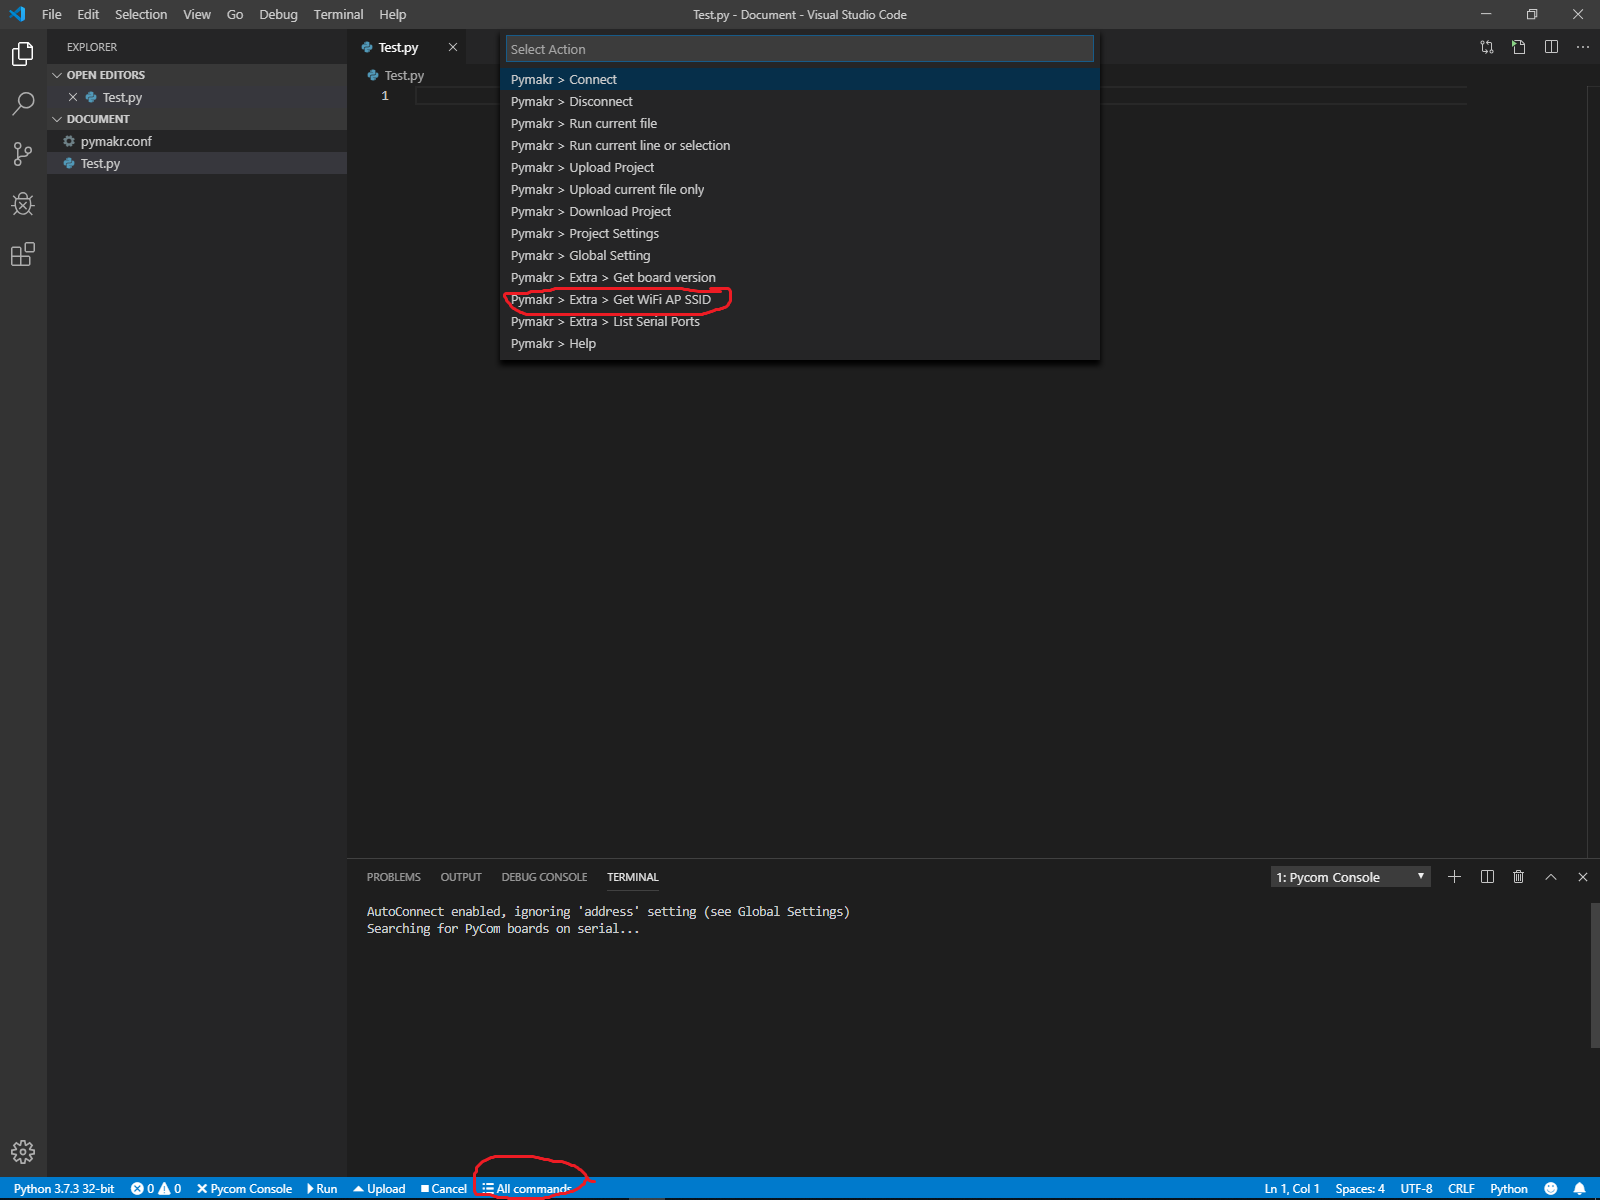
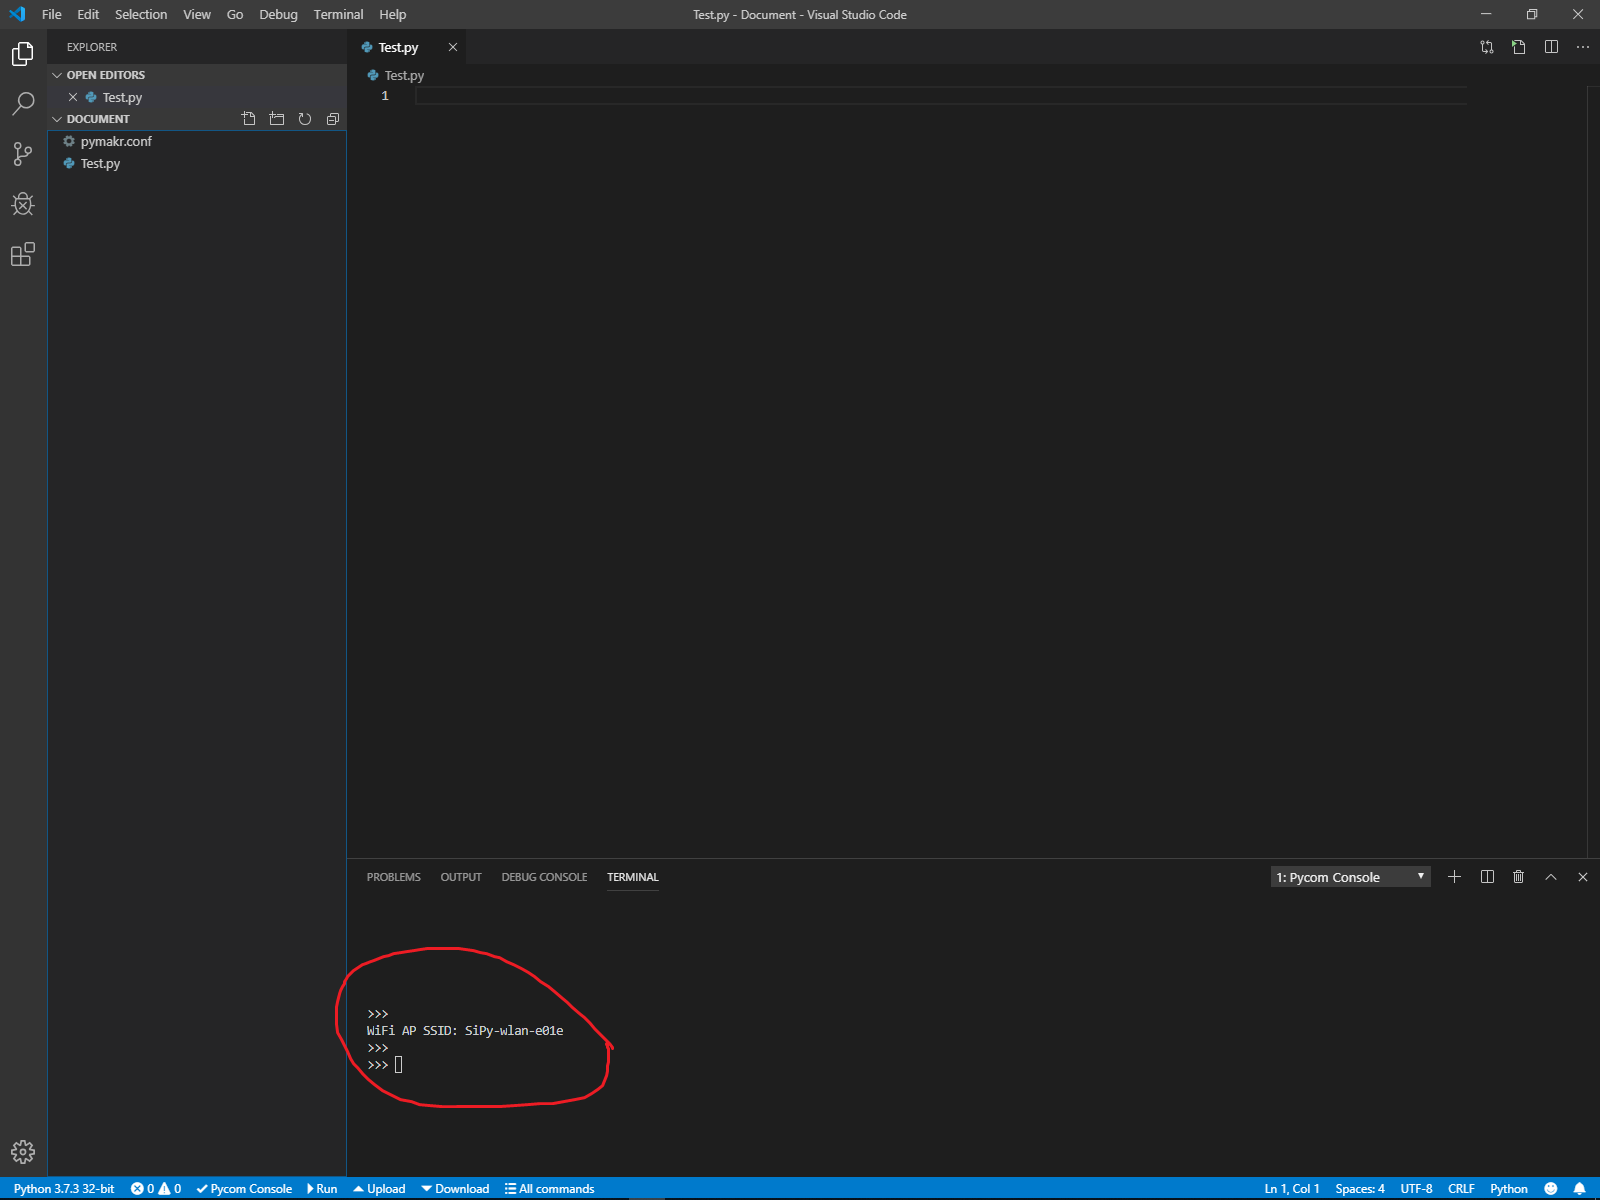
Selanjutnya Anda perlu mengetahui SSID Modul SiPy yang dapat ditemukan menggunakan semua perintah dan menekan get WiFI AP SSID. Setiap SSID Modul SiPy akan unik tetapi kata sandinya sama di seluruh dan tidak dapat diubah. Kata sandi untuk SSID Modul SiPy adalah www.pycom.io
Catatan: Pengguna Desktop perlu mendapatkan adaptor WiFi
Sekarang Anda dapat mulai menggunakan filezilla untuk mengakses SiPy Flash! Pertama sambungkan ke SSID SiPy, lalu buka pengelola situs filezilla dan sambungkan ke situs baru yang Anda buat dan ketik kata sandi. Sekarang buka folder flash dan hapus main.py ONLY! Setelah menghapus main.py, mulai ulang SiPy dan Anda dapat mulai menjalankan/mengunggah program Anda.
Catatan: Anda mungkin ingin menyalin folder flash ke OS (Sistem Operasi) Anda jika Anda menghapus semuanya.
5. Mendaftar dengan Sigfox Backend
Setelah menginstal Visual Studio Code, sambungkan papan ekstensi pycom ke komputer dan secara otomatis akan mendeteksi koneksi saat Anda membuka Visual Studio Code. Salin kode di bawah ini dan rekatkan ke terminal atau ke file dan jalankan. Metode mana pun bisa digunakan.
dari jaringan import Sigfox
import binascii

# initalise Sigfox untuk RCZ* (Anda mungkin memerlukan RCZ Region yang berbeda)
sigfox =Sigfox(mode=Sigfox .SIGFOX, rcz=Sigfox.RCZ*)

# print ID Perangkat Sigfox
print(binascii.hexlify(sigfox.id()))

# print Nomor PAC Sigfox
print(binascii.hexlify(sigfox.pac()))
Catatan :Ganti * dengan Nomor Wilayah RCZ Anda.
Metode Terminal untuk mendapatkan ID Perangkat Sigfox dan nomor PAC
Untuk membuka terminal di Visual Studio Code Tekan Ctrl+~. Kemudian paste kode di dalamnya dan akan muncul seperti gambar berikut.
Metode File untuk mendapatkan ID Perangkat Sigfox dan nomor PAC
Setelah file baru disimpan dengan menekan Ctrl+S atau pergi ke file lalu simpan, tempelkan kode ke dalam file dan simpan file kemudian Anda dapat menjalankan file dengan menekan tombol run di bagian bawah layar dan seharusnya sama seperti gambar di bawah ini.

Setelah mendapatkan ID Perangkat Sigfox dan nomor PAC Anda, Anda harus mendaftarkan Sigfox Anda ke Sigfox Backend sebelum Anda dapat mulai mentransmisikannya. Halaman pertama yang Anda lihat adalah di mana perusahaan sigfox Anda berada. Anda harus memilih negara tempat perangkat Sigfox ini akan digunakan karena setiap Zona Sigfox dikonfigurasi secara berbeda.
Setelah memilih negara yang benar, halaman berikutnya akan meminta ID Perangkat Sigfox Anda dan nomor PAC yang telah Anda dapatkan di awal bab ini. Tempelkan ke bidang yang benar dan halaman akan terlihat seperti pukulan gambar. Sedangkan sisanya diisi sesuai kebutuhan.
Setelah mengisi halaman perangkat, Buat Akun Sigfox atau login ke Akun Sigfox yang ada, Anda harus mendaftarkan Sigfox ke akun Anda. Jika Anda membuat Akun Sigfox baru, Sigfox akan mengirimkan email ke email terdaftar untuk mengatur kata sandi.

Setelah menyiapkan akun backend sigfox, Anda dapat menjalankan kode ini untuk mengirim beberapa data guna melihat apakah backend dapat menerimanya.
Catatan**: Hubungkan antena sigfox Anda terlebih dahulu sebelum menjalankan program sigfox apa pun.
dari network import Sigfox
import socket

# initalise Sigfox untuk RCZ* (Anda mungkin memerlukan RCZ Region yang berbeda)
sigfox =Sigfox(mode=Sigfox .SIGFOX, rcz=Sigfox.RCZ*)

# membuat soket Sigfox
s =socket.socket(socket.AF_SIGFOX, socket.SOCK_RAW)

# buat socket blocking
s.setblocking(True)

# konfigurasikan sebagai uplink saja
s.setsockopt(socket.SOL_SIGFOX, socket.SO_RX, False)

# mengirim beberapa byte
s.send(bytes([1, 2, 3, 4, 5, 6, 7, 8, 9, 10, 11, 12]))
Catatan :Ganti * dengan Nomor Wilayah RCZ Anda.
6. Menyiapkan Cloud
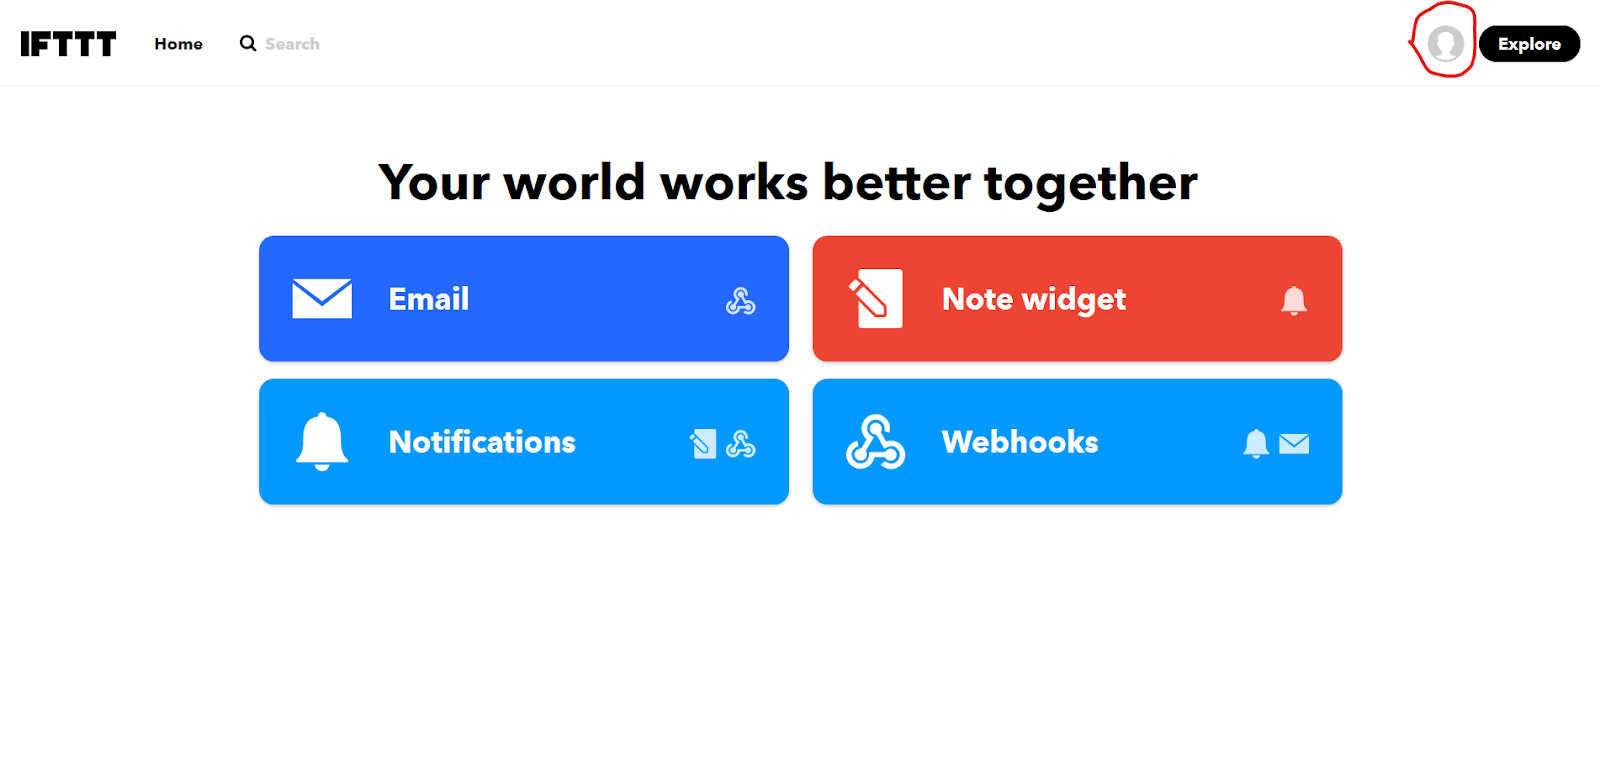
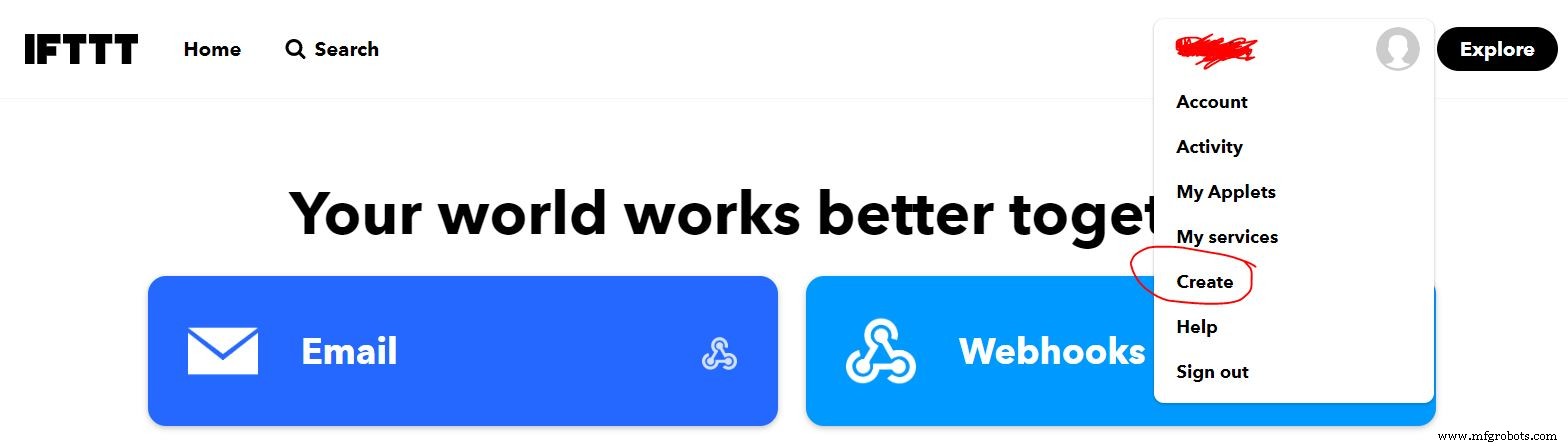
Pertama, Anda harus mengatur IFTTT untuk mengirim email, buka situs web IFTTT dan buat akun. Setelah menyiapkan akun dan masuk, buka profil Anda yang terletak di dekat sudut kanan atas layar di sisi kiri "Jelajahi" dan tekan tombol Buat .
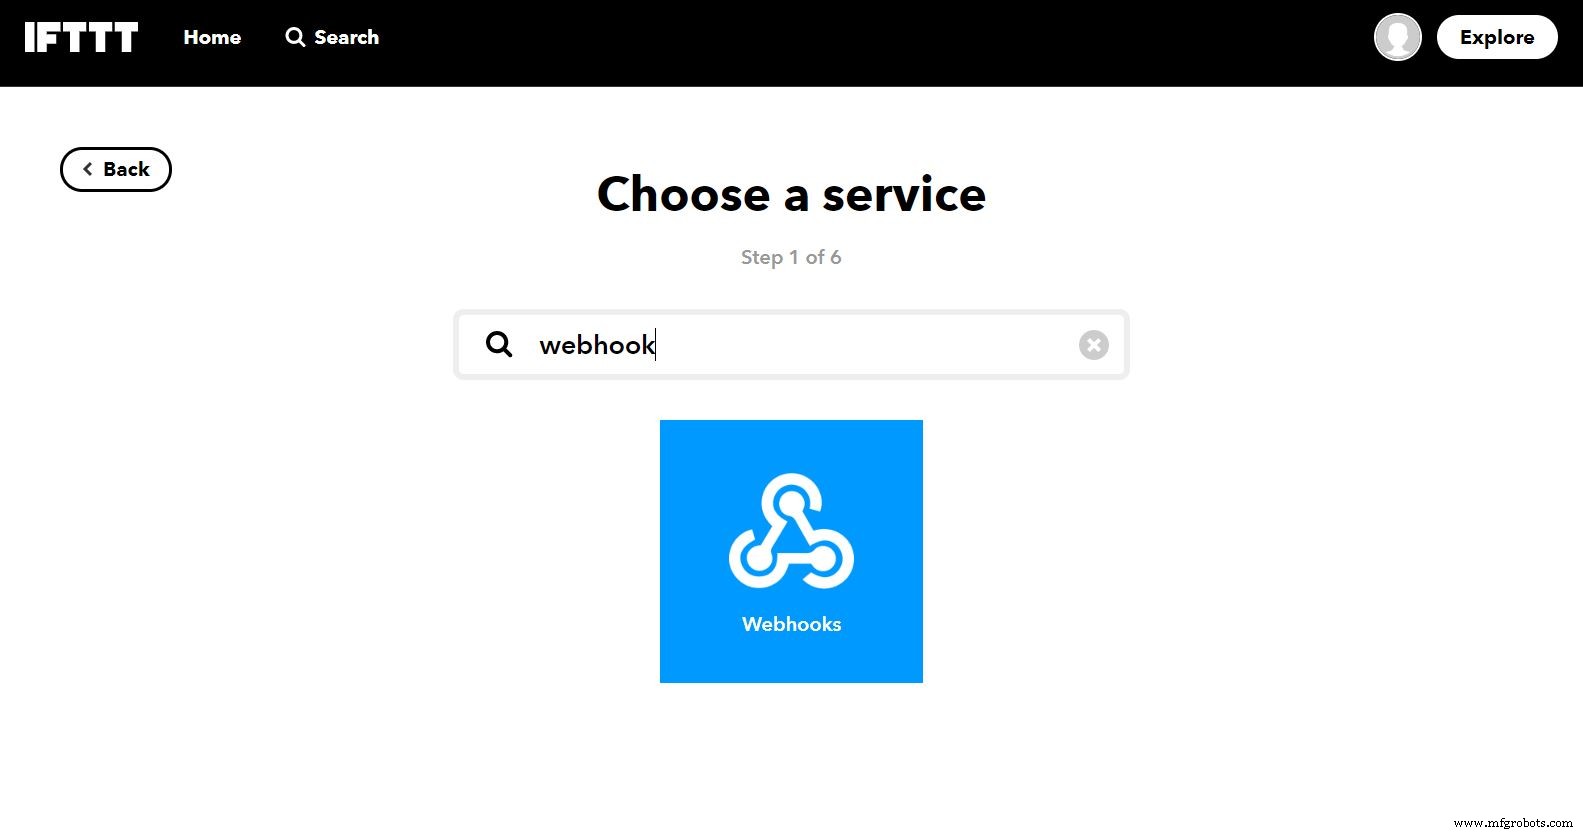
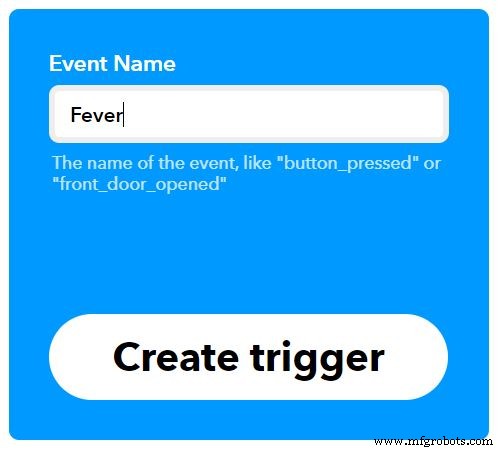
Klik "Ini " lalu telusuri Webhook dan tekan itu. If you are unsure, the following pictures will help you with what to do.

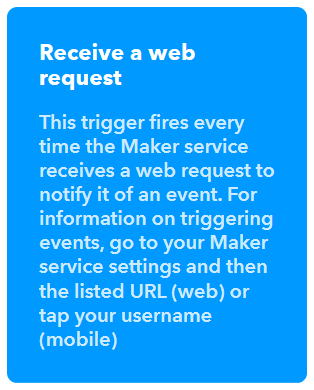
After selecting Webhooks, press the Receive a web request box and enter an event name to fit your requirements (in this example fever is used), afterwards press Create trigger .
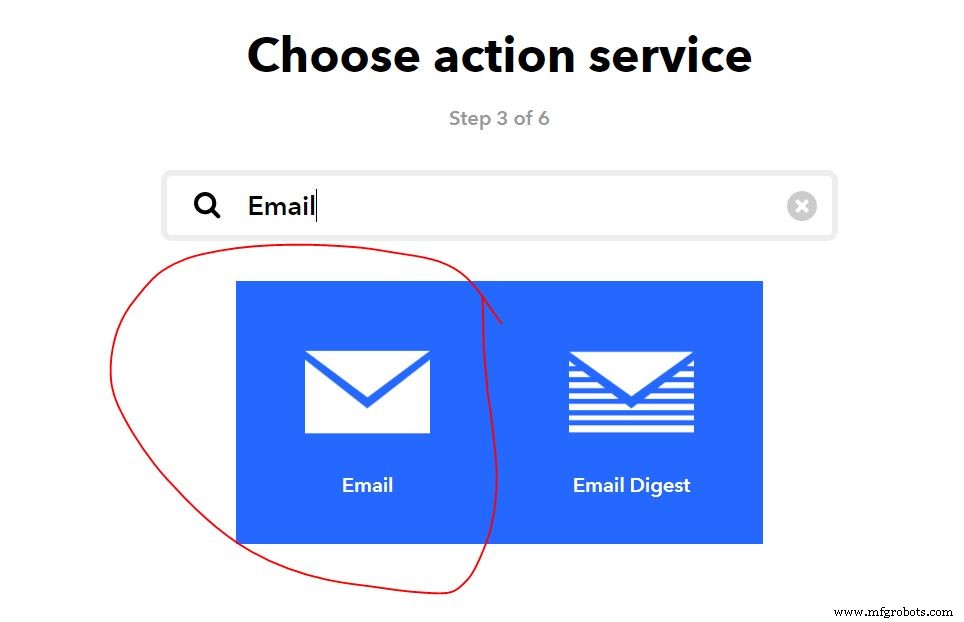
Press the word "That ", type email in the search box and press Email then press Send me an email box

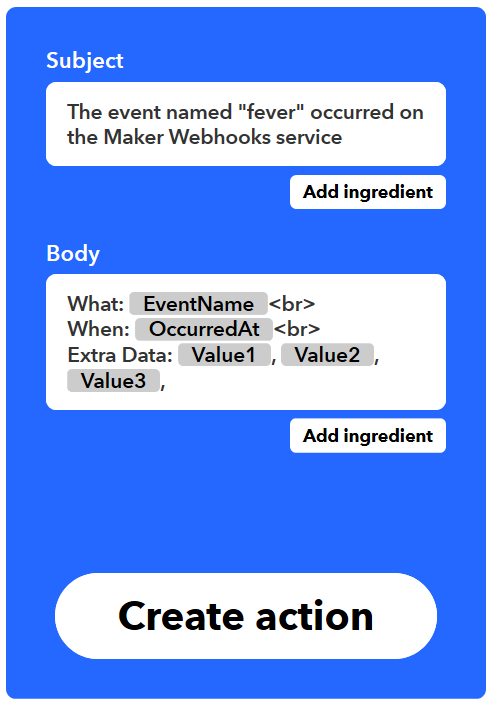
Enter message information. You can pass data about the event that triggered your message by using ingredients. For example, including {{Event Name}} adds the event name to your text message. The Body section must include at least {{Value1}} and {{Value2}}. Click Create action to finish the new applet. Note:Value 1, value 2 and value 3 in body message are derived from MATLAB Analysis and can be modified according to your requirement
ThingSpeak is an IOT (Internet of Things) platform which can be easily setup, learned and is open source.
First, we create two channels; (SIGFOX) TEMPERATURE PRIVATE VIEWING &(SIGFOX) TEMPERATURE PUBLIC VIEWING.
For the (SIGFOX) TEMPERATURE PRIVATE VIEWING , its purpose is to obtain data from the Sigfox backend. Sigfox sends up using bytes, this is because, we have realised that Ubidots (a web service) do not really work well with decoding Strings, so to make it work and accessible with both ThingSpeak and Ubidots, we chose to use bytes as it contain numbers from 0-255.
Therefore, using bytes makes it so we have to send both the whole number and the decimal number of the temperature information separately. So, this channel is mainly for keeping these messy values, later transferring to another channel for viewing which is the (SIGFOX) TEMPERATURE PUBLIC VIEWING channel.
We use MATLAB Analysis to convert the two messy values (whole number &decimal number) into just one combined value and transfer it onto the other channel. At the same time, we also transfer the userID onto the (SIGFOX) TEMPERATURE PUBLIC VIEWING as it's used for viewing. The MATLAB script is triggered on data insertion using a ThingSpeak REACT which will be explained below.
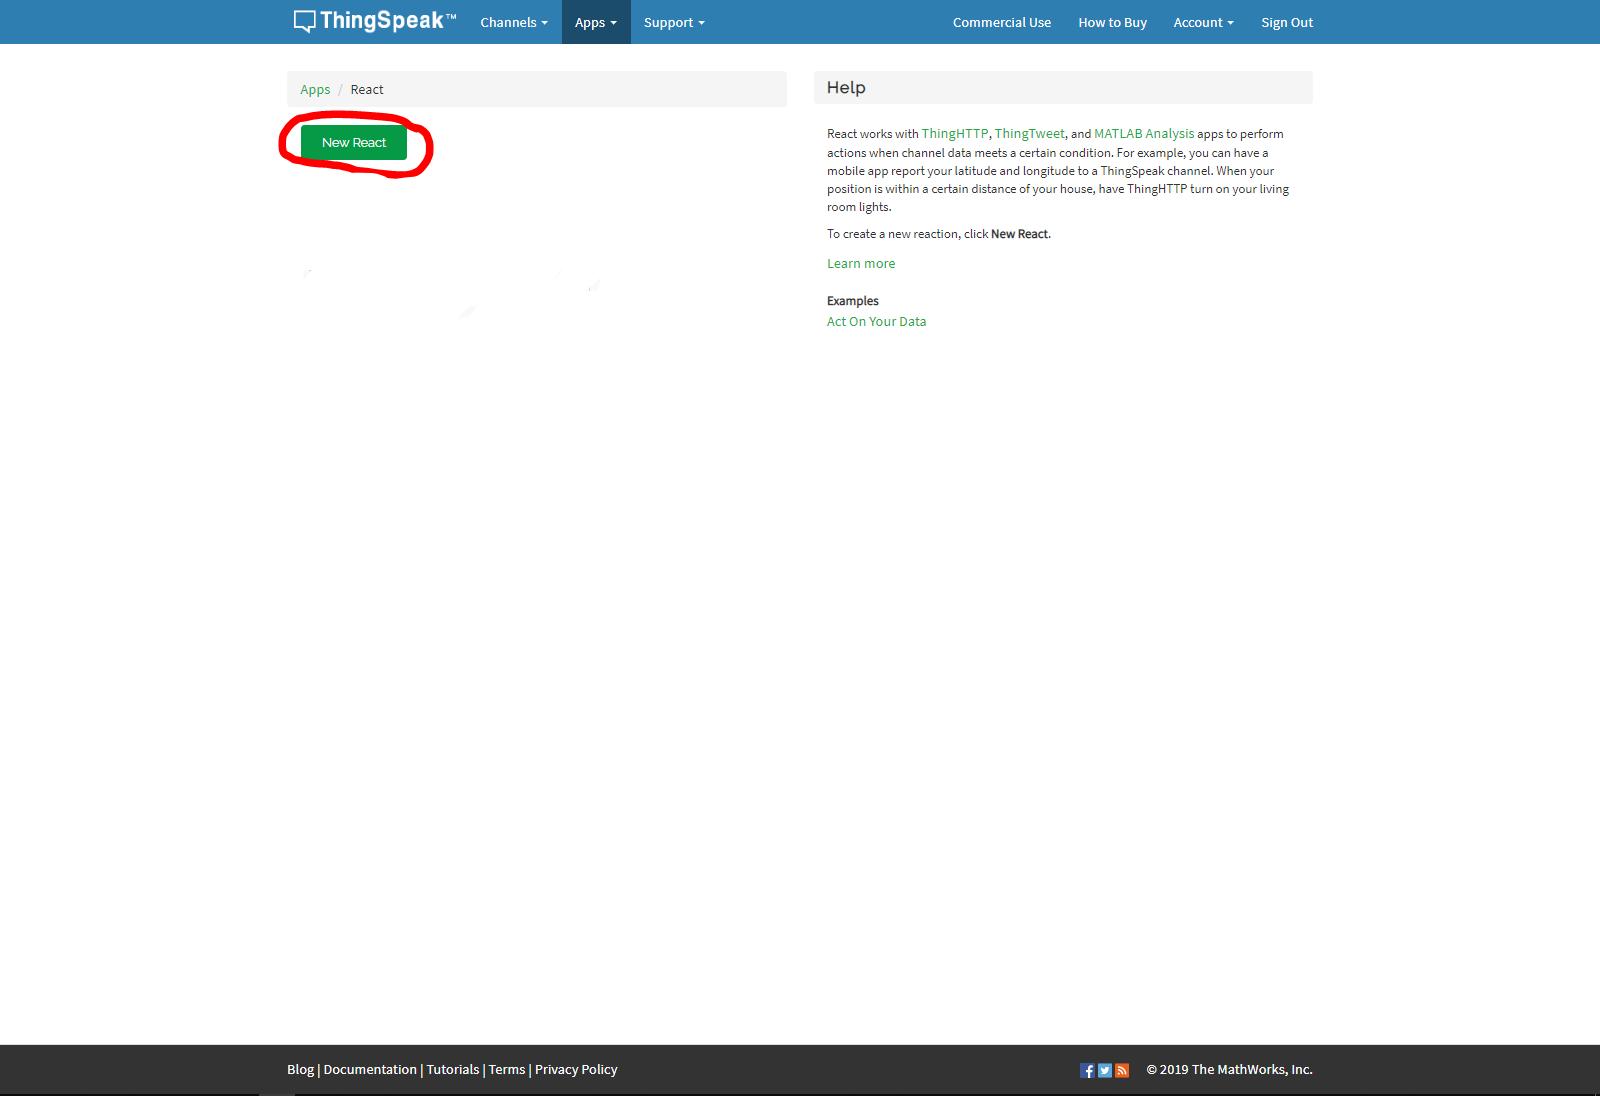
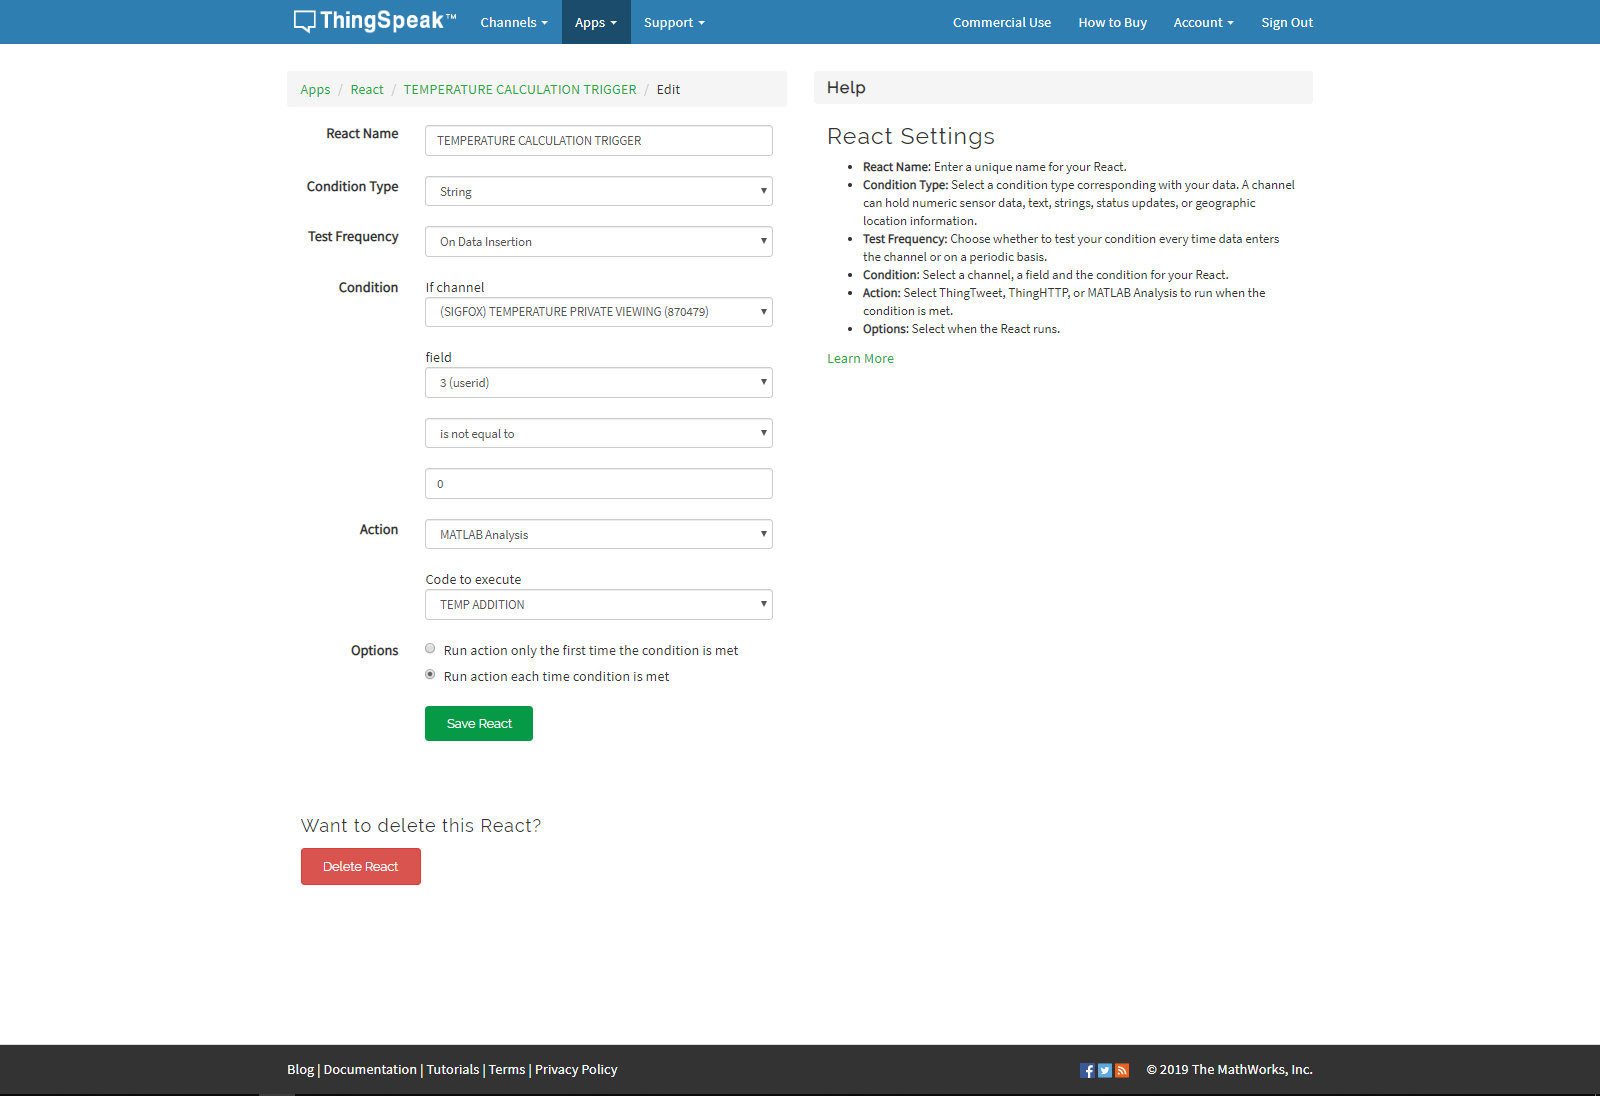
To setup the react, first go to Apps and then select React which will open the reacts tab. Press New React to create a new react for the MATLAB Analysis to be triggered when new data arrives from the Sigfox backend. Set the condition type to string, test frequency to on data insertion, condition to field 3 (which should be your userid) of the (SIGFOX) TEMPERATURE PRIVATE VIEWING when its not equal to 0, action to MATLAB Analysis with the code for calculating the temperature and Options to Run Action only the first time condition is met.

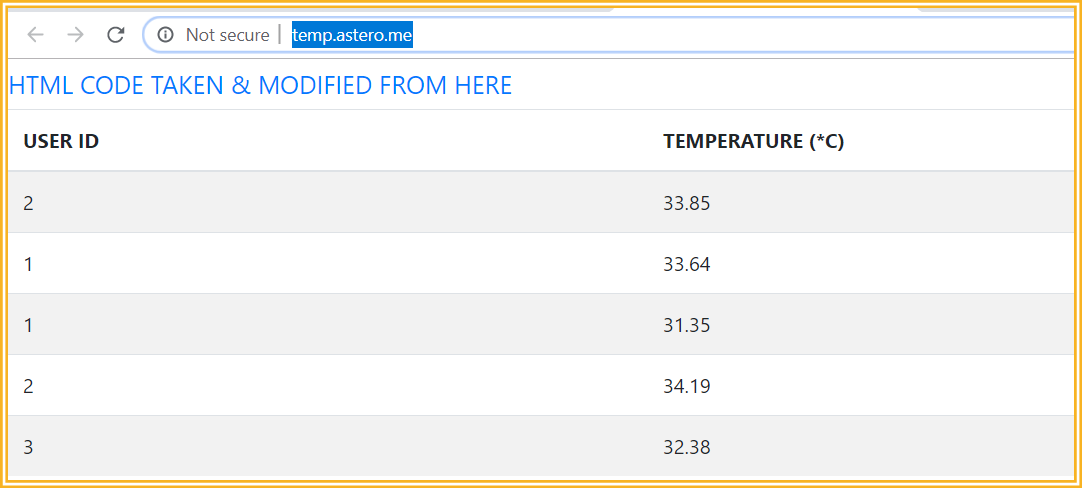
The table code was taken from an open sourced project and modified to suit our needs. It's very useful as the table auto updates every time a new data is sent in, perfect for our usage.
Unfortunately, the MATLAB plugin for the table is only view-able in private view and not in the public view. As it's intended for administrative purposes only, we do not subject this as an issue, it's intended to be only viewed in private view.
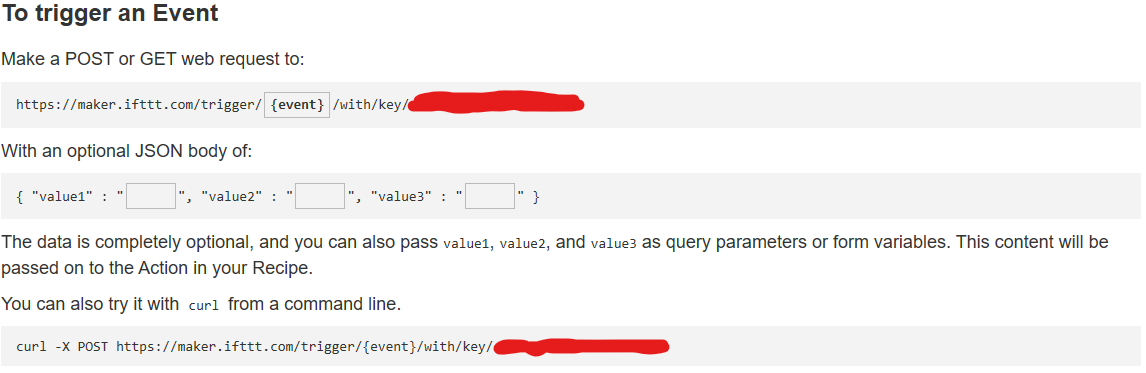
To retrieve Webhooks information, Click on your profile logo near the top right corner of the screen on the left of the “Explore” tab. Select My Services, select Webhooks then click documentation near the top right of the web page, from there you can see your key and format for sending a request. Enter that event name. The event name for this project is fever
https://maker.ifttt.com/trigger/{event}/with/key/(example)
https://maker.ifttt.com/trigger/fever/with/key/(example)
The service can be tested to see if it works or not by pasting the URL(example of the URL are shown above) into your browser or pressing the test button upon creation of the webhooks and email applet
After all that is done, you should be able to receive an email like the following picture, after you have finished setting up the ThingSpeak React.
Contributions
Aden - RaspberryPi + Arduino + its modules + ThingSpeak (MATLAB+ Setup)
Reginald - Sigfox + ThingSpeak Data Collection + Schematics
Bo Sheng - IFTTT Setup
Kode
- [C] ARDUINO NANO
- [PYTHON] RaspberryPi
- [MicroPython] Sigfox (Pycom)
- [ThingSpeak] MATLAB SCRIPT
[C] ARDUINO NANOArduino
This code is used for checking if there's a RFID card tap, if there is, there will be temperature taking and also handshaking between the Raspberry Pi to send data over like the card's ID, temperature and ready/standby signal and more.
It also uses LCD to show informative information.
If you're interested in knowing more, please read the section on "HOW IT WORKS:RaspberryPi &Arduino"/*90% is coded from scratch by Aden,http://www.astero.methe other 10% consists of open sourced libraries(Credits found below) used, like the RFID &temperature module.*//* * Initial Author:ryand1011 (https://github.com/ryand1011) * * Reads data written by a program such as "rfid_write_personal_data.ino" * * See:https://github.com/miguelbalboa/rfid/tree/master/examples/rfid_write_personal_data * * Uses MIFARE RFID card using RFID-RC522 reader * Uses MFRC522 - Library * ----------------------------------------------------------------------------------------- * MFRC522 Arduino Arduino Arduino Arduino Arduino * Reader/PCD Uno/101 Mega Nano v3 Leonardo/Micro Pro Micro * Signal Pin Pin Pin Pin Pin Pin * ----------------------------------------------------------------------------------------- * RST/Reset RST 9 5 D9 RESET/ICSP-5 RST * SPI SS SDA(SS) 10 53 D10 10 10 * SPI MOSI MOSI 11 / ICSP-4 51 D11 ICSP-4 16 * SPI MISO MISO 12 / ICSP-1 50 D12 ICSP-1 14 * SPI SCK SCK 13 / ICSP-3 52 D13 ICSP-3 15*//***************** This is a library example for the MLX90614 Temp Sensor Designed specifically to work with the MLX90614 sensors in the adafruit shop ----> https://www.adafruit.com/products/1748 ----> https://www.adafruit.com/products/1749 These sensors use I2C to communicate, 2 pins are required to interface Adafruit invests time and resources providing this open source code, please support Adafruit and open-source hardware by purchasing products from Adafruit! Written by Limor Fried/Ladyada for Adafruit Industries. BSD license, all text above must be included in any redistribution ******************/ // INCLUDE NECESSARY HEADER FILES #include #include #include #include #include #include // DEFINITION OF PINS#define RST_PIN 9 // Configurable, see typical pin layout above#define SS_PIN 10 // Configurable, see typical pin layout above#define BUZZER_PIN 7 //Pin define for Buzzer#define LED_PIN 6 //Pin define for LED #define dist_sensePin A0MFRC522 mfrc522(SS_PIN, RST_PIN); // Create MFRC522 instance.LiquidCrystal_I2C lcd(0x27,16,2); // Calls the LiquidCrystal class and creats an instance for the LCD.// set the LCD address to 0x27 with 16 chars and 2 line displayAdafruit_MLX90614 mlx =Adafruit_MLX90614(); // Calls the Adafruit MLX90614 instance.SoftwareSerial unoSerial(2, 3); // RX, TX // Calls the SoftwareSerial instance (for Pycom communication)// GLOBAL VARIABLESboolean tapped =true; boolean confirmation =false;String GetUID(){ String card_UID=""; String card_UID_no_space =""; for (byte i =0; i 200)) // Check if there is actually a valid user infront of the machine. If no, it'll keep looping what's under. { dist_senseValue =analogRead(dist_sensePin); // Keep checking until there's a person that comes in the distance sensor's range. lcd.setCursor(0,0); lcd.print("Please take"); lcd.setCursor(0,1); lcd.print("your temperature."); // Prompt the user to take their temperature by standing infront of the machine. } digitalWrite(BUZZER_PIN, 1); digitalWrite(LED_PIN, 1); lcd.clear(); // Turns on the Buzzer and LED, at the same time, clear the LCD too. meas_temp =(float)mlx.readObjectTempC(); temp_Hbyte =floor(meas_temp); temp_Lbyte =(meas_temp - temp_Hbyte) * 100; sMeasTemp +=userID; sMeasTemp +=","; sMeasTemp +=temp_Hbyte; sMeasTemp +=","; sMeasTemp +=temp_Lbyte; // Collect the temperature data that is taken. Serial.println("TEMP"); Serial.println(meas_temp); // Transfer the temperature data through Serial Communication to the RaspberryPi. if((meas_temp>
=28) &&(meas_temp <=42)) // Check if it's a valid temperature. unoSerial.print(sMeasTemp); // If it is, send to the sigfox module for cloud storage. lcd.setCursor(0,0); lcd.print("Suhu :"); lcd.setCursor(0,1); lcd.print(" " + String(meas_temp)); // Shows the temperature of the user through the LCD screen. } else // If it's an invalid user, { lcd.setCursor(0,0); lcd.print("Error!"); lcd.setCursor(0,1); lcd.print("Invalid User."); // Tells the user that he's not a valid user and he is unable to proceed to the temperature taking phase. } rawData =Serial.readString(); commaPos =rawData.indexOf(','); userInitial =rawData.substring(0, commaPos); // Above reads the incoming rawData again and converts into a userInitial variable. if(userInitial =="0") // If the user initial sent back is 0, it means that it's an invalid temperature because the RaspberryPi is unable to process it. { lcd.clear(); lcd.setCursor(0,0); lcd.print("Error!"); lcd.setCursor(0,1); lcd.print("Invalid Temperature."); // Prompts the user it's an invalid temperature range. } Serial.println("STANDBY"); // Sends Serial that the Arduino is still processing data. penundaan (1000); // Delay for 1 second. mfrc522.PICC_HaltA(); mfrc522.PCD_StopCrypto1(); } }
[PYTHON] RaspberryPiPython
This code is mainly used for updating the MySQL database and also to handshake with the Arduino via Serial Communication. It plays a vital role with the Arduino in this project
If you're interested in knowing more, please read the section on "HOW IT WORKS:RaspberryPi &Arduino".'''Coded from scratch by Aden; for the Hackster.io Sigfox competition.http://www.astero.me'''# IMPORTSimport mysql.connectorimport serialimport osimport time# METHODSdef queryConnection():cursor =conn.cursor(buffered=True) cursor.execute("USE `" + databaseName + "`") # Use the userInfo database, return cursor # DATABASE INFORMATIONhost ="localhost"user ="root"password ="password"databaseName ="smartTemp"conn =mysql.connector.connect(host=host, user=user,passwd=password)# Serial CommunicationcomPort ='ttyUSB0'baudRate =9600ser =serial.Serial('/dev/' + comPort, baudRate, timeout=0) # Set the timeout as 0 so if it doesn't read a serial, it skips.print("Confirming USB Serial Port now, please wait") connected =False# Below, is to ensure that the RaPi receives the correct COM port of the Arduino board.for x in range(2):time.sleep(2) ser.write("RAPI") # Basically, here, we're writing to the Arduino to confirm communication. if connected ==False:serialConfirmation =ser.readline().strip() =="ARDUINO" # Check if the RaPi is reading the correct COM port, whether it can read the Arduino's serial communications. print(serialConfirmation) if(serialConfirmation ==False):comPort ='ttyUSB1' connected =True else:comPort ='ttyUSB0' connected =True print(comPort) ser =serial.Serial('/dev/' + comPort, baudRate) # Re-initiates this variable again, this time without a Serial Communication timeout. Meaning, it'll try to communicate with the Arduino w/o a timeout. print("COM PORT confirmed, using " + comPort) # Print to let you know which PORT the Arduino is on.# File CreationcountFile =open("count.txt", "a++") # Creates a count file if it doesn't exist.# GLOBAL VARIABLEStapRFID =Falsecursor =queryConnection()if(os.stat("count.txt").st_size ==0):# Checks if the count.txt is empty. print("Count has not been set, setting to 1 now.") count =1else:for countNumber in countFile:count =int(countNumber) # Set the count to the last counted count. print("Count has been restored from previous session:" + str(count)) try:# Tries to create the database if it doesn't already exists. print("Creating " + databaseName + " database now..") cursor.execute("CREATE DATABASE " + databaseName) # Create a database. print("Database has been sucessfully created.") except(mysql.connector.errors.DatabaseError):# If the database already exists, it excepts here. print(databaseName + " database is already created.") # If that database is found, run this block of code instead.cursor.execute("CREATE TABLE IF NOT EXISTS `userInfo` (id int, cardID VARCHAR(9), userID VARCHAR(4), userInitial VARCHAR(8))") # Create a userInfo table if it doesn't exist.cursor.execute("CREATE TABLE IF NOT EXISTS `tempData` (id int, userID VARCHAR(4), dateMeas date, timeMeas time, tempMeasure decimal(5,2))") # Create a tempData table if it doesn't exist.while True:# Endless loop. cursor =queryConnection() # Re-establishes the query connection using the queryConnection() method. cardID =str(ser.readline().strip()) # Reads the serial line and converts it to a String, stripping any empty spaces. cursor.execute("SELECT * FROM userInfo WHERE cardID ='" + cardID + "'") # Select the userInfo table with the inputted cardID from the Arduino. items =cursor.fetchone() # Fetch one line of the table. if(items !=None):# If it's able to fetch (valid user) print(cardID) # Print out the cardID that it's currently fetching. userID =str(items[2]) # Gets the userID from the fetched line. userDetails =str(items[3] + ", " + items[2]) # Get the userDetails from the fetched line. # Get the currentDate ¤tTime. currentDate =str(time.strftime("%Y-%m-%d %H:%M:%S", time.gmtime()))[0:10] currentTime =str(time.strftime("%Y-%m-%d %H:%M:%S", time.gmtime()))[11:] print(items) # Print the whole item array that was fetched. (for debugging) ser.write(b'' + userDetails) # Serial communication to the Arudino. countFile.close() # Closes the count file. countFile =open("count.txt", 'w') # Makes it so it overwrites the count file with the new saved count below. tempSignal =False while(tempSignal ==False):# Keeps looping until it gets the temperature reading from the Arduino. print("Getting Temperature") tempSignal =ser.readline().strip() =="TEMP" # Read the Arudino incoming serial. tempData =float(ser.readline().strip()) # Read the Arduino incoming serial of the temperature data. print(tempData) # Prints the retrieved temperature data from the Arduino. if(tempData>=28 and tempData <=42):# Check if the temperature is of a valid range. cursor.execute("INSERT INTO `tempData`(`id`, `userID`, `dateMeas`, `timeMeas`, `tempMeasure`) VALUES (" + str(count) + ",'" + userID + "','" + currentDate + "','" + currentTime + "','" + str(tempData) + "')") # Write into the database the necessary information. conn.commit() # Commit the INSERT changes into the database. count =count + 1 # Ups the count. countFile.write(str(count)) # Update the count file with the new count. else:# If it's not a valid temperature. ser.write(b'' + "0, 0") # Serial Communication to the Arduino informing that it's invalid temperature. else:# If it's not a valid user. ser.write(b'' + ", 0") # Serial Communication to the Arduino informing that no valid cardID is found. print("Nothing found") readySignal =ser.readline().strip() =="STANDBY" # Waits for the Arduino to tell that it's ready to do it again, to read/validate data. while(readySignal ==True):# If the Arduino is ready, loop until we're able to tell him back that we're also ready for another session. ser.write(b'' + "READY") # Serial communication basically to say we're ready too. print("sending") receivedSignal =ser.readline().strip() =="RECEIVED" if(receivedSignal ==True):readySignal =False print("received") cursor.close() # Close the query connection to prevent memory leaks. conn.close() # Closes the connection to the MySQL. [MicroPython] Sigfox (Pycom)Python
This code is mainly used to read the serial communication from the Arduino and upload the received values to the Sigfox backend
If you're interested in knowing more, please read the section on "HOW IT WORKS:Sigfox (Pycom)"'''100% is coded by Reginald,'''from machine import UART # Tx and Rx (``P3`` and ``P4``)from network import Sigfox # Import the sigfox library from the pycom controllerimport binascii # Import the Binary to ASCII library for converting from Binary (1,0) to ASCII (readable characters)import socket # Import socket module to enable socket connection for Sigfoximport time # Import time that can be used for delaysimport pycom # Import pycom module that contains fucntions that controls the pycom deviceimport sys # Import sys module to enable exit from the pycom running programpycom.heartbeat(False)#init Sigfox for RCZ4 (Asia)sigfox =Sigfox(mode=Sigfox.SIGFOX,rcz=Sigfox.RCZ4)uart1 =UART(1, baudrate=9600) # To set the serial communcation parametersuart1.init(9600,bits=8,parity=None, stop=1, pins =('P3', 'P4'), timeout_chars=20) # To set the serial communcation parameterswhile True:try:recv=uart1.readline() # It always reads the serial communcation for any messages if recv !=None:'''If there is a message recieved from the serial communcation, it will procced to establish the sigfox connection and process the message for sending''' #print Sigfox DeviceID print(binascii.hexlify(sigfox.id())) # print Sigfox PAC number print(binascii.hexlify(sigfox.pac())) #create Sigfox socket sk1 =socket.socket(socket.AF_SIGFOX, socket.SOCK_RAW) #make thesocket blocking sk1.setblocking(False) #configure as uplink only sk1.setsockopt(socket.SOL_SIGFOX, socket.SO_RX, False) dataList =recv.decode("utf-8") #decode the received message print("dataList :%s" %(dataList)) split_val =dataList.split(",") #split the listing based on commas # eg. if receive message is 8,35,60 -> userID =8, temperature =35.60 degree celsius userID =int(split_val[0]) # assign the 1st element in the listing to userID. temp_H =int(split_val[1]) # assign the 2nd element in the listing to the whole number of the temperature. temp_L =int(split_val[2]) # assign the 3rd element in the listing to the decimal numner of the temperature. print("userID :%d temp_H :%d temp_L :%d" % (userID, temp_H, temp_L)) bData =[userID,temp_H,temp_L] # create a list print(bData) meas_temp =temp_H + (temp_L*0.01) # merge temperature values print("measure temperature :%.2f" %(meas_temp)) sk1.send(bytes(bData)) #cast the data list to bytes and send to Sigfox backend. sk1.close() #close Sigfox socket connection. time.sleep(5) #delay for 5 seconds. except KeyboardInterrupt:sys.exit() [ThingSpeak] MATLAB SCRIPTMATLAB
This script focuses on combining the raw data that is sent up by the Sigfox to ThingSpeak and put them together into a presentable visual state, allowing users to properly visualize the information. It also works alongside with IFTTT by triggering a webhook URL when it reaches a fever temperature, alerting user(s) via Email.
If you're interested in learning more about this code, please read the section on "HOW IT WORKS:ThingSpeak".%% Made from scratch by Aden; for the Hackster.io Sigfox Competition.%% http://www.astero.mereadChannelID =870479; %% Channel to read.webhookTrigger ='https://maker.ifttt.com/trigger/student_fever/with/key/h10MdSGwjSPtZQ43wH-AgoiKI0pwaljBNnGUEu4Yecn';readAPIKey ='QGHINBPNJQKULBH2'; %% Channel read API Key.writeChannelID =870482; %% Channel to write.writeAPIKey ='R6NJIM8NT5A42R9N'; %% Channel write API Key.wholeNumber =thingSpeakRead(readChannelID, 'ReadKey', readAPIKey, 'Fields', 1); %% Read the value from field 1 and save it to a variable.decimalNumber =thingSpeakRead(readChannelID, 'ReadKey', readAPIKey, 'Fields', 2)/100;%% Read the value from field 2 and save it to a variable.userID =thingSpeakRead(readChannelID, 'ReadKey', readAPIKey, 'Fields', 3);%% Read the value from field 3 and save it to a variable.display(wholeNumber, 'BEFORE') %% Display value for debugging.analyzedData =wholeNumber + decimalNumber; %% Converting the two into one whole number instead of two separate values.display(analyzedData, 'AFTER')display(userID, 'USERID')%%thingSpeakWrite(writeChannelID, analyzedData, 'Fields', 1, 'WriteKey', writeAPIKey);thingSpeakWrite(writeChannelID,'Fields',[1,2],'Values',{analyzedData,userID},'WriteKey', writeAPIKey)if(analyzedData>=38) %% Check if fever temperature. webwrite(webhookTrigger,'value1',analyzedData,'value2',userID); %% If yes, trigger the webhook and send an email of the values.end Skema
How everything is connected together 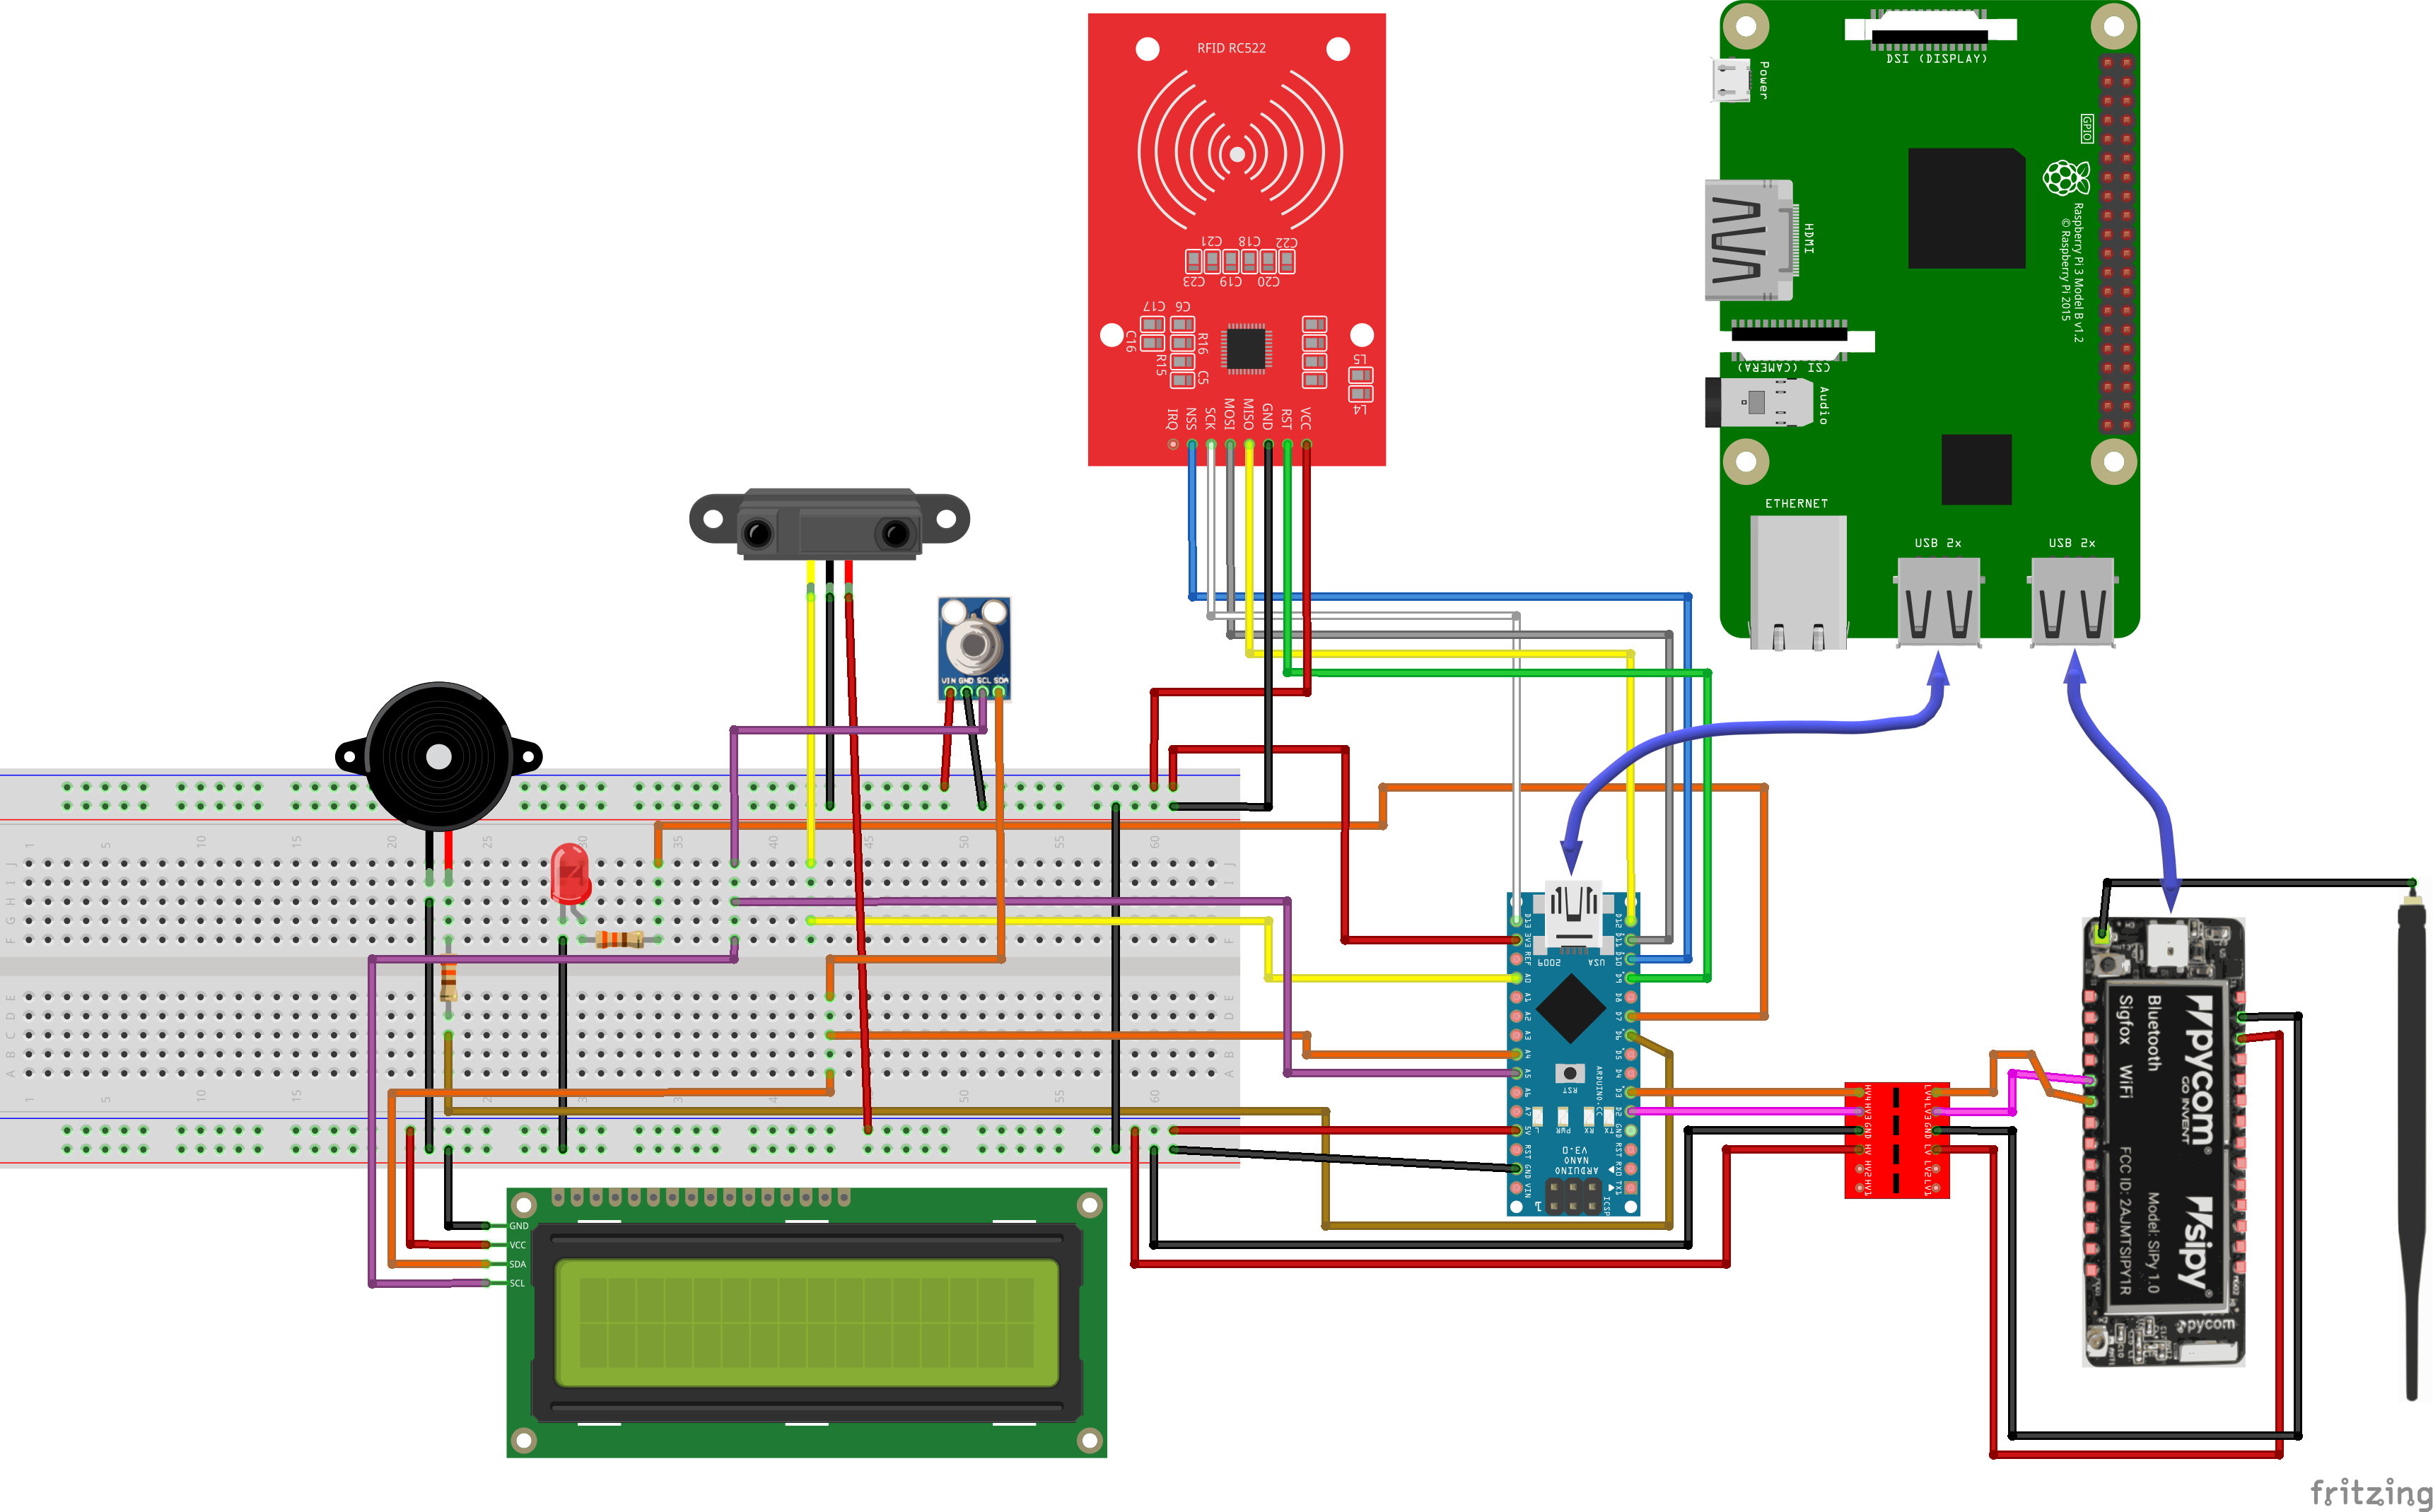 Connections for Distance Sensor for Arduino
 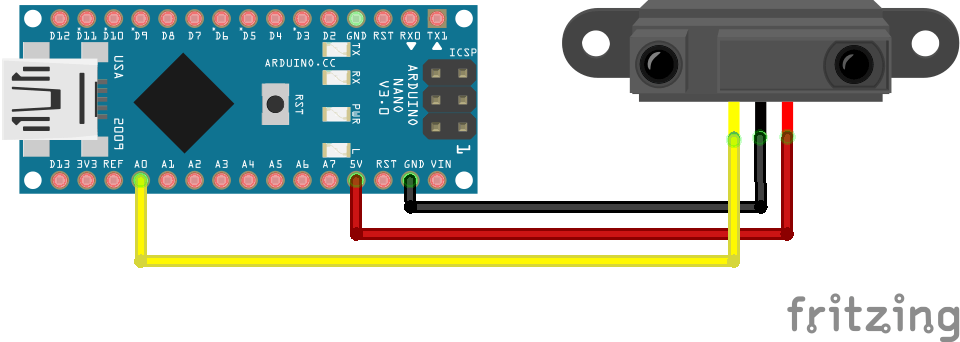 Connections for Temperature Sensor
 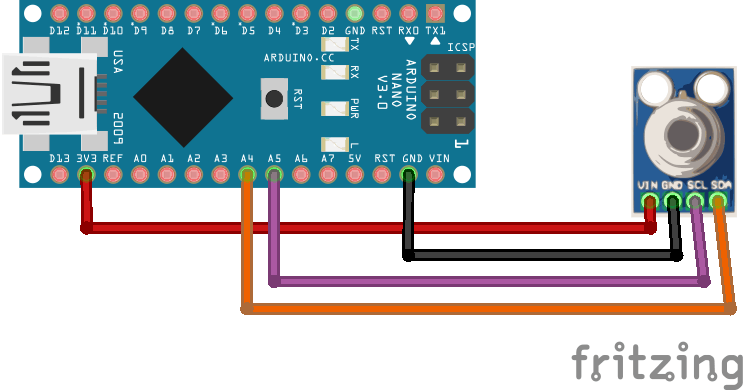 Connections for LED for Arduino
 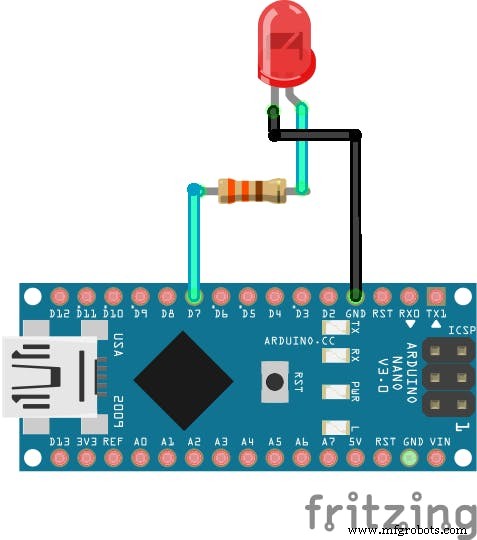 Connections for RFID for Arduino
 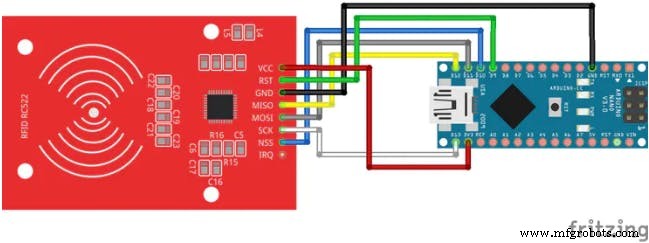 Connections for LCD for Arduino
 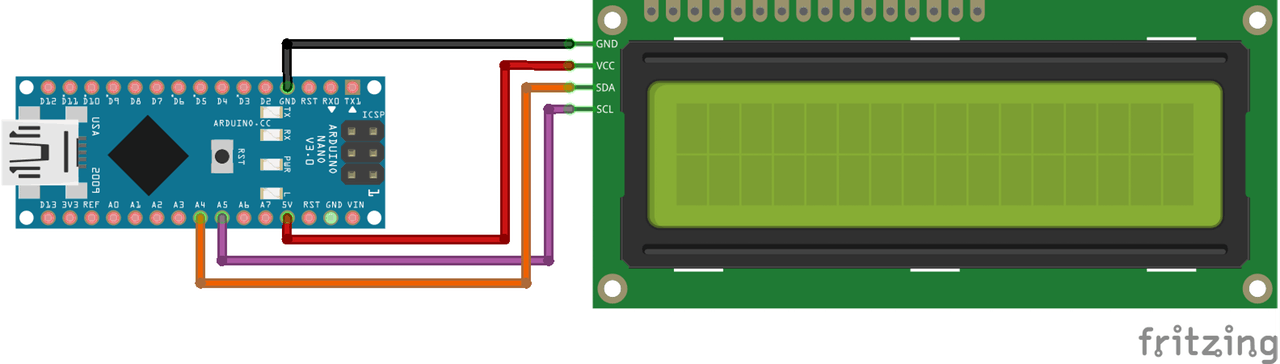 Connections for Buzzer for Arduino