Buat Lengan Robotik Arduino Pintar: Tutorial DIY Mudah
Komponen dan Perlengkapan
Arduino UNO
×
1
Micro Servos
×
5
Potentiometers
×
5
Breadboard (generik)
×
1
Tentang Proyek Ini
Dalam tutorial ini, saya akan membuat lengan robotik sederhana yang akan dikontrol menggunakan lengan master. Lengan akan mengingat gerakan dan memutarnya dalam urutan. Konsep ini tidak baru, saya mendapat ide dari "mini robotic arm -by Stoerpeak". Saya ingin membuat ini sejak lama, namun dulu saya total pemula dan tidak memiliki pengetahuan tentang pemrograman. Sekarang akhirnya saya membangun satu, menjaga tetap sederhana, murah, dan membaginya dengan kalian semua.
Jadi, mari kita mulai....
Langkah 1: Hal yang Perlu Anda Siapkan
Berikut daftar hal yang Anda butuhkan :-
1. Motor servo x 5 (Amazon Link)
2. Potensiometer x 5 (Amazon Link)
3. Arduino UNO. (Amazon Link)
4. Baterai. (Saya menggunakan adapter 5V)
5. Breadboard. (Amazon Link)
6. Kardus/Kayu/Sun-board/akrilik apa pun yang tersedia atau mudah ditemukan.
Dan Anda juga memerlukan Arduino IDE yang terinstal.
Langkah 2: Membuat Lengan
Di sini saya menggunakan tongkat es krim untuk membuat lengan. Anda dapat menggunakan materi apa pun yang tersedia untuk Anda. Dan Anda dapat mencoba desain mekanikal berbeda untuk membuat lengan yang lebih baik. Desain saya tidak terlalu stabil.
Saya hanya menggunakan double-sided tape untuk menempelkan servo ke tongkat es krim dan memasangnya menggunakan baut.
Untuk lengan master, saya melekatkan potensiometer ke tongkat es krim dan membuat lengan.
Merujuk pada gambar akan memberikan ide yang lebih baik.
Saya memasang semuanya pada papan kanvas ukuran A4 yang digunakan sebagai dasar.
Langkah 3: Membuat Koneksi
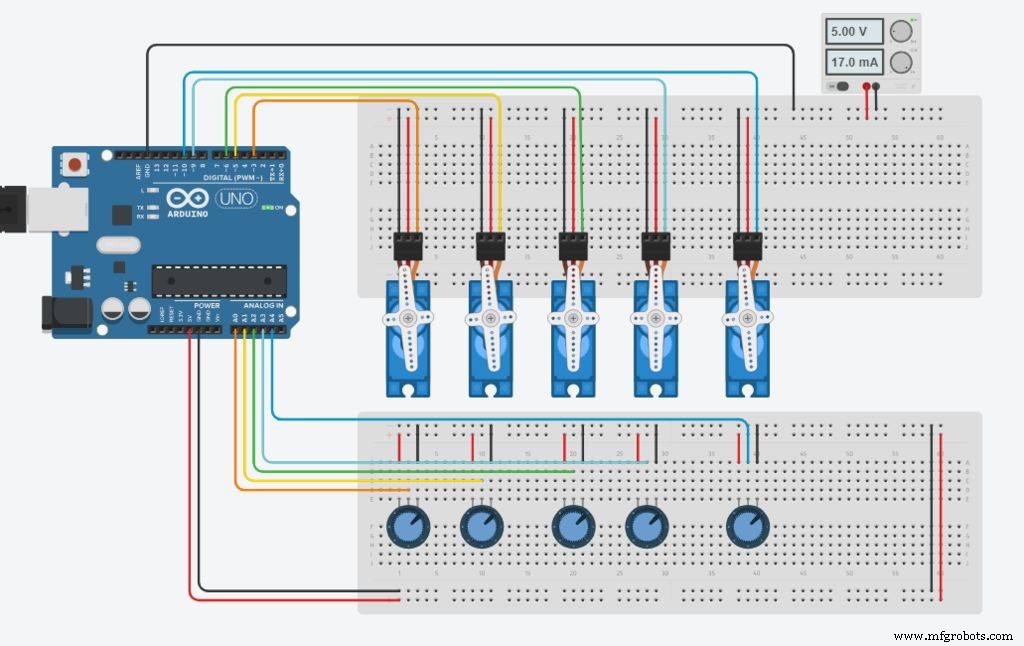
Dalam langkah ini kita akan membuat semua koneksi yang diperlukan, lihat gambar di atas.
Pertama, sambungkan semua servo secara paralel ke suplai daya (Kabel merah ke +ve dan kabel hitam atau coklat ke Gnd)
Selanjutnya, sambungkan kabel sinyal, yaitu kabel kuning atau oranye ke pin PWM Arduino.
Sekarang, sambungkan potensiometer ke +5v dan Gnd Arduino secara paralel.
Sambungkan kaki tengah ke pin Analog Arduino.
Di sini Pin Digital 3, 5, 6, 9 & 10 digunakan untuk mengontrol servo
Pin Analog A0 hingga A4 digunakan untuk Input dari Potensiometer.
Servo yang terhubung ke pin 3 akan dikontrol oleh potensiometer yang terhubung ke A0
Servo yang terhubung ke pin 5 akan dikontrol oleh pot di A1, dan seterusnya....
Catatan :- Meskipun servo tidak didayakan oleh Arduino, pastikan untuk menyambungkan Gnd servo ke Arduino atau lengan tidak akan berfungsi.
Langkah 4: Coding
Logika kode ini cukup sederhana: nilai potensiometer disimpan dalam array, rekaman kemudian dilewati menggunakan loop for, dan servo melakukan langkah sesuai nilai tersebut. Anda dapat memeriksa tutorial ini yang saya gunakan sebagai referensi "Arduino Potentiometer Servo Control & Memory"
Code :- (File dapat diunduh tersedia di bawah.)
Pertama kita akan mendeklarasikan semua variabel yang diperlukan secara global sehingga kita dapat menggunakannya di seluruh program. Tidak diperlukan penjelasan khusus untuk ini.
#include <Servo.h>
//Servo Objects
Servo Servo_0;
Servo Servo_1;
Servo Servo_2;
Servo Servo_3;
Servo Servo_4;
//Potentiometer Objects
int Pot_0;
int Pot_1;
int Pot_2;
int Pot_3;
int Pot_4;
//Variable to store Servo Position
int Servo_0_Pos;
int Servo_1_Pos;
int Servo_2_Pos;
int Servo_3_Pos;
int Servo_4_Pos;
//Variable to store Previous position values
int Prev_0_Pos;
int Prev_1_Pos;
int Prev_2_Pos;
int Prev_3_Pos;
int Prev_4_Pos;
//Variable to store Current position values
int Current_0_Pos;
int Current_1_Pos;
int Current_2_Pos;
int Current_3_Pos;
int Current_4_Pos;
int Servo_Position; //Stores the angle
int Servo_Number; //Stores no of servo
int Storage[600]; //Array to store data (Increasing array size will consume more memory)
int Index = 0; // Array index starts from 0th position
char data = 0; //variable to store data from serial input.
Sekarang kita akan menulis fungsi setup, di mana kita menetapkan pin dan fungsinya. Ini adalah fungsi utama yang dieksekusi pertama.
void setup()
{
 Serial.begin(9600); //For Serial communication between arduino and IDE.
 //Servo objects are attached to PWM pins.
 Servo_0.attach(3);
 Servo_1.attach(5);
 Servo_2.attach(6);
 Servo_3.attach(9);
 Servo_4.attach(10);
 //Servos are set to 100 position at initialization.
 Servo_0.write(100);
 Servo_1.write(100);
 Servo_2.write(100);
 Servo_3.write(100);
 Servo_4.write(100);
 Serial.println("Press 'R' to Record and 'P' to play");
}
Sekarang kita harus membaca nilai potensiometer menggunakan pin Input Analog dan memetakannya untuk mengontrol servo. Untuk ini kita akan mendefinisikan fungsi dan menamainya Map_Pot();, Anda dapat menamainya apa pun yang Anda inginkan, ini adalah fungsi yang didefinisikan pengguna.
void Map_Pot() { /* The servos rotate at 180 degrees but to using it to limits is not a good idea as it makes the servos buzz continuously which is annoying so we limit the servo to move between: 1-179 */ Pot_0 = analogRead(A0); // Read input from pot and store it in the Variable Pot_0. Servo_0_Pos = map(Pot_0, 0, 1023, 1, 179); //Map servos as per the value between 0 to 1023 Servo_0.write(Servo_0_Pos); //Move the servo to that position.
void loop() { Map_Pot(); //Function call to read pot values
while (Serial.available() > 0) { data = Serial.read(); if (data == 'R') Serial.println("Recording Moves..."); if (data == 'P') Serial.println("Playing Recorded Moves..."); } if (data == 'R') //If 'R' is entered, start recording. { //Store the values in a variable Prev_0_Pos = Servo_0_Pos; Prev_1_Pos = Servo_1_Pos; Prev_2_Pos = Servo_2_Pos; Prev_3_Pos = Servo_3_Pos; Prev_4_Pos = Servo_4_Pos;
Map_Pot(); // Map function recalled for comparison
if (abs(Prev_0_Pos == Servo_0_Pos)) // absolute value is obtained by comparing { Servo_0.write(Servo_0_Pos); // If values match servo is repositioned if (Current_0_Pos != Servo_0_Pos) // If values don't match { Storage[Index] = Servo_0_Pos + 0; // Value is added to array Index++; // Index value incremented by 1 } Current_0_Pos = Servo_0_Pos; } /* Similarly the value comparison is done for all the servos, +100 is added every for entry as a differential value. */ if (abs(Prev_1_Pos == Servo_1_Pos)) { Servo_1.write(Servo_1_Pos); if (Current_1_Pos != Servo_1_Pos) { Storage[Index] = Servo_1_Pos + 100; Index++; } Current_1_Pos = Servo_1_Pos; }
if (abs(Prev_3_Pos == Servo_3_Pos)) { Servo_3.write(Servo_3_Pos); if (Current_3_Pos != Servo_3_Pos) { Storage[Index] = Servo_3_Pos + 300; Index++; } Current_3_Pos = Servo_3_Pos; } if (abs(Prev_4_Pos == Servo_4_Pos)) { Servo_4.write(Servo_4_Pos); if (Current_4_Pos != Servo_4_Pos) { Storage[Index] = Servo_4_Pos + 400; Index++; } Current_4_Pos = Servo_4_Pos; } /* Values are printed on serial monitor, '\t' is for displaying values in tabular format */ Serial.print(Servo_0_Pos); Serial.print(" \t "); Serial.print(Servo_1_Pos); Serial.print(" \t "); Serial.print(Servo_2_Pos); Serial.print(" \t "); Serial.print(Servo_3_Pos); Serial.print(" \t "); Serial.println(Servo_4_Pos); Serial.print ("Index = "); Serial.println(Index); delay(50); } if (data == 'P') //IF 'P' is entered , Start playing recorded moves. { for (int i = 0; i < Index; i++) //Traverse the array using for loop { Servo_Number = Storage[i] / 100; // Finds number of servo Servo_Position = Storage[i] % 100; // Finds position of servo switch(Servo_Number) { case 0: Servo_0.write(Servo_Position); break; case 1: Servo_1.write(Servo_Position); break; case 2: Servo_2.write(Servo_Position); break; case 3: Servo_3.write(Servo_Position); break; case 4: Servo_4.write(Servo_Position); break; } delay(50); } } }
Setelah kode siap, sekarang unggah ke board Arduino.
Smart arm siap untuk bekerja. Fungsi belum sehalus yang dibuat oleh Stoerpeak.
Jika Anda dapat membuat kode lebih baik atau memiliki saran untuk saya, silakan beri tahu saya di bagian komentar.
Dengan itu, mari kita lanjutkan ke pengujian....
Record-Play.ino
Langkah 5: Pengujian
Setelah mengunggah kode ke board dengan sukses, buka 'Serial Monitor' yang dapat Anda temukan di opsi Tools. Ketika Serial Monitor dimulai, Arduino akan di-reset. Sekarang Anda dapat mengontrol lengan robotik menggunakan lengan master. Namun tidak ada yang direkam.
Untuk memulai merekam, masukkan 'R' di monitor sekarang Anda dapat melakukan gerakan yang ingin Anda rekam.
Setelah gerakan selesai, Anda harus memasukkan 'P' untuk memutar gerakan yang direkam. Servo akan terus melakukan gerakan selama board tidak di-reset.
Semoga Anda menyukai proyek ini.
Terima kasih...
Kode
Record-Play.ino
Code snippet #1
Code snippet #2
Code snippet #3
Code snippet #4
Record-Play.inoArduino
Error opening file.
Code snippet #1Plain text
#include <Servo.h> //Servo Objects Servo Servo_0; Servo Servo_1; Servo Servo_2; Servo Servo_3; Servo Servo_4; //Potentiometer Objects int Pot_0; int Pot_1; int Pot_2; int Pot_3; int Pot_4; //Variable to store Servo Position int Servo_0_Pos; int Servo_1_Pos; int Servo_2_Pos; int Servo_3_Pos; int Servo_4_Pos; //Variable to store Previous position values int Prev_0_Pos; int Prev_1_Pos; int Prev_2_Pos; int Prev_3_Pos; int Prev_4_Pos; //Variable to store Current position values int Current_0_Pos; int Current_1_Pos; int Current_2_Pos; int Current_3_Pos; int Current_4_Pos; int Servo_Position; //Stores the angle int Servo_Number; //Stores no of servo int Storage[600]; //Array to store data (Increasing array size will consume more memory) int Index = 0; // Array index starts from 0th position char data = 0; //variable to store data from serial input.
Code snippet #2Plain text
void setup() { Serial.begin(9600); //For Serial communication between arduino and IDE. //Servo objects are attached to PWM pins. Servo_0.attach(3); Servo_1.attach(5); Servo_2.attach(6); Servo_3.attach(9); Servo_4.attach(10); //Servos are set to 100 position at initialization. Servo_0.write(100); Servo_1.write(100); Servo_2.write(100); Servo_3.write(100); Servo_4.write(100); Serial.println("Press 'R' to Record and 'P' to play"); }
Code snippet #3Plain text
void Map_Pot()
{
 /* The servos rotate at 180 degrees
 but to using it to limits is not
 a good idea as it makes the servos buzz continuously
 which is annoying so we limit the servo to move
 between: 1-179 */
 Pot_0 = analogRead(A0); // Read input from pot and store it in the Variable Pot_0.
 Servo_0_Pos = map(Pot_0, 0, 1023, 1, 179); //Map servos as per the value between 0 to 1023
 Servo_0.write(Servo_0_Pos); //Move the servo to that position.

 Pot_1 = analogRead(A1);
 Servo_1_Pos = map(Pot_1, 0, 1023, 1, 179);
 Servo_1.write(Servo_1_Pos);

 Pot_2 = analogRead(A2);
 Servo_2_Pos = map(Pot_2, 0, 1023, 1, 179);
 Servo_2.write(Servo_2_Pos);

 Pot_3 = analogRead(A3);
 Servo_3_Pos = map(Pot_3, 0, 1023, 1, 179);
 Servo_3.write(Servo_3_Pos);

 Pot_4 = analogRead(A4);
 Servo_4_Pos = map(Pot_4, 0, 1023 , 1, 179);
 Servo_4.write(Servo_4_Pos);
}
Code snippet #4Plain text
void loop()
{
 Map_Pot(); //Function call to read pot values

 while (Serial.available() > 0)
 {
 data = Serial.read();
 if (data == 'R')
 Serial.println("Recording Moves...");
 if (data == 'P')
 Serial.println("Playing Recorded Moves...");
 }
 if (data == 'R') //If 'R' is entered, start recording.
 {
 //Store the values in a variable
 Prev_0_Pos = Servo_0_Pos;
 Prev_1_Pos = Servo_1_Pos;
 Prev_2_Pos = Servo_2_Pos;
 Prev_3_Pos = Servo_3_Pos;
 Prev_4_Pos = Servo_4_Pos;

 Map_Pot(); // Map function recalled for comparison

 if (abs(Prev_0_Pos == Servo_0_Pos)) // absolute value is obtained by comparing
 {
 Servo_0.write(Servo_0_Pos); // If values match servo is repositioned
 if (Current_0_Pos != Servo_0_Pos) // If values don't match
 {
 Storage[Index] = Servo_0_Pos + 0; // Value is added to array
 Index++; // Index value incremented by 1
 }
 Current_0_Pos = Servo_0_Pos;
 }
 /* Similarly the value comparison is done for all the servos, +100 is added every for entry
 as a differential value. */
 if (abs(Prev_1_Pos == Servo_1_Pos))
 {
 Servo_1.write(Servo_1_Pos);
 if (Current_1_Pos != Servo_1_Pos)
 {
 Storage[Index] = Servo_1_Pos + 100;
 Index++;
 }
 Current_1_Pos = Servo_1_Pos;
 }

 if (abs(Prev_2_Pos == Servo_2_Pos))
 {
 Servo_2.write(Servo_2_Pos);
 if (Current_2_Pos != Servo_2_Pos)
 {
 Storage[Index] = Servo_2_Pos + 200;
 Index++;
 }
 Current_2_Pos = Servo_2_Pos;
 }

 if (abs(Prev_3_Pos == Servo_3_Pos))
 {
 Servo_3.write(Servo_3_Pos);
 if (Current_3_Pos != Servo_3_Pos)
 {
 Storage[Index] = Servo_3_Pos + 300;
 Index++;
 }
 Current_3_Pos = Servo_3_Pos;
 }
 if (abs(Prev_4_Pos == Servo_4_Pos))
 {
 Servo_4.write(Servo_4_Pos);
 if (Current_4_Pos != Servo_4_Pos)
 {
 Storage[Index] = Servo_4_Pos + 400;
 Index++;
 }
 Current_4_Pos = Servo_4_Pos;
 }
 /* Values are printed on serial monitor, '\t' is for displaying values in tabular format */
 Serial.print(Servo_0_Pos);
 Serial.print(" \t ");
 Serial.print(Servo_1_Pos);
 Serial.print(" \t ");
 Serial.print(Servo_2_Pos);
 Serial.print(" \t ");
 Serial.print(Servo_3_Pos);
 Serial.print(" \t ");
 Serial.println(Servo_4_Pos);
 Serial.print ("Index = ");
 Serial.println(Index);
 delay(50);
 }
 if (data == 'P') //IF 'P' is entered , Start playing recorded moves.
 {
 for (int i = 0; i < Index; i++) //Traverse the array using for loop
 {
 Servo_Number = Storage[i] / 100; // Finds number of servo
 Servo_Position = Storage[i] % 100; // Finds position of servo
 switch(Servo_Number)
 {
 case 0:
 Servo_0.write(Servo_Position);
 break;
 case 1:
 Servo_1.write(Servo_Position);
 break;
 case 2:
 Servo_2.write(Servo_Position);
 break;
 case 3:
 Servo_3.write(Servo_Position);
 break;
 case 4:
 Servo_4.write(Servo_Position);
 break;
 }
 delay(50);
 }
 }
}