Pong Matriks NeoPixel pada Arduino Nano: Buat Game Pong Neon
Komponen dan Perlengkapan
- Strip NeoPixel — 1 unit
- Kabel Jumper (generik) — 1 set
- Arduino Nano R3 — 1 unit
- Header Betina 8 Posisi 1 Baris (0.1") — 1 unit
- Papan Roti Perma-Proto Ukuran Setengah — 1 unit
- Joystick Analog (Generik) — 1 unit
- Potensiometer Putar (generik) — 1 unit
Alat dan Mesin yang Diperlukan
Aplikasi dan Layanan Online
Tentang Proyek Ini
Matriks
Tidak, bukan film, matriks NeoPixel! Untuk membuat matriks, cukup beli satu strip LED NeoPixel yang dapat diaddress secara individual. Gulung strip, dan perhatikan panah pada strip. Anda hanya dapat menyatukannya dalam SATU ARAH, Anda bisa merusak mereka jika orientasi salah.
Saya menggunakan strip 30 led/m 5m dan memotongnya menjadi strip sepuluh LED setiapnya. Kemudian saya mulai menaruh strip pada selembar karton, dengan orientasi bergantian. Kemudian saya memotong kabel dengan panjang yang tepat dan solder mereka ke terminal NeoPixel. Setelah melakukan itu 14 kali, matriks saya akhirnya selesai! Selanjutnya, saya memeriksa dengan multimeter untuk memastikan tidak ada short-circuit, karena short-circuit akan membakar Nano, matriks, dan mungkin port USB Anda (saya tahu dari pengalaman). Unggah sketsa tes neomatrix dengan parameter "NEO_BOTTOM + NEO_LEFT + NEO_COLUMNS + NEO_ZIGZAG". Jika menggulung "howdy" di seluruh layar, Anda selesai dengan bagian layar!
Logika
Sebuah game pong memiliki beberapa objek: palet, dinding, dan bola. Kode memiliki variabel bola X dan bola Y, yang melacak posisi bola. Arah bola ditangani dengan 1 atau -1 yang ditetapkan ke variabel arah. Palet adalah persegi panjang yang dikontrol melalui potensiometer yang dipetakan ke 0 hingga 15. Y palet tidak akan berubah, jadi variabel untuk memetanya tidak diperlukan. Di awal permainan, bola dimulai di 1,1 dan pemain harus mengizinkan bola untuk memantul sekali untuk memulai. Fisika mempertimbangkan arah bola dan tempat tabrakan pada palet.
Saatnya Bersenang-senang!
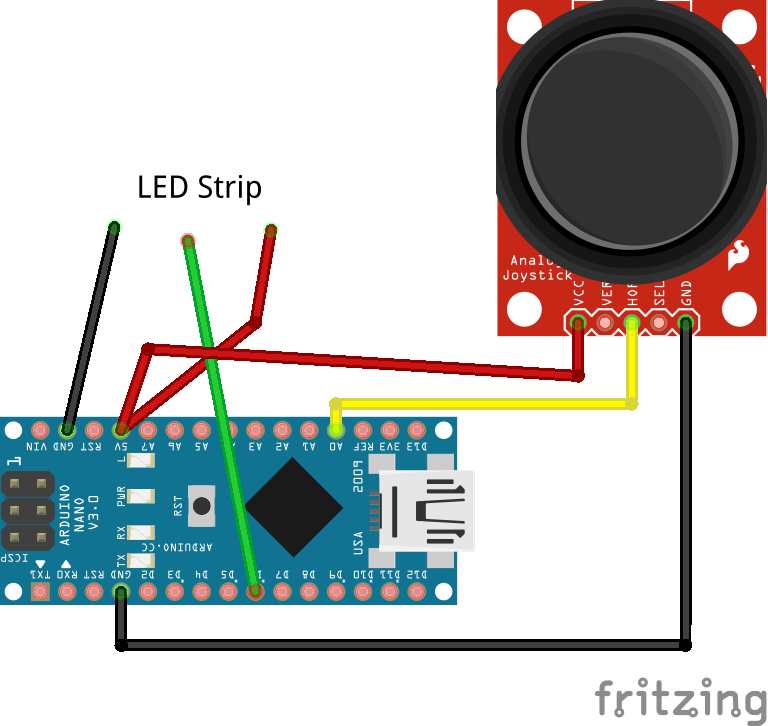
Sekarang, cukup hubungkan matriks NeoPixel ke Arduino Nano Anda, +5V pada joystick ke 5v, GND ke Arduino GND, dan akhirnya sumbu X ke A0. Nikmati game pong baru Anda! Coba tambahkan lebih banyak pemain dan fisika yang lebih baik untuk tantangan!
Kode
Kode ArduinoC/C++
#include <Adafruit_GFX.h> #include <Adafruit_NeoMatrix.h> #include <Adafruit_NeoPixel.h> #define PIN 6 Adafruit_NeoMatrix matrix = Adafruit_NeoMatrix(15, 10, PIN, NEO_MATRIX_BOTTOM + NEO_MATRIX_LEFT + NEO_MATRIX_COLUMNS + NEO_MATRIX_ZIGZAG, NEO_GRB + NEO_KHZ800); // variables for the position of the ball and paddle int paddleX = 0; int paddleY = 0; int oldPaddleX, oldPaddleY; int ballDirectionX = 1; int ballDirectionY = 1; int score = 0; int ballSpeed = 10; // lower numbers are faster int ballX, ballY, oldBallX, oldBallY; void setup() { Serial.begin(9600); // initialize the display matrix.begin(); // black background matrix.fillScreen(0); matrix.setTextColor(matrix.Color(0,255,0)); matrix.print("GO"); matrix.show(); delay(2000); matrix.fillScreen(0); matrix.show(); } void loop() { // save the width and height of the screen int myWidth = matrix.width(); int myHeight = matrix.height(); // map the paddle's location to the position of the potentiometers paddleX = map(analogRead(A0), 0, 1023, 0, 12); paddleY = 8; // set the fill color to black and erase the previous // position of the paddle if different from present if (oldPaddleX != paddleX || oldPaddleY != paddleY) { matrix.fillRect(oldPaddleX, oldPaddleY, 4, 1,matrix.Color(0,0,0)); } // draw the paddle on screen, save the current position // as the previous. //if(paddleX >= 0 && paddleX <= 11){ matrix.fillRect(paddleX, paddleY, 4, 1,matrix.Color(0,0,255)); //} //else if(paddleX < 0){ //paddleX = 0; //matrix.fillRect(paddleX, paddleY, 3, 1,matrix.Color(0,0,255)); //} //else if(paddleX >= 13){ //} oldPaddleX = paddleX; oldPaddleY = paddleY; matrix.show(); // update the ball's position and draw it on screen if (millis() % ballSpeed < 2) { moveBall(); } matrix.show(); if(ballY > 8 && (millis() > 10000)){ score += 1; matrix.fillScreen(0); matrix.setTextColor(matrix.Color(255,0,0)); matrix.setCursor(0,2); matrix.print(String(score)); matrix.show(); delay(4000); ballX = random(3,11); ballY = random(1,1); matrix.fillScreen(0); matrix.show(); delay(1000); } delay(5); } // this function determines the ball's position on screen void moveBall() { // if the ball goes offscreen, reverse the direction: if (ballX > matrix.width() - 1 || ballX < 0) { ballDirectionX = -ballDirectionX; } if (ballY > matrix.height() || ballY < 0) { ballDirectionY = -ballDirectionY; } // check if the ball and the paddle occupy the same space on screen if (inPaddle(ballX, ballY, paddleX, paddleY, 4, 1)) { if(ballX == paddleX && ballY == paddleY){ ballDirectionX = -ballDirectionX; ballDirectionY = -ballDirectionY; } else if(ballX == paddleX + 3 && ballY == paddleY){ ballDirectionX = ballDirectionX; ballDirectionY = -ballDirectionY; } else if(ballX == paddleX + 1 && ballY == paddleY){ ballDirectionX = -ballDirectionX; ballDirectionY = -ballDirectionY; } else if(ballX == paddleX + 2 && ballY == paddleY){ ballDirectionX = ballDirectionX; ballDirectionY = -ballDirectionY; } } // update the ball's position ballX += ballDirectionX; ballY += ballDirectionY; // erase the ball's previous position if (oldBallX != ballX || oldBallY != ballY) { matrix.drawPixel(oldBallX, oldBallY,matrix.Color(0,0,0)); } // draw the ball's current position matrix.drawPixel(ballX, ballY,matrix.Color(150,150,0)); oldBallX = ballX; oldBallY = ballY; } // this function checks the position of the ball // to see if it intersects with the paddle boolean inPaddle(int x, int y, int rectX, int rectY, int rectWidth, int rectHeight) { boolean result = false; if ((x >= rectX && x <= (rectX + rectWidth)) && (y >= rectY && y <= (rectY + rectHeight))) { result = true; } return result; }
Skematik