Kit Adapter USB MIDI untuk Arduino Micro / Leonardo – Daftar Lengkap Komponen
Komponen dan perlengkapan
Arduino Micro
Atau Arduino Leonardo
×
1
Opto coupler 6n137
×
1
1N4148 – Switching Cepat Umum
×
1
Kapasitor 100 nF
×
1
Resistor 220 ohm
×
3
Resistor 10k ohm
×
1
Resistor Through Hole, 470 ohm
×
1
LED (umum)
×
1
Holder LED
Sesuatu untuk memasang LED dalam kotak plastik
×
1
Konektor Audio / Video DIN, 5 Kontak
Plus bout dan dadu untuk memasang konektor
×
2
Kotak
Kotak plastik untuk menempatkan semua komponen
×
1
PCB
Sepotong PCB umum
×
1
Pemasang PCB
Sesuatu untuk memasang PCB Anda ke kotak, seperti standoff nylon
×
1
Aplikasi dan layanan online
Arduino IDE
Tentang proyek ini
Saya mencari di internet cara membuat adapter USB ke MIDI menggunakan Arduino, tetapi sayangnya saya hanya menemukan solusi yang kurang bagus (implementasi perangkat lunak atau perangkat keras MIDI yang buruk). Jadi saya memutuskan untuk membuat sendiri dan menempatkan hasilnya di sini di hackster.io.
Saya menggunakan Arduino Leonardo dengan papan roti untuk membuat prototipe pertama. Setelah semuanya berfungsi, saya membuat versi solder menggunakan Arduino Micro. Keduanya didasarkan pada ATmega32u4, yang memiliki USB asli sehingga dapat menyampaikan dirinya sebagai antarmuka USB MIDI ke PC yang Anda hubungkan.
MIDI menggunakan opto-kopler dan beberapa resistor untuk membuat loop arus yang terisolasi sepenuhnya. Rangkainya cukup standar, saya menggunakan 6n137 karena cepat dan tersedia luas. Seperti yang ditunjukkan oleh diagram rangkaian, hanya konektor MIDI OUT yang memiliki pin 2 yang terhubung ke ground, ini adalah standar untuk MIDI.
Beberapa foto hasil akhir:
Di sisi perangkat lunak, saya memutuskan untuk menggunakan perpustakaan Control Surface yang sangat baik. Tidak seperti beberapa perpustakaan lain atau implementasi yang dikodekan secara manual, Control Surface menangani semua aspek dari protokol MIDI yang cukup kompleks dengan benar.
Control Surface juga memungkinkan Anda menambahkan semua macam tambahan. Anda misalnya dapat menambahkan beberapa potensiometer, pedal atau tombol yang terhubung ke input analog / digital untuk menambahkan kontrol MIDI tambahan. Cukup lihat situs web Control Surface untuk informasi lebih lanjut, sangat mudah dilakukan!
Anda juga dapat mendaftarkan callback sehingga Anda dapat memproses data sebelum diteruskan dari MIDI ke USB atau sebaliknya. Dalam kasus saya, saya menggunakan ini untuk memperbaiki implementasi MIDI yang rusak pada sintetizer Roland D50 saya. D50 mengirim perintah "all notes off" setiap kali kunci terakhir dilepas. Implementasi modern, seperti sebagian besar instrumen VST yang saya gunakan, menginterpretasikan ini sebagai pemotongan keras segera dari semua nada yang berlangsung. Dengan memfilter "all notes off", D50 menjadi berguna lagi sebagai keyboard master.
Satu masalah yang saya temui dengan perpustakaan Control Surface adalah bahwa ia tidak menangani paket SysEx yang besar dengan baik. Ini menghasilkan kesalahan saat mencoba menggunakan editor/librarian D50, karena mengirim paket SysEx yang cukup besar. Saya menambahkan instruksi dalam komentar heading kode sumber tentang cara memperbaiki masalah ini. Orang yang menulis perpustakaan menunjukkan bahwa masalah ini akan diperbaiki ketika versi 2.x dirilis.
Saya menyertakan baik kode sumber untuk antarmuka MIDI ke USB dasar dan versi dengan filter "all notes off".
Anda juga dapat menggunakan perpustakaan lain atau menulis implementasi MIDI Anda sendiri tentu saja, perangkat keras harus bekerja dengan perpustakaan MIDI apa pun dengan dukungan USB MIDI dan Serial MIDI.
Tips pemecahan masalah: jika Anda tidak dapat membuat antarmuka ini berbicara dengan perangkat MIDI eksternal, maka mungkin Anda menukar pin 4 dan 5. Diagram pinout konektor kadang-kadang dapat membingungkan karena tidak selalu menunjukkan dengan jelas sisi mana dari konektor yang Anda lihat.
Saya berharap skematis dan kode sumber berguna bagi siapa pun di luar sana. Beri saya jempol kalian jika Anda menyukai proyek ini dan silakan tinggalkan komentar di bawah jika Anda memiliki pertanyaan.
Kode
Kode sumber untuk antarmuka MIDI ke USB dasar
Kode sumber untuk adapter MIDI ke USB dengan filter "all notes off"
Kode sumber untuk antarmuka MIDI ke USB dasarArduino
/* * USB MIDI adapter. * * --- * * To allow larger sysex packages, modify the Control Surface library as follows: * * In: * src\MIDI_Parsers\MIDI_MessageTypes.hpp * change: * uint8_t length; * to: * size_t length; * * In: * src/Settings/Settings.hpp * change: * constexpr size_t SYSEX_BUFFER_SIZE = 128; * to: * constexpr size_t SYSEX_BUFFER_SIZE = 320; * * This should be fixed when Control Surface 2.x will be released. * * --- * * To use a different USB device name, edit hardware/arduino/avr/boards.txt in your Arduino IDE install using admin privileges. * Change: * leonardo.build.usb_product="Arduino Leonardo" * to: * leonardo.build.usb_product="..." * change it back after uploading the project to your Arduino device. */ #include <Control_Surface.h> // Include the Control Surface library USBMIDI_Interface midiusb; // use this one instead to dump all MIDI data to the serial monitor // USBDebugMIDI_Interface midiusb; HardwareSerialMIDI_Interface midiser = {Serial1, MIDI_BAUD}; // Create a MIDI pipe factory to connect the MIDI interfaces to eachother and to the Control Surface MIDI_PipeFactory<5> pipes; // Example for adding extra controllers: // CCPotentiometer pot = { A0, MIDI_CC::Expression_Controller }; // pin to which the power LED is connected const int ledPin = 10; // setup code void setup() { Serial.begin(115200); // turn on the power LED pinMode(ledPin, OUTPUT); digitalWrite(ledPin, HIGH); // forward MIDI USB to MIDI serial midiusb >> pipes >> midiser; // forward MIDI serial to MIDI USB midiser >> pipes >> midiusb; // send control suface messages only to MIDI USB Control_Surface >> pipes >> midiusb; // connect both MIDI USB and serial to control surface midiser >> pipes >> Control_Surface; midiusb >> pipes >> Control_Surface; // initialize Control Surface _after_ connecting the interfaces Control_Surface.begin(); } // main processing loop void loop() { Control_Surface.loop(); }
Kode sumber untuk adapter MIDI ke USB dengan filter "all notes off"Arduino
/* * USB MIDI adapter with "all notes off" filter. * * --- * * To allow larger sysex packages, modify the Control Surface library as follows: * * In: * src\MIDI_Parsers\MIDI_MessageTypes.hpp * change: * uint8_t length; * to: * size_t length; * * In: * src/Settings/Settings.hpp * change: * constexpr size_t SYSEX_BUFFER_SIZE = 128; * to: * constexpr size_t SYSEX_BUFFER_SIZE = 320; * * This should be fixed when Control Surface 2.x will be released. * * --- * * To use a different USB device name, edit hardware/arduino/avr/boards.txt in your Arduino IDE install using admin privileges. * Change: * leonardo.build.usb_product="Arduino Leonardo" * to: * leonardo.build.usb_product="..." * change it back after uploading the project to your Arduino device. */ #include <Control_Surface.h> // Include the Control Surface library USBMIDI_Interface midiusb; // use this one instead to dump all MIDI data to the serial monitor // USBDebugMIDI_Interface midiusb; HardwareSerialMIDI_Interface midiser = {Serial1, MIDI_BAUD}; // Create a MIDI pipe factory to connect the MIDI interfaces to eachother and to the Control Surface MIDI_PipeFactory<4> pipes; // Example for adding extra controllers: // CCPotentiometer pot = { A0, MIDI_CC::Expression_Controller }; // pin to which the power LED is connected const int ledPin = 10; // Custom MIDI callback that prints incoming messages. struct MyMIDI_Callbacks : MIDI_Callbacks { // Callback for channel messages (notes, control change, pitch bend, etc.). void onChannelMessage(Parsing_MIDI_Interface &midi) override { ChannelMessage cm = midi.getChannelMessage(); if (cm.header == 0xb0 && cm.data1 == 0x7b) { // ignore "all notes off" messages return; } else if (cm.header == 0x90 && cm.data2 == 0x00) { // convert "note on" messages with velocity of 0 to "note off" messages cm.header = 0x80; } midiusb.send(cm); } // Callback for system exclusive messages void onSysExMessage(Parsing_MIDI_Interface &midi) override { SysExMessage se = midi.getSysExMessage(); // forward system exclusive messages without changes midiusb.send(se); } // Callback for real-time messages void onRealTimeMessage(Parsing_MIDI_Interface &midi) override { RealTimeMessage rt = midi.getRealTimeMessage(); // forward real-time messages without changes midiusb.send(rt); } } callbacks; // setup code void setup() { Serial.begin(115200); // turn on the power LED pinMode(ledPin, OUTPUT); digitalWrite(ledPin, HIGH); // forward MIDI USB to MIDI serial midiusb >> pipes >> midiser; // send control suface messages only to MIDI USB Control_Surface >> pipes >> midiusb; // connect both MIDI USB and serial to control surface midiser >> pipes >> Control_Surface; midiusb >> pipes >> Control_Surface; // initialize Control Surface _after_ connecting the interfaces Control_Surface.begin(); // set the callback methods midiser.setCallbacks(callbacks); } // main processing loop void loop() { Control_Surface.loop(); }
Skematik
Only the schematic tab is filled inusb_midi_interface_twiE32gvR3.fzz




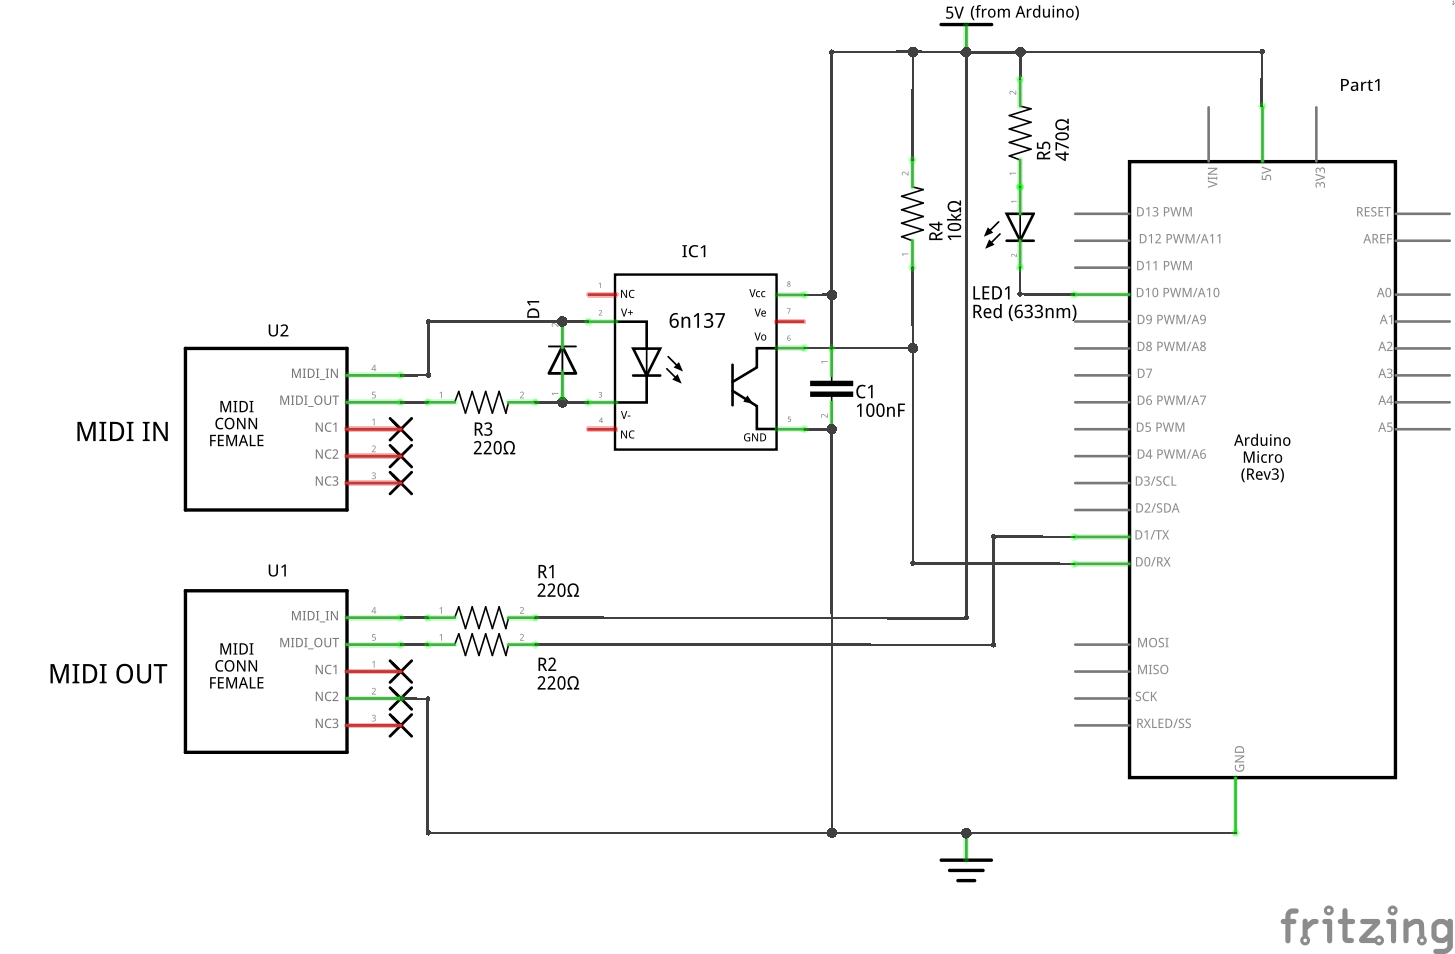 Only the schematic tab is filled inusb_midi_interface_twiE32gvR3.fzz