Rangka Kamera FPV Dual‑Axis DIY: Tutorial Joystick Berbasis Arduino
Komponen dan Perlengkapan
 | | × | 1 | |
| | × | 2 | |
Tentang Proyek Ini
Halo semuanya,
Kali ini kita akan melihat tutorial lengkap cara mengontrol rangka kamera FPV 2-sumbu dengan modul joystick, rangka kamera datang dalam paket kecil yang berisi dukungan akrilik dan potongan, beberapa sekrup dan dua motor servo.
Persyaratan: Jadi silakan sebelum melanjutkan, jika Anda tidak akrab dengan joystick, maupun motor servo, berikut adalah dua tutorial untuk Anda:
- Cara antarmuka sederhana modul Joystick dengan papan Arduino
- Gunakan motor servo dengan Arduino
Jadi di sini kita akan menggunakan dua metode untuk mengontrol servo: yang pertama di mana servo mengikuti posisi joystick dan bergerak saat kita memindahkan stick, yang kedua servo mulai bergerak ke arah di mana joystick menunjuk dan akan tinggal di sana sampai kita memindahkan stick lagi atau mengubah arah.
Ini adalah demo dari apa yang akan kita miliki di akhir:
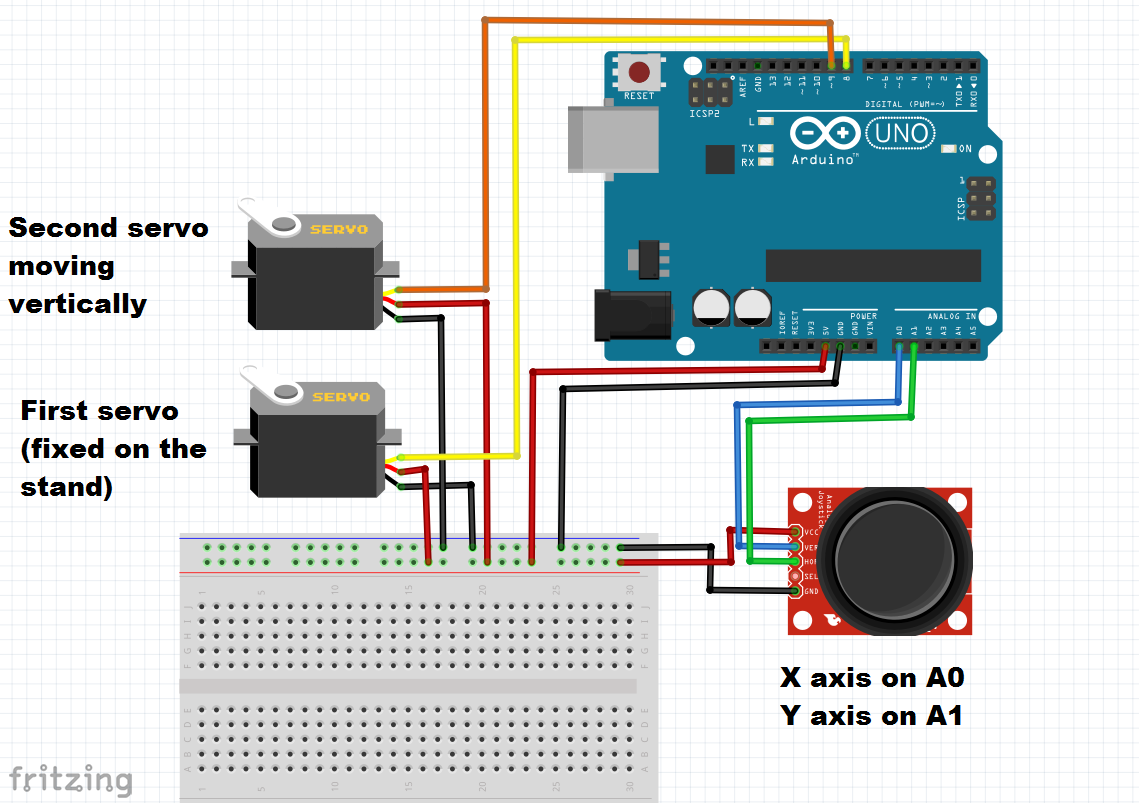
Dalam video tutorial saya per langkah demi langkah saat memasang kabel atau kalibrasi juga langkah demi langkah saat coding, tetapi di sini saya akan memberikan semua pemasangan kabel yang bukan masalah karena tidak ada modul atau servo yang mempengaruhi yang lain.
Untuk tidak bingung dengan axis joystick joystick saya memiliki (X axis di atas lalu Y axis) di sini dalam gambar mereka terbalik dan dinamakan berbeda tetapi saya biarkan pemasangan kabel seperti yang saya gunakan Anda dapat mengubahnya sesuai keinginan (pin servo, input joystick, arah …)
Jadi untuk tidak membingungkan Anda karena saya sebenarnya telah menggunakan banyak kode dalam video, tetapi mereka sangat dasar (penempatan servo, membaca nilai analog dari joystick…) Saya telah melakukan ini sebelum Anda dapat memeriksa tutorial lain saya, jadi di sini saya hanya mengunggah dua kode untuk dua versi akhir seperti yang terlihat dalam video.
Jika Anda membutuhkan sesuatu tentang ini Anda dapat menghubungi saya.
Kode
- Kode 1 seperti dalam video
- Kode 2 seperti dalam video
Kode 1 seperti dalam videoArduino
//This code is to use with dual axis fpv camera cradle that uses two servos, adding a joystick module //we control the position of the cradle by moving the analog stick, the cradle follows the joystick movements //Refer to surtrtech.com for more information #include <Servo.h> //Servos library and declaration Servo myservo1; Servo myservo2; int YAxis = 1; //Declaring where the X axis and Y axis of the joystick pins are wired int XAxis = 0; //Of course analog inputs void setup() { Serial.begin(9600); //Setting the Serial monitor baude rate and launching pinMode(XAxis, INPUT); //Declaring the pin modes and servo pins myservo1.attach(8); pinMode(YAxis, INPUT); myservo2.attach(9); } void loop() { int X=analogRead(XAxis); //Reading from the X axis potentiometer X=X*0.1756; //Converting the range of the potentiometer from 0-1023 to 0-180 limits of the servo you can change them if you have a 360° servos X=180-X;// This is used so the servo turn to exact position otherwise it will be inverted myservo1.write(X); //After adapting we inject that value to the first servo int Y=analogRead(YAxis);//Reading from the Y axis potentiometer Y=Y*0.1466; //Here we did conversion that suits the servo limits so we went from 0-1023 to 0-150 myservo2.write(Y);//And we inject to our servo }
Kode 2 seperti dalam videoArduino
//This code is to use with dual axis fpv camera cradle that uses two servos, adding a joystick module //We control the position of the cradle by moving the analog stick, the cradle move to the direction where the stick is pointing //until the limits and stay there //Refer to surtrtech.com for more information #include <Servo.h> //Servos library and declaration Servo myservo1; Servo myservo2; int a,b,X,Y; //Variables needed later int YAxis = 1; //Declaring where the X axis and Y axis of the joystick pins are wired int XAxis = 0; //Of course analog inputs void setup() { Serial.begin(9600); //Setting the Serial monitor baude rate and launching pinMode(XAxis, INPUT); //Declaring the pin modes and servo pins myservo1.attach(8); pinMode(YAxis, INPUT); myservo2.attach(9); } void loop() { a=myservo1.read(); //Reading the previous servos positions is an important step so we can know where they should position next b=myservo2.read(); X=analogRead(XAxis);//Reading the joystick values Y=analogRead(YAxis); if(X>550){ //Here we didn't do any calibration so the joystick has three positions (Left|Resting|Right) a=a-1; //it depends on the value we read we can know in which direction the stick is pointing and I left the resting position big actually it's just 1 value myservo1.write(a); //we inject the new value delay(50); //You can make the delay big or short or act on a=a-x to make big steps or short steps } if(X<450){ a=a+1; //Here we did the opposit operation to move to the opposit direction myservo1.write(a); delay(50); } if(Y>600){ //Here we didn't do any calibration so the joystick has three positions (Up|Resting|Down) ditto b=b+1; myservo2.write(b); delay(50); } if(Y<450){ b=b-1; myservo2.write(b); delay(50); }
Skematik
Ada servo atas dan servo bawah jangan salah paham