Membangun Game Memori Arduino (Kloning Simon) – Tutorial Langkah demi Langkah
Komponen dan Perlengkapan
Berikut komponen yang dibutuhkan untuk membuat game memori Arduino ini:
Arduino UNO
1
Resistor 330 ohm SparkFun
1
Resistor 10k ohm SparkFun
1
LED Beragam SparkFun
1
Mini Speaker SparkFun
1
BreadBoard Ukuran Penuh SparkFun
1
Kabel Jumper (generik)
1
Aplikasi dan Layanan Online
Arduino IDE
Tentang Proyek
Apakah Anda ingat permainan "Simon"? Banyak orang dalam usia saya (lahir pada tahun 70-an) kehilangan banyak waktu bermainnya. Permainan itu sederhana, memiliki 4 tombol dengan warna berbeda yang akan menyala dalam urutan dan Anda harus mengulang urutannya. Setiap kali Anda benar, permainan akan memberikan urutan lagi dengan warna tambahan di akhir.
Saya mendapatkannya untuk Natal lama sekali namun kemudian saya pindah dan pindah, dan pindah lagi sehingga permainan hilang di salah satu banyak kotak yang tidak pernah dibuka dari satu pindahan ke pindahan lainnya...
Sebagai "dewasa", saya menemukan kegembiraan Arduino dan dengan itu, mendapat kesempatan untuk menghidupkan kembali teman membuang waktu lama saya yang hilang.
Tutorial ini akan menunjukkan kepada Anda cara membuat permainan serupa menggunakan Arduino Uno, beberapa LED dan resistor serta rangkaian yang relatif sederhana.
Program itu sendiri mungkin sedikit rumit untuk pemula jadi saya mencoba menjelaskan dalam kode apa yang dilakukan dan bagaimana.
Cara termudah untuk menjalankan permainan ini adalah sebagai berikut.
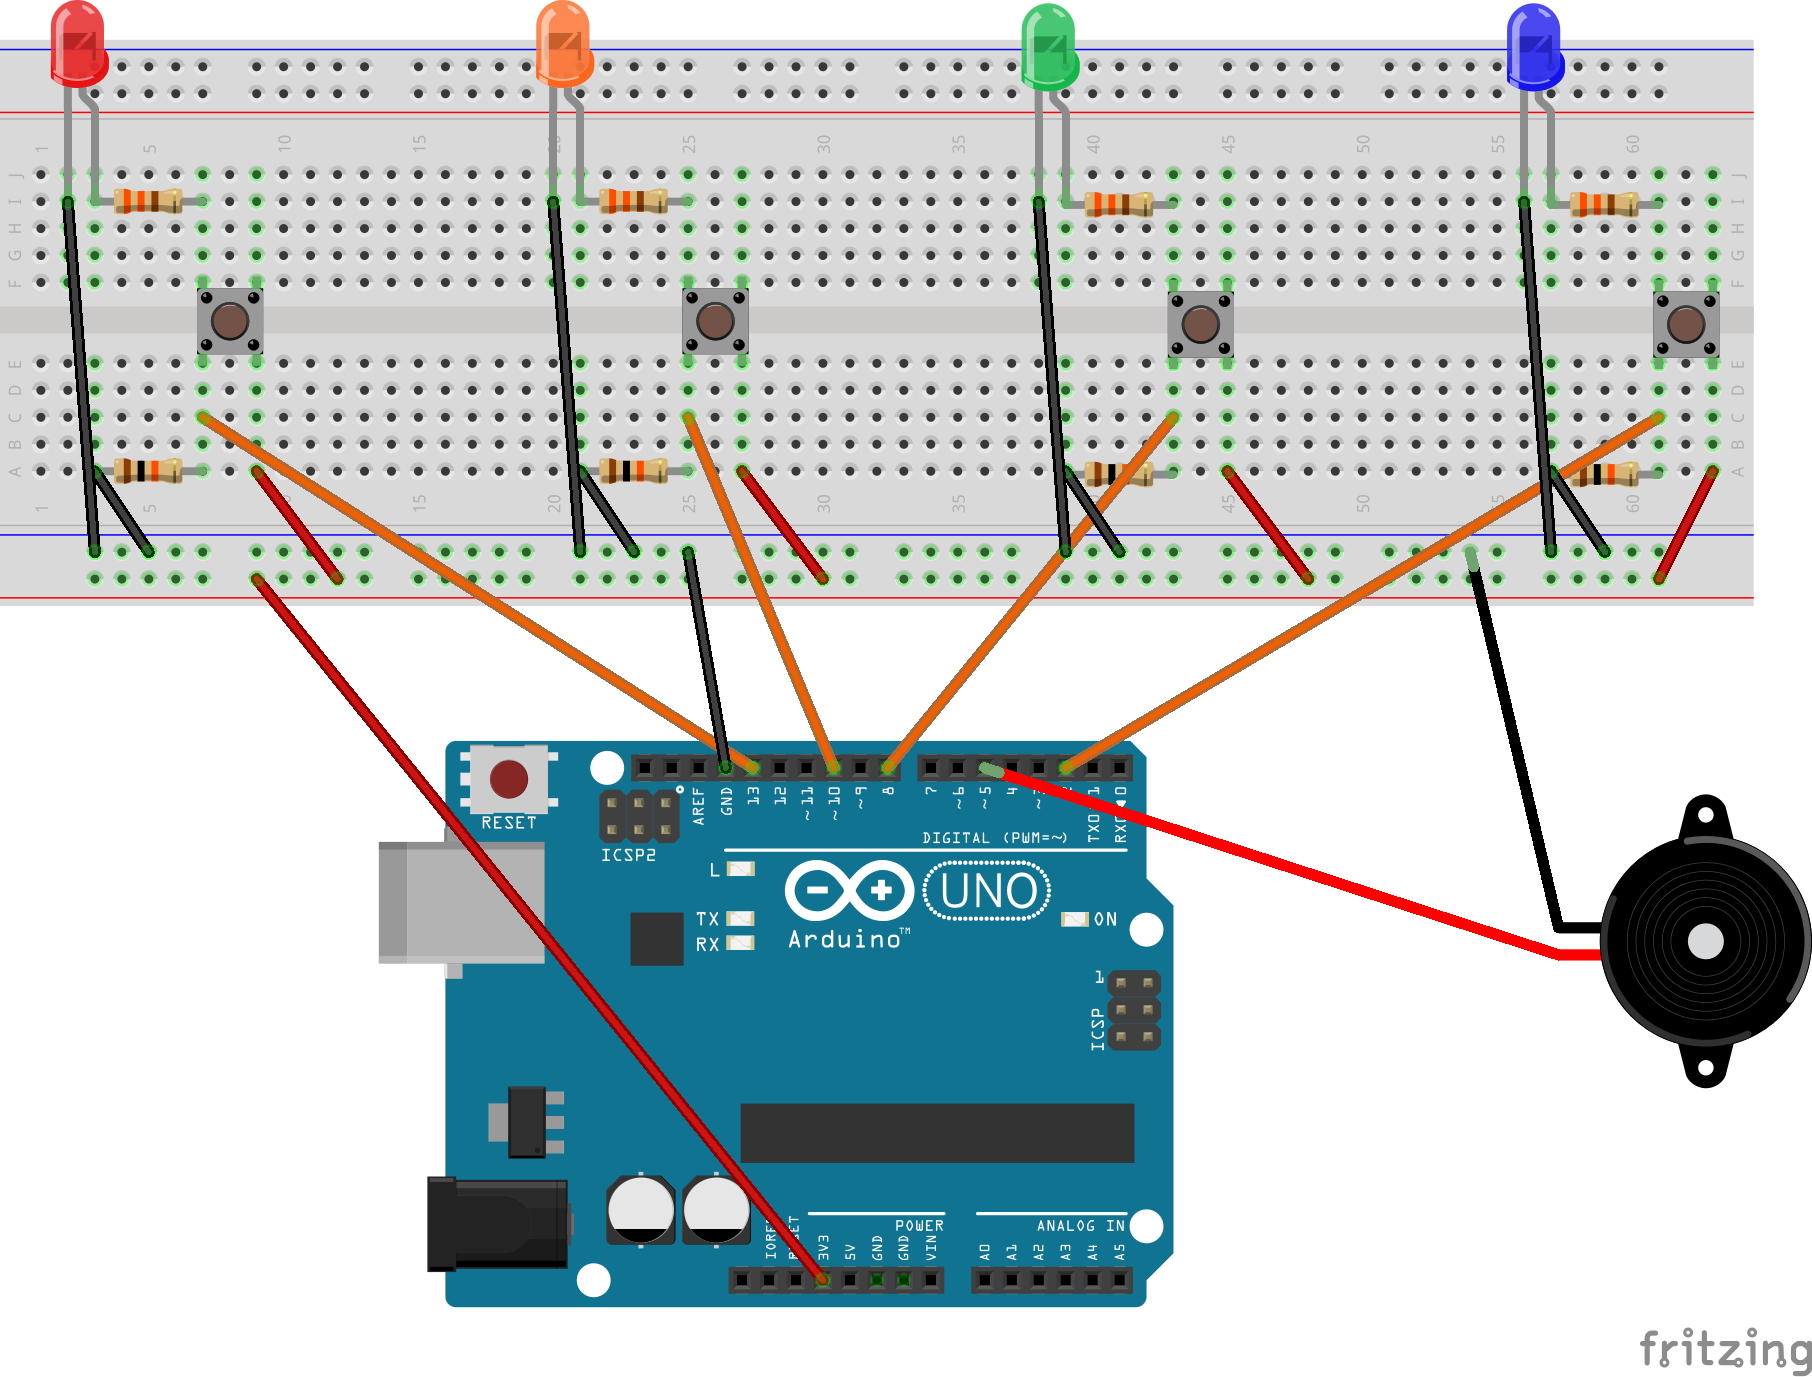
1) Hubungkan rangkaian persis seperti yang ditunjukkan pada diagram. Warna kabel tidak relevan jadi jika Anda kehabisan kabel hitam, tidak apa-apa. :)
2) Tempelkan kode sumber ke editor Arduino favorit Anda dan unggah ke papan
3) Mainkan permainan
Permainan dimulai setelah sekitar 3 detik dengan 5 kilatan lambat semua LED.
Jika satu atau lebih LED tidak berkedap, periksa kabelnya. Pada papan saya, tombol yang sangat kecil tidak selalu duduk dengan baik dan cenderung terlepas sendiri.
Jika kabelnya terlihat benar, coba balikkan LED yang berfungsi dengan yang tidak berfungsi untuk melihat apakah itu kabel atau LED itu sendiri.
Setelah 5 kilatan selesai, satu LED akan menyala. Saya tidak bisa memberi tahu Anda mana, itu kejutan :) Tekan tombol untuk LED tersebut. LED tersebut akan menyala lagi diikuti oleh yang baru. Tekan tombol yang benar dalam urutan... Anda tahu ke arah mana saya pergi...
Kemudian, cukup lama, Anda akan melihat semuanya berkedap dengan cepat. Artinya Anda kalah. :D
Urutan terakhir yang Anda berikan akan diputar sehingga Anda dapat menghitung poin Anda diikuti oleh 5 kilatan lambat sebelumnya yang menunjukkan permainan dimulai lagi.
Anda memiliki 2 detik untuk menekan setiap tombol.
Itu saja! Enjoy!
Ingin membuatnya sedikit lebih sulit? Mengapa tidak mengubah baris pertama dalam kode ke nilai yang berbeda?
#define PLAYER_WAIT_TIME 2000
Atau Anda dapat menambahkan LED lain, jika Anda punya... Untuk ini, Anda pertama perlu mereproduksi bagian rangkaian ini:
Kabel oranye di sini akan pergi ke pin yang tidak digunakan pada Arduino Anda (Hindari 0 dan 1 meskipun)
Lalu ubah baris berikut dalam kode:
byte noPins = 4 byte pins[] = {2, 13, 10, 8};
jika Anda menambahkan satu LED pada pin 6, kode akan menjadi
Letakkan jeda singkat sebagai pernyataan pertama dari fungsi setup() Anda. Sangat mudah untuk membuat Arduino masuk ke loop tak terbatas atau menguncinya dengan cara apa pun. Jika itu terjadi jeda pendek ini memungkinkan Anda mereset Arduino dan mengunggah sketsa kosong sebelum mengunci lagi. .
Akhirnya saya mengambil ide kecil ini dan membuatnya portabel...
Jika Anda ingin melihat ide yang sangat keren untuk permainan serupa (namun jauh lebih canggih). Cek ini https://www.instructables.com/id/Lego-Mini-Memory-Game oleh Peter Kent. Dia membuat permainan di ponsel dengan antarmuka ke mobil Lego. Ini sangat luar biasa!
Kode
Kode Game Memori
Kode Game MemoriArduino
Ini adalah seluruh kode untuk permainan. Cukup salin dan tempelkan di IDE favorit Anda dan unggah ke Arduino.
#define PLAYER_WAIT_TIME 2000 // The time allowed between button presses - 2s byte sequence[100]; // Storage for the light sequence byte curLen = 0; // Current length of the sequence byte inputCount = 0; // The number of times that the player has pressed a (correct) button in a given turn byte lastInput = 0; // Last input from the player byte expRd = 0; // The LED that's suppose to be lit by the player bool btnDwn = false; // Used to check if a button is pressed bool wait = false; // Is the program waiting for the user to press a button bool resetFlag = false; // Used to indicate to the program that once the player lost byte soundPin = 5; // Speaker output byte noPins = 4; // Number of buttons/LEDs (While working on this, I was using only 2 LEDs) // You could make the game harder by adding an additional LED/button/resistors combination. byte pins[] = {2, 13, 10, 8}; // Button input pins and LED ouput pins - change these vaules if you wwant to connect yourbuttons to other pins // The number of elements must match noPins below long inputTime = 0; // Timer variable for the delay between user inputs void setup() { delay(3000); // This is to give me time to breathe after connection the arduino - can be removed if you want Serial.begin(9600); // Start Serial monitor. This can be removed too as long as you remove all references to Serial below Reset(); } /// /// Sets all the pins as either INPUT or OUTPUT based on the value of 'dir' /// void setPinDirection(byte dir){ for(byte i = 0; i < noPins; i++){ pinMode(pins[i], dir); } } //send the same value to all the LED pins void writeAllPins(byte val){ for(byte i = 0; i < noPins; i++){ digitalWrite(pins[i], val); } } //Makes a (very annoying :) beep sound void beep(byte freq){ analogWrite(soundPin, 2); delay(freq); analogWrite(soundPin, 0); delay(freq); } /// /// Flashes all the LEDs together /// freq is the blink speed - small number -> fast | big number -> slow /// void flash(short freq){ setPinDirection(OUTPUT); /// We're activating the LEDS now for(int i = 0; i < 5; i++){ writeAllPins(HIGH); beep(50); delay(freq); writeAllPins(LOW); delay(freq); } } /// ///This function resets all the game variables to their default values /// void Reset(){ flash(500); curLen = 0; inputCount = 0; lastInput = 0; expRd = 0; btnDwn = false; wait = false; resetFlag = false; } /// /// User lost /// void Lose(){ flash(50); } /// /// The arduino shows the user what must be memorized /// Also called after losing to show you what you last sequence was /// void playSequence(){ //Loop through the stored sequence and light the appropriate LEDs in turn for(int i = 0; i < curLen; i++){ Serial.print("Seq: "); Serial.print(i); Serial.print("Pin: "); Serial.println(sequence[i]); digitalWrite(sequence[i], HIGH); delay(500); digitalWrite(sequence[i], LOW); delay(250); } } /// /// The events that occur upon a loss /// void DoLoseProcess(){ Lose(); // Flash all the LEDS quickly (see Lose function) delay(1000); playSequence(); // Shows the user the last sequence - So you can count remember your best score - Mine's 22 by the way :) delay(1000); Reset(); // Reset everything for a new game } /// /// Where the magic happens /// void loop() { if(!wait){ //****************// // Arduino's turn // //****************// setPinDirection(OUTPUT); // We're using the LEDs randomSeed(analogRead(A0)); // https://www.arduino.cc/en/Reference/RandomSeed sequence[curLen] = pins[random(0,noPins)]; // Put a new random value in the next position in the sequence - https://www.arduino.cc/en/Reference/random curLen++; // Set the new Current length of the sequence playSequence(); // Show the sequence to the player beep(50); // Make a beep for the player to be aware wait = true; // Set Wait to true as it's now going to be the turn of the player inputTime = millis(); // Store the time to measure the player's response time }else{ //***************// // Player's turn // //***************// setPinDirection(INPUT); // We're using the buttons if(millis() - inputTime > PLAYER_WAIT_TIME){ // If the player takes more than the allowed time, DoLoseProcess(); // All is lost :( return; } if(!btnDwn){ // expRd = sequence[inputCount]; // Find the value we expect from the player Serial.print("Expected: "); // Serial Monitor Output - Should be removed if you removed the Serial.begin above Serial.println(expRd); // Serial Monitor Output - Should be removed if you removed the Serial.begin above for(int i = 0; i < noPins; i++){ // Loop through the all the pins if(pins[i]==expRd) continue; // Ignore the correct pin if(digitalRead(pins[i]) == HIGH){ // Is the buttong pressed lastInput = pins[i]; resetFlag = true; // Set the resetFlag - this means you lost btnDwn = true; // This will prevent the program from doing the same thing over and over again Serial.print("Read: "); // Serial Monitor Output - Should be removed if you removed the Serial.begin above Serial.println(lastInput); // Serial Monitor Output - Should be removed if you removed the Serial.begin above } } } if(digitalRead(expRd) == 1 && !btnDwn) // The player pressed the right button { inputTime = millis(); // lastInput = expRd; inputCount++; // The user pressed a (correct) button again btnDwn = true; // This will prevent the program from doing the same thing over and over again Serial.print("Read: "); // Serial Monitor Output - Should be removed if you removed the Serial.begin above Serial.println(lastInput); // Serial Monitor Output - Should be removed if you removed the Serial.begin above }else{ if(btnDwn && digitalRead(lastInput) == LOW){ // Check if the player released the button btnDwn = false; delay(20); if(resetFlag){ // If this was set to true up above, you lost DoLoseProcess(); // So we do the losing sequence of events } else{ if(inputCount == curLen){ // Has the player finished repeating the sequence wait = false; // If so, this will make the next turn the program's turn inputCount = 0; // Reset the number of times that the player has pressed a button delay(1500); } } } } } }