Bangun Permainan Operasi Animatronic Minifigure Lego Raksasa dengan Arduino
Komponen dan perlengkapan
Arduino UNO × 2
Adafruit Arduino MP3 Shield × 1
MG90S Gear Micro Servo × 6
Speaker: 3W, 4 ohm × 2
OpenBuilds Ball Bearing – 688Z 8x16x5 × 12
Alat dan mesin yang diperlukan
Printer FDM Lulzbot Taz 5
X-Carve CNC
Tentang proyek ini
Proyek ini telah diselesaikan dalam 4 tahap. Saya akan segera membahas 3 tahap pertama (yang tidak mengandung elektronika) dan merinci tahap ke-4 yang mengubah Frank menjadi permainan operasi dan menambahkan audio serta animatronic.
Tahap 1: Membangun Megafigs
Saya memulai dengan membangun tangan. Saya pikir ini akan menjadi bagian ter sulit dari pembangunan awal dan menentukan skala untuk bagian lain yang perlu diproduksi. Tangan diproduksi dari pipa PVC dan resin serat kaca untuk mengisi celah di antara tangan dalam dan luar.
Pembuatan kepala adalah berikutnya. Terbuat dari pipa PVC (racikan pipa besar untuk bagian utama kepala), MDF, dan resin untuk mengisi celah di atas buncit.
Tubuh megafigs terbuat dari MDF dan pembuatan kotak yang cukup sederhana. Racikan pipa PVC digunakan sebagai persimpangan di antara appendages dan torso.
Kaki terbuat dari MDF dan PVC untuk menentukan kurva kaki atas.
Lengan (yang akhirnya menjadi bagian ter sulit) dirakit kasar dengan pipa PVC untuk lengan bawah, dan MDF untuk lengan atas. Busa bunga digunakan sebagai pengisi ruang. Bondo digunakan untuk membuat bentuk lengan atas, dan banyak penggosokan serta pengisian membawa pada bentuk akhir.
Lengan dan tangan dicetak cetakan dan dicor dengan Smoothcast 300.
Semua dicat berdasarkan kit Lego Monster Hunters.
Fase 2: Rambut
Fase ini terdiri dari pembuatan rambut Ilmuwan. Busa perkakas dipotong menggunakan gergaji pita ke dalam bentuk dasar kerucut rambut. Berbagai bagian potongan rambut diperekat bersama dengan epoksi.
Seluruh potongan rambut dilapisi dengan Smoothcast 300 untuk membuat cangkang plastik di atas busa. Kemudian digosok dan diisi.
Epoxy sculpt digunakan untuk mengisi semua kerucut di antara bagian rambut.
Diprim dan dicat.
Fase 3: Tempat Tidur Frank
Fase ketiga adalah pembuatan tempat tidur Frank berdasarkan kit Lego Crazy Scientist dan Monster-nya. Ini adalah pembuatan kotak sederhana terbuat dari MDF dan pipa PVC untuk buncit.
Detail sudut dibuat dengan pipa PVC yang mencangkak cakram MDF.
Semua digosok, diprim, dan dicat.
Fase 4: Permainan Operasi dan Gerakan
Bagian akhir dari proyek ini (hingga saat ini) adalah mengubah Frank menjadi permainan operasi dan menambahkan audio serta gerakan pada Megafigs. Saya akan merinci setiap bagian tubuh dari pembangunan alih-alih menurut urutan kronologis bagaimana hal-hal terjadi (semua sedang dikerjakan pada saat yang bersamaan).
Torso:
Torso memiliki bracket cetak 3D yang ditambahkan pada persimpangan yang menahan 2 bearing sepatu roda. Ini bertindak sebagai titik poros untuk lengan dan kepala.
Badan atas Frank memiliki 2 mangkuk permen yang dicetak 3D, di atasnya bibir aluminium yang di frais, dan dilapisi dengan plat torso baru. Bibir aluminium bertindak sebagai sakutu untuk permainan operasi. Ketika tengguk (yang terhubung ke MP3 shield) menyentuh aluminium, itu melengkapi rangkaian, mengaktifkan program.
Kepala:
Kedua kepala dimodifikasi untuk bergerak dan menahan speaker. Pertama, bracket cetak 3D ditambahkan pada leher untuk menahan baut 5/16 inci yang bertindak sebagai poros.
Logam berlubang digunakan sebagai panduan untuk memetakan lubang untuk grille speaker. Saya sangat cemas tentang proses ini. Kesalahan apapun akan merusak pekerjaan cat pada wajah. Lubang dicat untuk cocok dengan warna di sekitarnya.
Bracket cetak 3D dibuat untuk menahan speaker di balik grille speaker.
Kaki:
Kaki baru dicetak 3D dalam dua bagian serta mangkuk permen berbentuk tulang. Plat aluminium di frais seperti torso. Kaki dilekatkan bersama, digosok, dihaluskan dengan bondo dan dicat.
Lengan:
Master asli untuk lengan dimodifikasi untuk menerima bracket cetak 3D yang menahan baut 5/16 inci untuk poros. Kemudian dicetak ulang, dicor, dibersihkan dan dicat.
Servo:
Servo dipasang menggunakan bracket cetak 3D dan terhubung ke appendages melalui kawat dan coreng aluminium yang melekat pada baut 5/16 inci. Pegas ditambahkan nanti untuk membantu pengangkatan lengan.
Elektronika:
Semua elektronika dipasang pada potongan MDF untuk membuat tempat uji prototipe. Pengaturan ini memungkinkan saya dan Daniel untuk memahami pemrograman, menyesuaikan hal-hal, dan mengatasi gangguan. Semua berfungsi dengan baik.
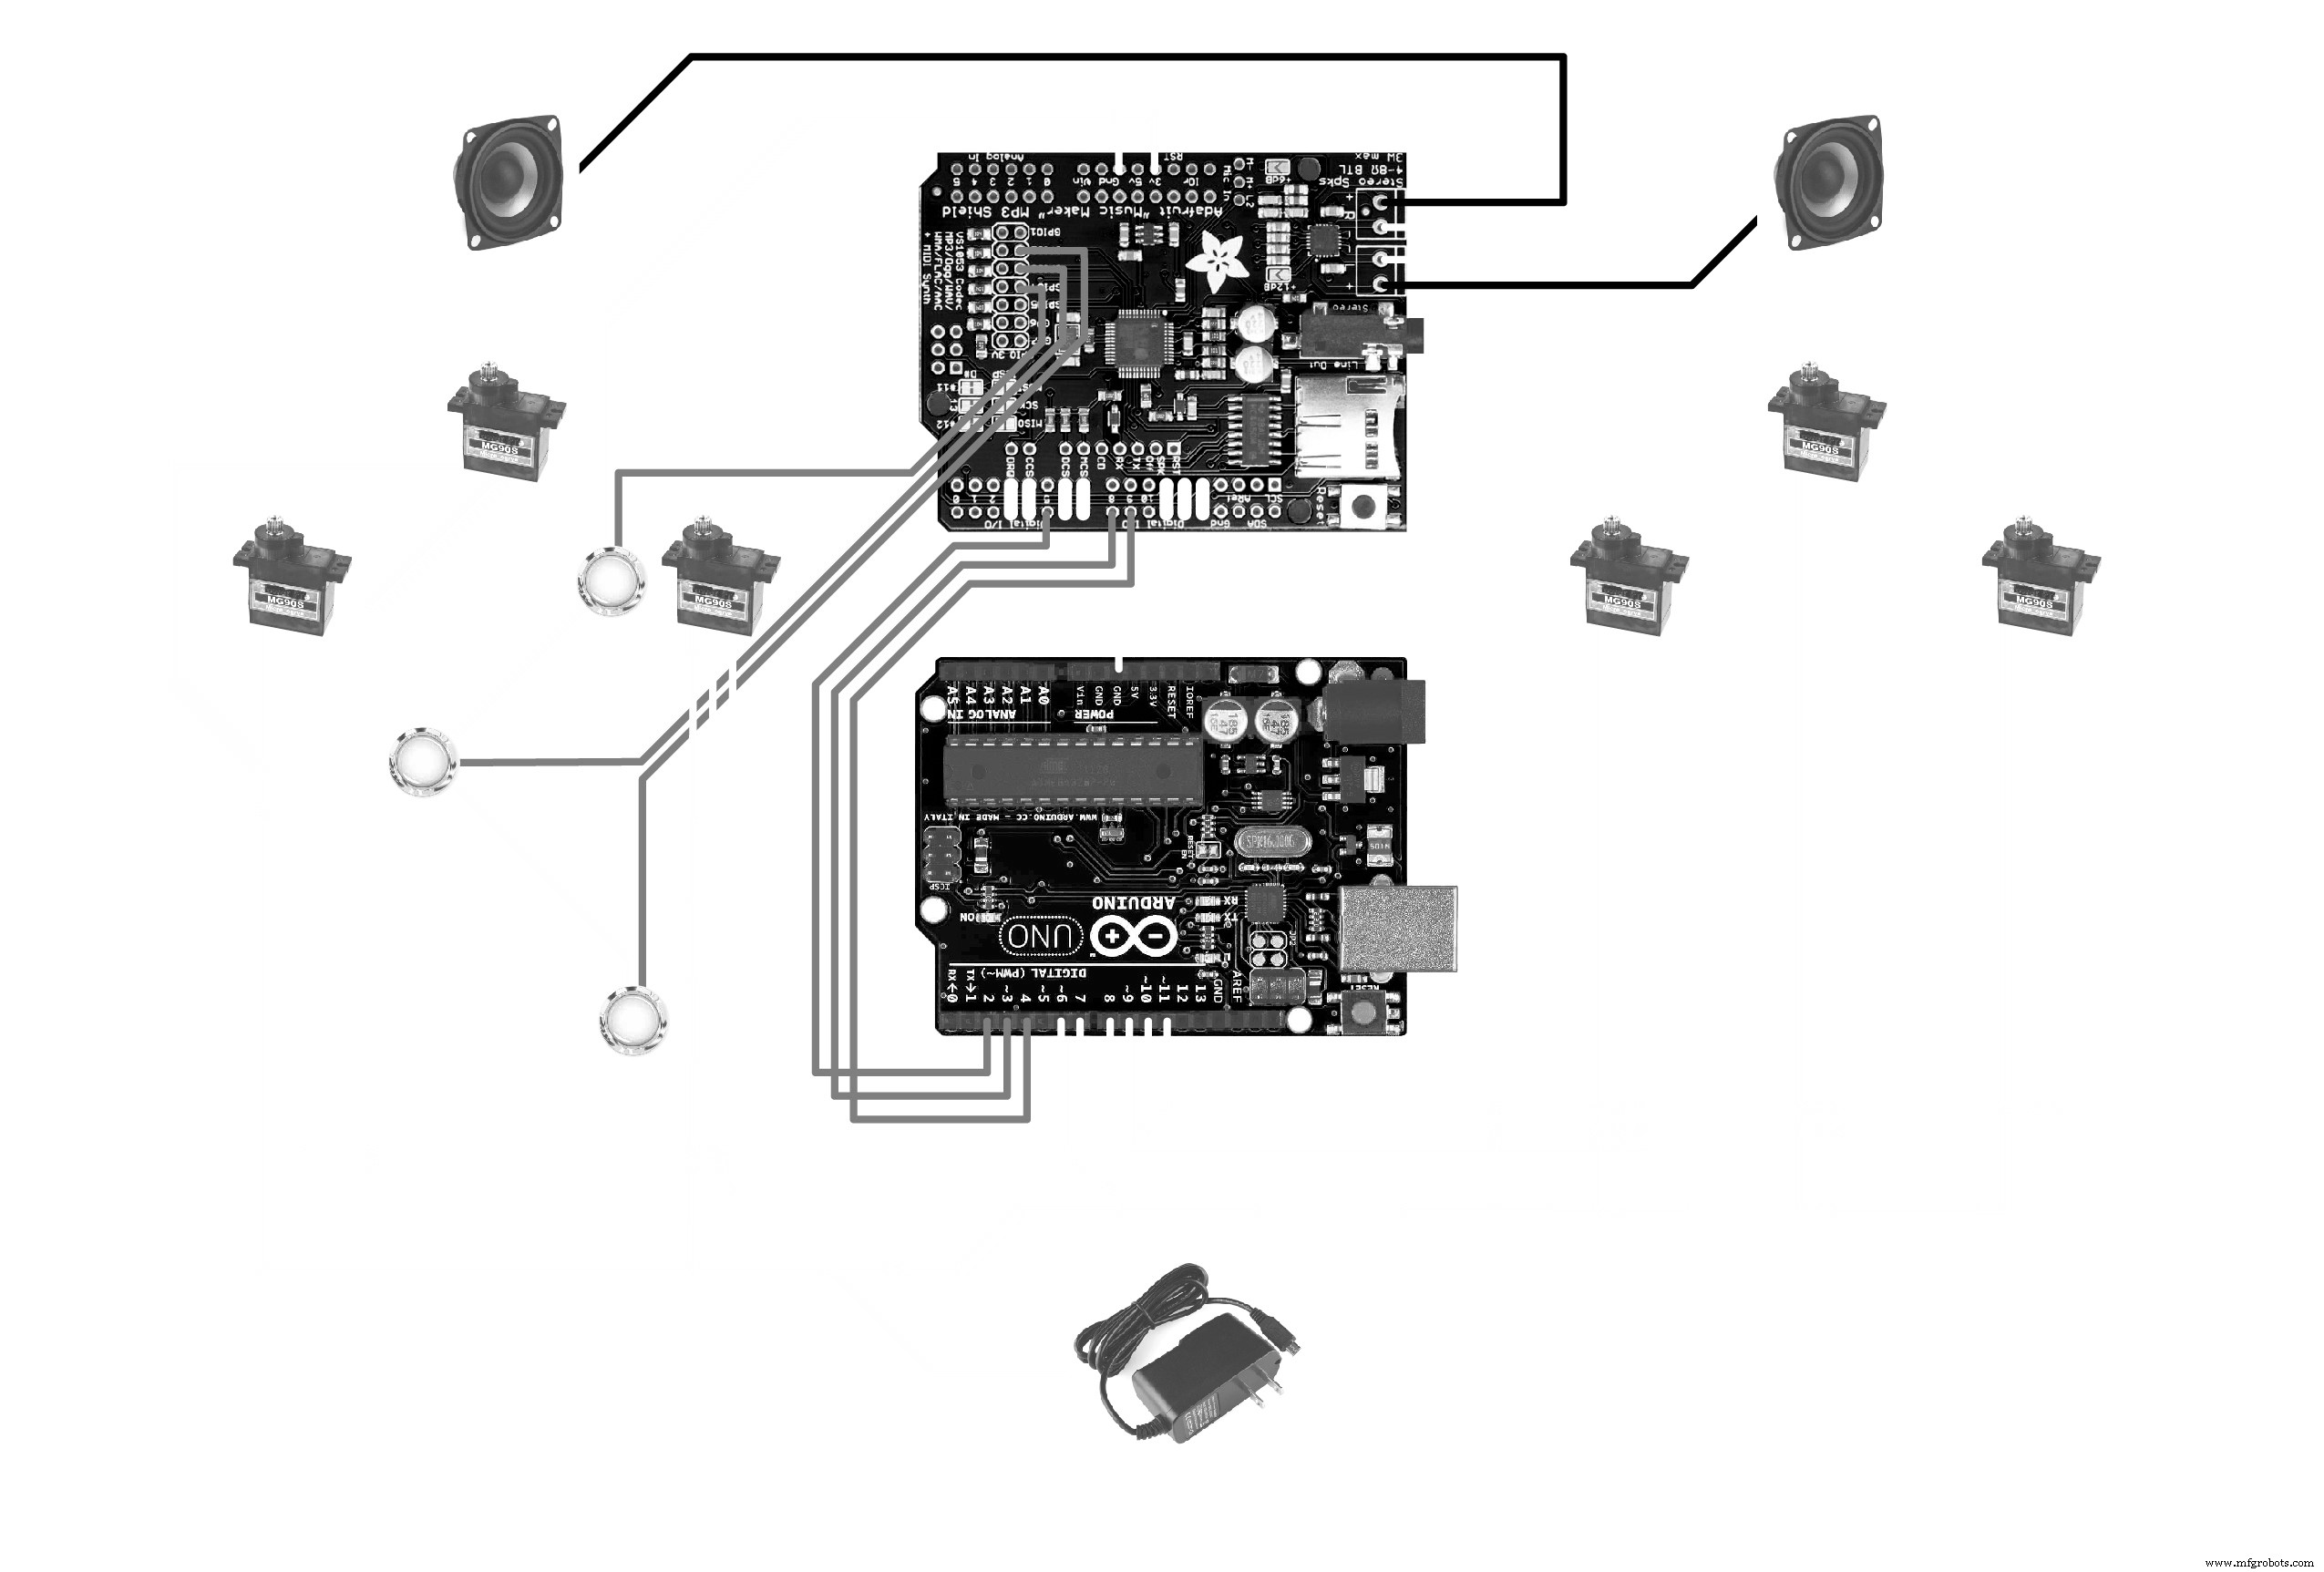
Cara elektronika bekerja adalah
1: MP3 shield menunggu 1 dari 3 input (tengguk ke salah satu plat aluminium)
2: Ketika plat aluminium diaktifkan, MP3 shield memutar file MP3 yang sesuai dan mengirim sinyal ke servo Arduino.
3: Ketika servo Arduino menerima sinyal dari MP3 shield, ini menjalankan kode yang sesuai untuk servo.
Kedua Arduino dipasang di bawah tempat tidur Frank, dan semuilah diulangi kabel.
Siap untuk Trick or Treaters:
Semua berfungsi fantastis dan tahan terhadap malam penuh penyalahgunaan.
Untuk log pembangunan yang lebih rinci, kunjungi ... https://www.therpf.com/showthread.php?t=195101. Di sana saya merinci setiap langkah saat saya memproduksinya.
Kode
Servos
Sound Effects
ServosArduino
Kode ini dimuat ke Arduino uno yang mengontrol semua 6 motor servo. Pada dasarnya menunggu untuk menerima salah satu dari 3 sinyal dari MP3 shield. Ketika sinyal diterima, servo Arduino Uno menjalankan gerakan servo yang sesuai.
/**************************** Targus - Operation - Servos *****************************/ /****** Notes *******/ // Digital Pins 0 and 1 are normally used for serial commucation when uploading and monitoring an Arduino from a computer. // Digital Pins 0 and 1 can be used for servos if the Arduino is not connected to a computer. // If Digital Pins 0 and 1 are being used for servos, comment out any lines beginning with 'Serial.' in this file. // Make sure this Arduino is powered on before the other Arduino since this Arduino will be receiving 5V signals. // Make sure a GND wire on this Arduino is connected to GND on the other Arduino. /********* Includes **********/ #include <Servo.h> /********** Variables ***********/ Servo servo5; Servo servo6; Servo servo7; Servo servo8; Servo servo9; Servo servo10; Servo servo11; int pin2 = 2; int pin3 = 3; int pin4 = 4; /************** Arduino Setup ***************/ void setup() { Serial.begin(9600); // enable serial communication for development and troubleshooting Serial.println("Targus - Operation - Servos\n"); /***************************************** Connect Servos and set initial positions ******************************************/ servo5.attach(5); // digital pin 5 servo5.write(90); // move to 90 degrees servo6.attach(6); // digital pin 6 servo6.write(90); servo7.attach(7); // digital pin 7 servo7.write(90); servo8.attach(8); // digital pin 8 servo8.write(90); servo9.attach(9); // digital pin 9 servo9.write(80); servo10.attach(10); // digital pin 10 servo10.write(90); servo11.attach(11); // digital pin 11 servo11.write(80); /************************* Setup Digital Input Pins **************************/ // Setup input pins so the Arduino with sound effects can tell us when to activate servos. pinMode(pin2, INPUT_PULLUP); pinMode(pin3, INPUT_PULLUP); pinMode(pin4, INPUT_PULLUP); } /************* Arduino Loop **************/ void loop() { if (digitalRead(pin2) == HIGH) { zap2(); } else if (digitalRead(pin3) == HIGH) { zap3(); } else if (digitalRead(pin4) == HIGH) { zap4(); } delay(300); } /********** Functions ***********/ int moveServo(Servo &servo, int degreeStart, int degreeEnd, unsigned long timeEnd, unsigned long timeStart, float (*easing)(float), unsigned long timeNow) { // this function will return a number 1 if there is still work to be done timeEnd += timeStart; // add any delay to the end time if (timeNow < timeStart) { // servo movement delayed, nothing to do yet so return early return 1; } if (timeNow > timeEnd) { // servo movement phase done, nothing to do return 0; } // if we get this far, prepare to move a servo float percentToMove = float(timeNow - timeStart) / float(timeEnd - timeStart); percentToMove = easing(percentToMove); // map degree ranges 0-180 to microsecond range 500-2400 for a SG-92R https://www.servodatabase.com/servo/towerpro/sg92r degreeStart = map(degreeStart, 0, 180, 500, 2400); degreeEnd = map(degreeEnd, 0, 180, 500, 2400); float servoTo = 0; if (degreeEnd > degreeStart) { // rotate anti-clockwise servoTo = ((degreeEnd - degreeStart) * percentToMove) + degreeStart; } else { // rotate clockwise percentToMove = 1 - percentToMove; // inverse percent so values like 0.8 become 0.2 servoTo = ((degreeStart - degreeEnd) * percentToMove) + degreeEnd; } servo.writeMicroseconds(servoTo); // Serial.print("Would map to: "); Serial.println(servoTo); // Serial.print("degreeStart: "); Serial.println(degreeStart); // Serial.print("degreeEnd: "); Serial.println(degreeEnd); // Serial.print("timeEnd: "); Serial.println(timeEnd); // Serial.print("timeStart: "); Serial.println(timeStart); // Serial.print("timeNow: "); Serial.println(timeNow); // Serial.print("percentToMove: "); Serial.println(percentToMove); // Serial.print("servoTo: "); Serial.println(servoTo); // Serial.print("\n"); return 1; } /****************** Functions: Easing *******************/ // Easing functions from https://github.com/warrenm/AHEasing/blob/master/AHEasing/easing.c renamed to match https://easings.net/ for easy previewing. float easeInBack(float pos) { // Modeled after the overshooting cubic y = x^3-x*sin(x*pi) return pos * pos * pos - pos * sin(pos * M_PI); } float easeOutBack(float pos) { // Modeled after overshooting cubic y = 1-((1-x)^3-(1-x)*sin((1-x)*pi)) float f = (1 - pos); return 1 - (f * f * f - f * sin(f * M_PI)); } float easeInOutBack(float pos) { // Modeled after the piecewise overshooting cubic function: // y = (1/2)*((2x)^3-(2x)*sin(2*x*pi)) ; [0, 0.5) // y = (1/2)*(1-((1-x)^3-(1-x)*sin((1-x)*pi))+1) ; [0.5, 1] if (pos < 0.5) { float f = 2 * pos; return 0.5 * (f * f * f - f * sin(f * M_PI)); } else { float f = (1 - (2 * pos - 1)); return 0.5 * (1 - (f * f * f - f * sin(f * M_PI))) + 0.5; } } float easeInBounce(float pos) { return 1 - easeOutBounce(1 - pos); } float easeOutBounce(float pos) { if (pos < 4 / 11.0) { return (121 * pos * pos) / 16.0; } else if (pos < 8 / 11.0) { return (363 / 40.0 * pos * pos) - (99 / 10.0 * pos) + 17 / 5.0; } else if (pos < 9 / 10.0) { return (4356 / 361.0 * pos * pos) - (35442 / 1805.0 * pos) + 16061 / 1805.0; } else { return (54 / 5.0 * pos * pos) - (513 / 25.0 * pos) + 268 / 25.0; } } float easeInOutBounce(float pos) { if (pos < 0.5) { return 0.5 * easeInBounce(pos * 2); } else { return 0.5 * easeOutBounce(pos * 2 - 1) + 0.5; } } float easeInCirc(float pos) { // Modeled after shifted quadrant IV of unit circle return 1 - sqrt(1 - (pos * pos)); } float easeOutCirc(float pos) { // Modeled after shifted quadrant II of unit circle return sqrt((2 - pos) * pos); } float easeInOutCirc(float pos) { // Modeled after the piecewise circular function // y = (1/2)(1 - sqrt(1 - 4x^2)) ; [0, 0.5) // y = (1/2)(sqrt(-(2x - 3)*(2x - 1)) + 1) ; [0.5, 1] if (pos < 0.5) { return 0.5 * (1 - sqrt(1 - 4 * (pos * pos))); } else { return 0.5 * (sqrt(-((2 * pos) - 3) * ((2 * pos) - 1)) + 1); } } float easeInCubic(float pos) { // Modeled after the cubic y = x^3 return pos * pos * pos; } float easeOutCubic(float pos) { // Modeled after the cubic y = (x - 1)^3 + 1 float f = (pos - 1); return f * f * f + 1; } float easeInOutCubic(float pos) { // Modeled after the piecewise cubic // y = (1/2)((2x)^3) ; [0, 0.5) // y = (1/2)((2x-2)^3 + 2) ; [0.5, 1] if (pos < 0.5) { return 4 * pos * pos * pos; } else { float f = ((2 * pos) - 2); return 0.5 * f * f * f + 1; } } float easeInElastic(float pos) { // Modeled after the damped sine wave y = sin(13pi/2*x)*pow(2, 10 * (x - 1)) return sin(13 * M_PI_2 * pos) * pow(2, 10 * (pos - 1)); } float easeOutElastic(float pos) { // Modeled after the damped sine wave y = sin(-13pi/2*(x + 1))*pow(2, -10x) + 1 return sin(-13 * M_PI_2 * (pos + 1)) * pow(2, -10 * pos) + 1; } float easeInOutElastic(float pos) { // Modeled after the piecewise exponentially-damped sine wave: // y = (1/2)*sin(13pi/2*(2*x))*pow(2, 10 * ((2*x) - 1)) ; [0,0.5) // y = (1/2)*(sin(-13pi/2*((2x-1)+1))*pow(2,-10(2*x-1)) + 2) ; [0.5, 1] if (pos < 0.5) { return 0.5 * sin(13 * M_PI_2 * (2 * pos)) * pow(2, 10 * ((2 * pos) - 1)); } else { return 0.5 * (sin(-13 * M_PI_2 * ((2 * pos - 1) + 1)) * pow(2, -10 * (2 * pos - 1)) + 2); } } float easeInExpo(float pos) { // Modeled after the exponential function y = 2^(10(x - 1)) return (pos == 0.0) ? pos : pow(2, 10 * (pos - 1)); } float easeOutExpo(float pos) { // Modeled after the exponential function y = -2^(-10x) + 1 return (pos == 1.0) ? pos : 1 - pow(2, -10 * pos); } float easeInOutExpo(float pos) { // Modeled after the piecewise exponential // y = (1/2)2^(10(2x - 1)) ; [0,0.5) // y = -(1/2)*2^(-10(2x - 1))) + 1 ; [0.5,1] if (pos == 0.0 || pos == 1.0) return pos; if (pos < 0.5) { return 0.5 * pow(2, (20 * pos) - 10); } else { return -0.5 * pow(2, (-20 * pos) + 10) + 1; } } float linear(float pos) { return pos; } float easeInQuad(float pos) { // Modeled after the parabola y = x^2 return pos * pos; } float easeOutQuad(float pos) { // Modeled after the parabola y = -x^2 + 2x return -(pos * (pos - 2)); } float easeInOutQuad(float pos) { // Modeled after the piecewise quadratic // y = (1/2)((2x)^2) ; [0, 0.5) // y = -(1/2)((2x-1)*(2x-3) - 1) ; [0.5, 1] if (pos < 0.5) { return 2 * pos * pos; } else { return (-2 * pos * pos) + (4 * pos) - 1; } } float easeInQuart(float pos) { // Modeled after the quartic x^4 return pos * pos * pos * pos; } float easeOutQuart(float pos) { // Modeled after the quartic y = 1 - (x - 1)^4 float f = (pos - 1); return f * f * f * (1 - pos) + 1; } float easeInOutQuart(float pos) { // Modeled after the piecewise quartic // y = (1/2)((2x)^4) ; [0, 0.5) // y = -(1/2)((2x-2)^4 - 2) ; [0.5, 1] if (pos < 0.5) { return 8 * pos * pos * pos * pos; } else { float f = (pos - 1); return -8 * f * f * f * f + 1; } } float easeInQuint(float pos) { // Modeled after the quintic y = x^5 return pos * pos * pos * pos * pos; } float easeOutQuint(float pos) { // Modeled after the quintic y = (x - 1)^5 + 1 float f = (pos - 1); return f * f * f * f * f + 1; } float easeInOutQuint(float pos) { // Modeled after the piecewise quintic // y = (1/2)((2x)^5) ; [0, 0.5) // y = (1/2)((2x-2)^5 + 2) ; [0.5, 1] if (pos < 0.5) { return 16 * pos * pos * pos * pos * pos; } else { float f = ((2 * pos) - 2); return 0.5 * f * f * f * f * f + 1; } } float easeInSine(float pos) { // Modeled after quarter-cycle of sine wave return sin((pos - 1) * M_PI_2) + 1; } float easeOutSine(float pos) { // Modeled after quarter-cycle of sine wave (different phase) return sin(pos * M_PI_2); } float easeInOutSine(float pos) { // Modeled after half sine wave return 0.5 * (1 - cos(pos * M_PI)); } /*************** Functions: Zap ****************/ /****** Zap 2 *******/ void zap2() { Serial.println("ZAP 2 called!"); //Bone unsigned long timeStart = millis(); int todo; do { unsigned long timeNow = millis() - timeStart; todo = 0; // M Leg Kick //todo += moveServo(servo5, 90, 50, 100, 0, easeInOutCubic, timeNow); // move servo5 from 90 to 180 degrees for 1 second after a 0 second delay // todo += moveServo(servo5, 50, 90, 500, 500, easeOutBounce, timeNow); // move servo5 from 180 to 90 degrees for 1 second after a 1 second delay // M Head side to side todo += moveServo(servo7, 90, 110, 500,0, easeInOutCubic, timeNow); // move servo7 from 90 to 180 degrees for 1 second after a 0 second delay todo += moveServo(servo7, 110, 70, 500, 500, easeInOutCubic, timeNow); // move servo7 from 180 to 90 degrees for 1 second after a 1 second delay todo += moveServo(servo7, 70, 110, 500, 1000, easeInOutCubic, timeNow); todo += moveServo(servo7, 110, 70, 500, 1500, easeInOutCubic, timeNow); todo += moveServo(servo7, 70, 110, 500, 2000, easeInOutCubic, timeNow); todo += moveServo(servo7, 110, 70, 500, 2500, easeInOutCubic, timeNow); todo += moveServo(servo7, 70, 90, 500, 3000, easeInOutCubic, timeNow); // M left arm up and down todo += moveServo(servo8, 90, 170, 1000, 0, easeInOutCubic, timeNow); // move servo8 from 90 to 180 degrees for 1 second after a 0 second delay todo += moveServo(servo8, 170, 90, 1000, 4000, easeOutBounce, timeNow); // move servo8 from 180 to 90 degrees for 1 second after a 1 second delay // M right arm up and down todo += moveServo(servo6, 90, 130, 1000, 1500, easeInOutCubic, timeNow); // move servo8 from 90 to 180 degrees for 1 second after a 0 second delay todo += moveServo(servo6, 130, 90, 1000, 5000, easeOutBounce, timeNow); // move servo8 from 180 to 90 degrees for 1 second after a 1 second delay // S Head side to side todo += moveServo(servo10, 90, 40, 1000, 500, easeInOutCubic, timeNow); // move servo7 from 90 to 180 degrees for 1 second after a 0 second delay todo += moveServo(servo10, 40, 105, 1000, 2000, easeInOutCubic, timeNow); // move servo7 from 180 to 90 degrees for 1 second after a 1 second delay todo += moveServo(servo10, 105, 90, 1000, 6000, easeInOutCubic, timeNow); // S left arm up and down todo += moveServo(servo11, 80, 160, 1000, 2000, easeInOutCubic, timeNow); // move servo8 from 90 to 180 degrees for 1 second after a 0 second delay todo += moveServo(servo11, 160, 80, 1000, 5000, easeInOutCubic, timeNow); // move servo8 from 180 to 90 degrees for 1 second after a 1 second delay // S right arm up and down todo += moveServo(servo9, 80, 20, 1000, 1000, easeInOutCubic, timeNow); // move servo8 from 90 to 180 degrees for 1 second after a 0 second delay todo += moveServo(servo9, 20, 80, 1000, 2000, easeInOutCubic, timeNow); // move servo8 from 180 to 90 degrees for 1 second after a 1 second delay delay(20); } while (todo > 0); } /****** Zap 3 *******/ void zap3() { Serial.println("ZAP 3 called!"); unsigned long timeStart = millis(); int todo; do { unsigned long timeNow = millis() - timeStart; todo = 0; // M Head side to side todo += moveServo(servo7, 90, 130, 1000, 0, easeInOutCubic, timeNow); // move servo7 from 90 to 180 degrees for 1 second after a 0 second delay todo += moveServo(servo7, 130, 90, 1000, 5000, easeInOutCubic, timeNow); // move servo7 from 180 to 90 degrees for 1 second after a 1 second delay // M left arm up and down todo += moveServo(servo8, 90, 170, 1000, 0, easeInOutCubic, timeNow); // move servo8 from 90 to 180 degrees for 1 second after a 0 second delay todo += moveServo(servo8, 170, 90, 1000, 4000, easeOutBounce, timeNow); // move servo8 from 180 to 90 degrees for 1 second after a 1 second delay // M right arm up and down todo += moveServo(servo6, 90, 130, 1000, 1500, easeInOutCubic, timeNow); // move servo8 from 90 to 180 degrees for 1 second after a 0 second delay todo += moveServo(servo6, 130, 90, 1000, 5000, easeOutBounce, timeNow); // move servo8 from 180 to 90 degrees for 1 second after a 1 second delay // S Head side to side todo += moveServo(servo10, 90, 40, 1000, 500, easeInOutCubic, timeNow); // move servo7 from 90 to 180 degrees for 1 second after a 0 second delay todo += moveServo(servo10, 40, 105, 1000, 2000, easeInOutCubic, timeNow); // move servo7 from 180 to 90 degrees for 1 second after a 1 second delay todo += moveServo(servo10, 105, 90, 1000, 6000, easeInOutCubic, timeNow); // S left arm up and down todo += moveServo(servo11, 80, 160, 1000, 0, easeInOutCubic, timeNow); // move servo8 from 90 to 180 degrees for 1 second after a 0 second delay todo += moveServo(servo11, 160, 80, 1000, 5000, easeInOutCubic, timeNow); // move servo8 from 180 to 90 degrees for 1 second after a 1 second delay // S right arm up and down todo += moveServo(servo9, 80, 20, 1000, 1000, easeInOutCubic, timeNow); // move servo8 from 90 to 180 degrees for 1 second after a 0 second delay todo += moveServo(servo9, 20, 80, 1000, 6000, easeInOutCubic, timeNow); // move servo8 from 180 to 90 degrees for 1 second after a 1 second delay delay(10); } while (todo > 0); } /****** Zap 4 *******/ void zap4() { Serial.println("ZAP 4 called!"); unsigned long timeStart = millis(); int todo; do { unsigned long timeNow = millis() - timeStart; todo = 0; // M Head side to side todo += moveServo(servo7, 90, 130, 1000, 0, easeInOutCubic, timeNow); // move servo7 from 90 to 180 degrees for 1 second after a 0 second delay todo += moveServo(servo7, 130, 90, 1000, 5000, easeInOutCubic, timeNow); // move servo7 from 180 to 90 degrees for 1 second after a 1 second delay // M left arm up and down todo += moveServo(servo8, 90, 170, 1000, 0, easeInOutCubic, timeNow); // move servo8 from 90 to 180 degrees for 1 second after a 0 second delay todo += moveServo(servo8, 170, 90, 1000, 4000, easeOutBounce, timeNow); // move servo8 from 180 to 90 degrees for 1 second after a 1 second delay // M right arm up and down todo += moveServo(servo6, 90, 130, 1000, 1500, easeInOutCubic, timeNow); // move servo8 from 90 to 180 degrees for 1 second after a 0 second delay todo += moveServo(servo6, 130, 90, 1000, 5000, easeOutBounce, timeNow); // move servo8 from 180 to 90 degrees for 1 second after a 1 second delay // S Head side to side todo += moveServo(servo10, 90, 40, 1000, 500, easeInOutCubic, timeNow); // move servo7 from 90 to 180 degrees for 1 second after a 0 second delay todo += moveServo(servo10, 40, 105, 1000, 2000, easeInOutCubic, timeNow); // move servo7 from 180 to 90 degrees for 1 second after a 1 second delay todo += moveServo(servo10, 105, 90, 1000, 6000, easeInOutCubic, timeNow); // S left arm up and down todo += moveServo(servo11, 80, 160, 1000, 2000, easeInOutCubic, timeNow); // move servo8 from 90 to 180 degrees for 1 second after a 0 second delay todo += moveServo(servo11, 160, 80, 1000, 5000, easeInOutCubic, timeNow); // move servo8 from 180 to 90 degrees for 1 second after a 1 second delay // S right arm up and down todo += moveServo(servo9, 80, 20, 1000, 1000, easeInOutCubic, timeNow); // move servo8 from 90 to 180 degrees for 1 second after a 0 second delay todo += moveServo(servo9, 20, 80, 1000, 2000, easeInOutCubic, timeNow); // move servo8 from 180 to 90 degrees for 1 second after a 1 second delay delay(10); } while (todo > 0); }
Sound EffectsArduino
Kode ini dimuat ke Arduino Uno dengan MP3 shield dipasang di atasnya. Pada dasarnya menerima sinyal dari salah satu dari tiga sakutu, memutar file audio yang sesuai dan mengirim sinyal ke Arduino Uno yang mengontrol servo. Dua tombol juga dapat dipasang di atasnya untuk mengontrol volume.
/*********************************** Targus - Operation - Sound Effects ************************************/ /****** Notes *******/ // Digital Pins 0 and 1 are normally used for serial commucation when uploading and monitoring an Arduino from a computer. // Digital Pins 3, 4, 6, 7, 11, 12, and 13 are used by the Adafruit Music Maker Shield. // This Arduino should be powered on after the servos Arduino since this Arduino will be sending 5V signals. // Make sure a GND wire on this Arduino is connected to GND on the other Arduino. /********* Includes **********/ #include <SPI.h> #include <Adafruit_VS1053.h> #include <SD.h> /********** Variables ***********/ int relayPin5 = 5; int relayPin8 = 8; int relayPin9 = 9; int pinVolDown = 14; // aka Analog In 0 int pinVolUp = 15; // aka Analog In 1 int volume = 50; // this is the default volume which can be changed later by the volDown() and volUp() functions /******************************************************************** Adafruit Music Maker Shield - https://www.adafruit.com/product/1788 *********************************************************************/ // Adafruit Music Maker Shield Pins #define SHIELD_RESET -1 // VS1053 reset pin (unused!) #define DREQ 3 // VS1053 Data request, ideally an Interrupt pin. See https://arduino.cc/en/Reference/attachInterrupt for more info. #define CARDCS 4 // Card chip select pin #define SHIELD_DCS 6 // VS1053 Data/command select pin (output) #define SHIELD_CS 7 // VS1053 chip select pin (output) // the most important thing on the line below is the variable 'musicPlayer' which we will use to play music later Adafruit_VS1053_FilePlayer musicPlayer = Adafruit_VS1053_FilePlayer(SHIELD_RESET, SHIELD_CS, SHIELD_DCS, DREQ, CARDCS); /************** Arduino Setup ***************/ void setup() { Serial.begin(9600); // enable serial communication for development and troubleshooting Serial.println("Targus - Operation - Sound Effects\n"); if (! musicPlayer.begin()) { // initialise the music player Serial.println(F("Couldn't find VS1053, do you have the right pins defined?")); while (1); // loop forever since we could not connect to the Adafruit Music Maker Shield } SD.begin(CARDCS); // initialise the SD card // Set volumes for the left and right channels. musicPlayer.setVolume(volume,volume); // 0-255 with 0 being crazy loud // If DREQ is on an interrupt pin (on uno, #2 or #3) we can do background audio playing musicPlayer.useInterrupt(VS1053_FILEPLAYER_PIN_INT); // DREQ int // Specify which GPIO pins to use for input. musicPlayer.GPIO_pinMode(2, OUTPUT); // switch for ... musicPlayer.GPIO_pinMode(3, OUTPUT); // switch for ... musicPlayer.GPIO_pinMode(4, OUTPUT); // switch for ... // Specify which digital pins we will use for volume control pinMode(pinVolDown, INPUT_PULLUP); pinMode(pinVolUp, INPUT_PULLUP); // Specify which digital pins we will use to communicate with the other Arduino (aka the Arduino with all the servos). pinMode(relayPin5, OUTPUT); pinMode(relayPin8, OUTPUT); pinMode(relayPin9, OUTPUT); } /************* Arduino Loop **************/ void loop() { int gpio2 = musicPlayer.GPIO_digitalRead(2); int gpio3 = musicPlayer.GPIO_digitalRead(3); int gpio4 = musicPlayer.GPIO_digitalRead(4); int ioDown = digitalRead(pinVolDown); // volume down int ioUp = digitalRead(pinVolUp); // volume up // Serial.println(ioDown); // Serial.println(ioUp); // Serial.println(gpio2); if (gpio2 == 1) { Serial.println("GPIO 2 triggered.\n"); zap2(); } else if (gpio3 == 1) { Serial.println("GPIO 3 triggered.\n"); zap3(); } else if (gpio4 == 1) { Serial.println("GPIO 4 triggered.\n"); zap4(); } else if (ioDown == LOW) { Serial.println("Analog 0 triggered.\n"); volDown(); } else if (ioUp == LOW) { Serial.println("Analog 1 triggered.\n"); volUp(); } delay(2); // this delay may need to be reduced or removed depending on how responsive hitting the tongs to the side of a container feels } /********** Functions ***********/ void audioPlay(String file) { Serial.println("Playing " + file); musicPlayer.startPlayingFile(file.c_str()); delay(500); // wait half a second before returning so the audio can get going } void audioStop(String file) { musicPlayer.stopPlaying(); Serial.println("Done playing " + file); } void activate(int pin) { digitalWrite(pin, HIGH); delay(300); // delay as long as needed for the other Arduino to notice an event digitalWrite(pin, LOW); } void volDown() { volume = volume + 1; if (volume > 255) { volume = 255; } // Set volumes for the left and right channels. musicPlayer.setVolume(volume,volume); // 0-255 with 0 being crazy loud Serial.print("Volume set to "); Serial.println(volume); } void volUp() { volume = volume - 1; if (volume < 0) { volume = 0; } // Set volumes for the left and right channels. musicPlayer.setVolume(volume,volume); // 0-255 with 0 being crazy loud Serial.print("Volume set to "); Serial.println(volume); } /*************** Functions: Zap ****************/ /****** Zap 2 *******/ void zap2() { // Audio and Servo(s) triggered by GPIO 2 String file = "02.mp3"; // this file should exist on the SD card /*********** Play Audio ************/ audioPlay(file); /************************************* Tell other Arduino to Animate Servos **************************************/ activate(relayPin5); delay(6000); // Customize delay to match end of servo movements, go by feel vs. accurate math since this Arduino's clock may not sync with the other Arduino. /*********** Stop Audio ************/ audioStop(file); } /****** Zap 3 *******/ void zap3() { // Audio and Servo(s) triggered by GPIO 3 String file = "03.mp3"; // this file should exist on the SD card /*********** Play Audio ************/ audioPlay(file); /************************************* Tell other Arduino to Animate Servos **************************************/ activate(relayPin8); delay(6000); // Customize delay to match end of servo movements, go by feel vs. accurate math since this Arduino's clock may not sync with the other Arduino. /*********** Stop Audio ************/ audioStop(file); } /****** Zap 4 *******/ void zap4() { // Audio and Servo(s) triggered by GPIO 4 String file = "04.mp3"; // this file should exist on the SD card /*********** Play Audio ************/ audioPlay(file); /************************************* Tell other Arduino to Animate Servos **************************************/ activate(relayPin9); delay(6000); // Customize delay to match end of servo movements, go by feel vs. accurate math since this Arduino's clock may not sync with the other Arduino. /*********** Stop Audio ************/ audioStop(file); }
Bagian dan kotak khusus
Bagian yang ditanam 3D
CAD file on thingiverse.com
Skema
Hubungkan GPIO 2, 3, 4 dari MP3 shield ke plat aluminium. Hubungkan 3V dari MP3 shield ke tengguk. Hubungkan pin 5, 8, 9 dari MP3 shield ke pin 2, 3, 4 dari servo Arduino. Hubungkan pin 6, 7, 8, 9, 10, 11 dari servo Arduino ke servo. Sambungkan positif dan negatif servo ke soket 5V. Sambungkan ground dari servo Arduino dan MP3 shield ke soket 5V. Sambungkan kedua input speaker.Ini adalah gambar skala dan dimensi yang saya gunakan untuk membangun megafigs.




 Ini adalah gambar skala dan dimensi yang saya gunakan untuk membangun megafigs.