Membangun Sistem Otomasi & Keamanan Rumah Pintar dengan 1Sheeld
Komponen dan Perlengkapan
| Arduino UNO |
1 |
| 1Sheeld |
1 |
| Relay (umum) |
1 |
| Buzzer |
2 |
| Sensor Suhu |
1 |
| Kabel Jumper (umum) |
1 |
| Sensor Gerak PIR (umum) |
1 |
| Saklar Magnet Pintu SparkFun |
2 |
| LCD Standar Adafruit - 16x2 Putih pada Biru |
1 |
Alat dan Mesin yang Diperlukan
Tentang Proyek Ini
Hey Overview
Cerita dimulai dari sini.
Kami Memutuskan Untuk Membuat Proyek Ini Karena Ini adalah Langkah Besar Untuk Membangun Semua Hal Bersama, Proyek Ini Akan Membantu Anda Memahami Banyak Konsep Dan Anda Akan Mendapatkan Pengalaman yang Baik Jadi Mari Kita Belajar Cara Membuat Hal Keren Ini :)
Cara Kerja Proyek Kami :
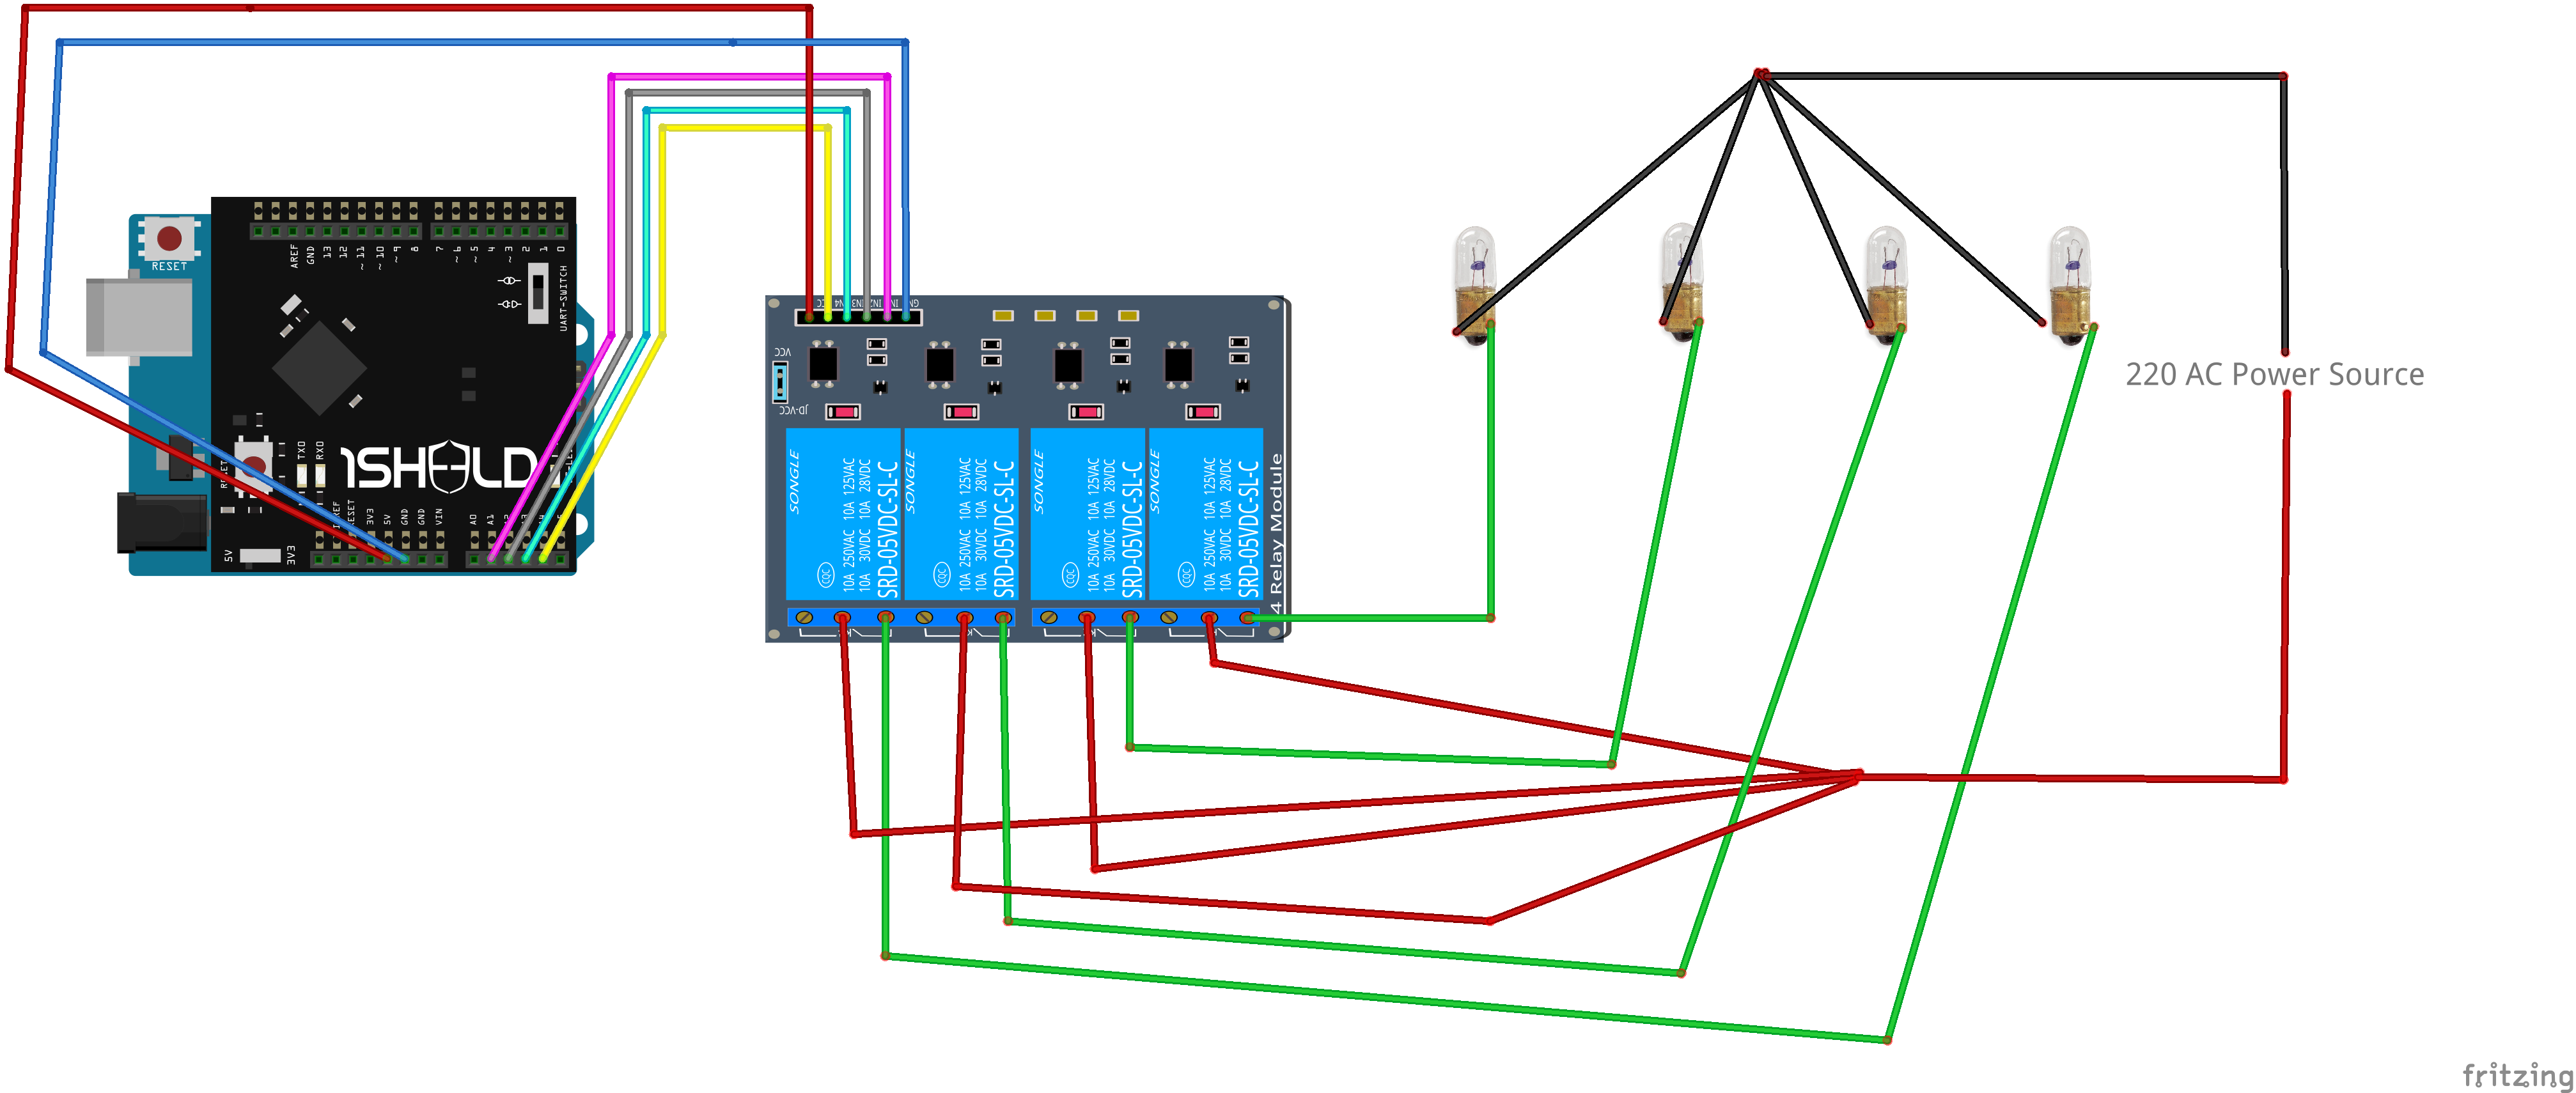
Proyek Ini Membuat Anda Dapat Mengontrol Semua Lampu Rumah Anda Dengan Perintah Suara Atau Dengan SMS :) , Hanya Itu Saja Ini Juga Adalah Sistem Keamanan , Ketika Orang Asing Masuk Ke Rumah Anda Saat Anda Tidur Atau Di Luar Rumah Ini Mengirim Email Kepada Anda Katakan Ada Orang Asing Masuk Ke Rumah Anda Dan Sistem Alarm (Buzzer) Akan Bekerja Di Rumah Anda , Juga Ketika Anda Mengirim SMS Untuk Menyalakan Atau Mematikan Lampu Ini Mengirim Kepada Anda Email Untuk Memberitahu Anda Pesanan Dieksekusi , Juga Jika Sensor Tmp Merasakan Suhu Lebih Dari 35 Alarm (Buzzer) Akan Bekerja Di Rumah Anda Dan Sistem Akan Mengirim Kepada Anda Email Katakan Suhu Lebih Tinggi Dari 35 .
CATATAN : Jangan Lupa Untuk Mengucapkan Jarvis Sebelum Perintah Yang Anda Berikan :) Untuk Membuat Sistem Dapat Mendengar Perintah Anda .
CATATAN : Setelah Setiap Perintah Yang Anda Berikan Ke Sistem Jarvis Akan Merespons Anda :) Seperti Anda Bicara Dengan Asisten Asli Anda .
CATATAN : Untuk Menyalakan Sistem Keamanan Berikan Ponsel Anda Perintah Suara ( security on ) , Untuk Mematikan Sistem Keamanan Katakan ( security off )
mengenal lebih tentang 1sheeld:
1Sheeld mengubah ponsel Anda menjadi 40 shield Arduino yang berbeda. Jadi kita tidak perlu membeli shield untuk Arduino karena kita memilikinya di ponsel kita.
Ini Alasan Di Balik Mengapa Kami Menggunakan Papan 1Sheeld Anda tidak perlu membeli sensor apa pun karena Anda sudah memilikinya di ponsel Anda.
Jika Anda Ingin Lebih Banyak Tentang Cara Memulai Dengan 1Sheeld Klik Di Sini
Pertama Anda Perlu Mengambil File CAD Yang Kami Unggah Dan Memotongnya Dengan Mesin Pemotong Laser .
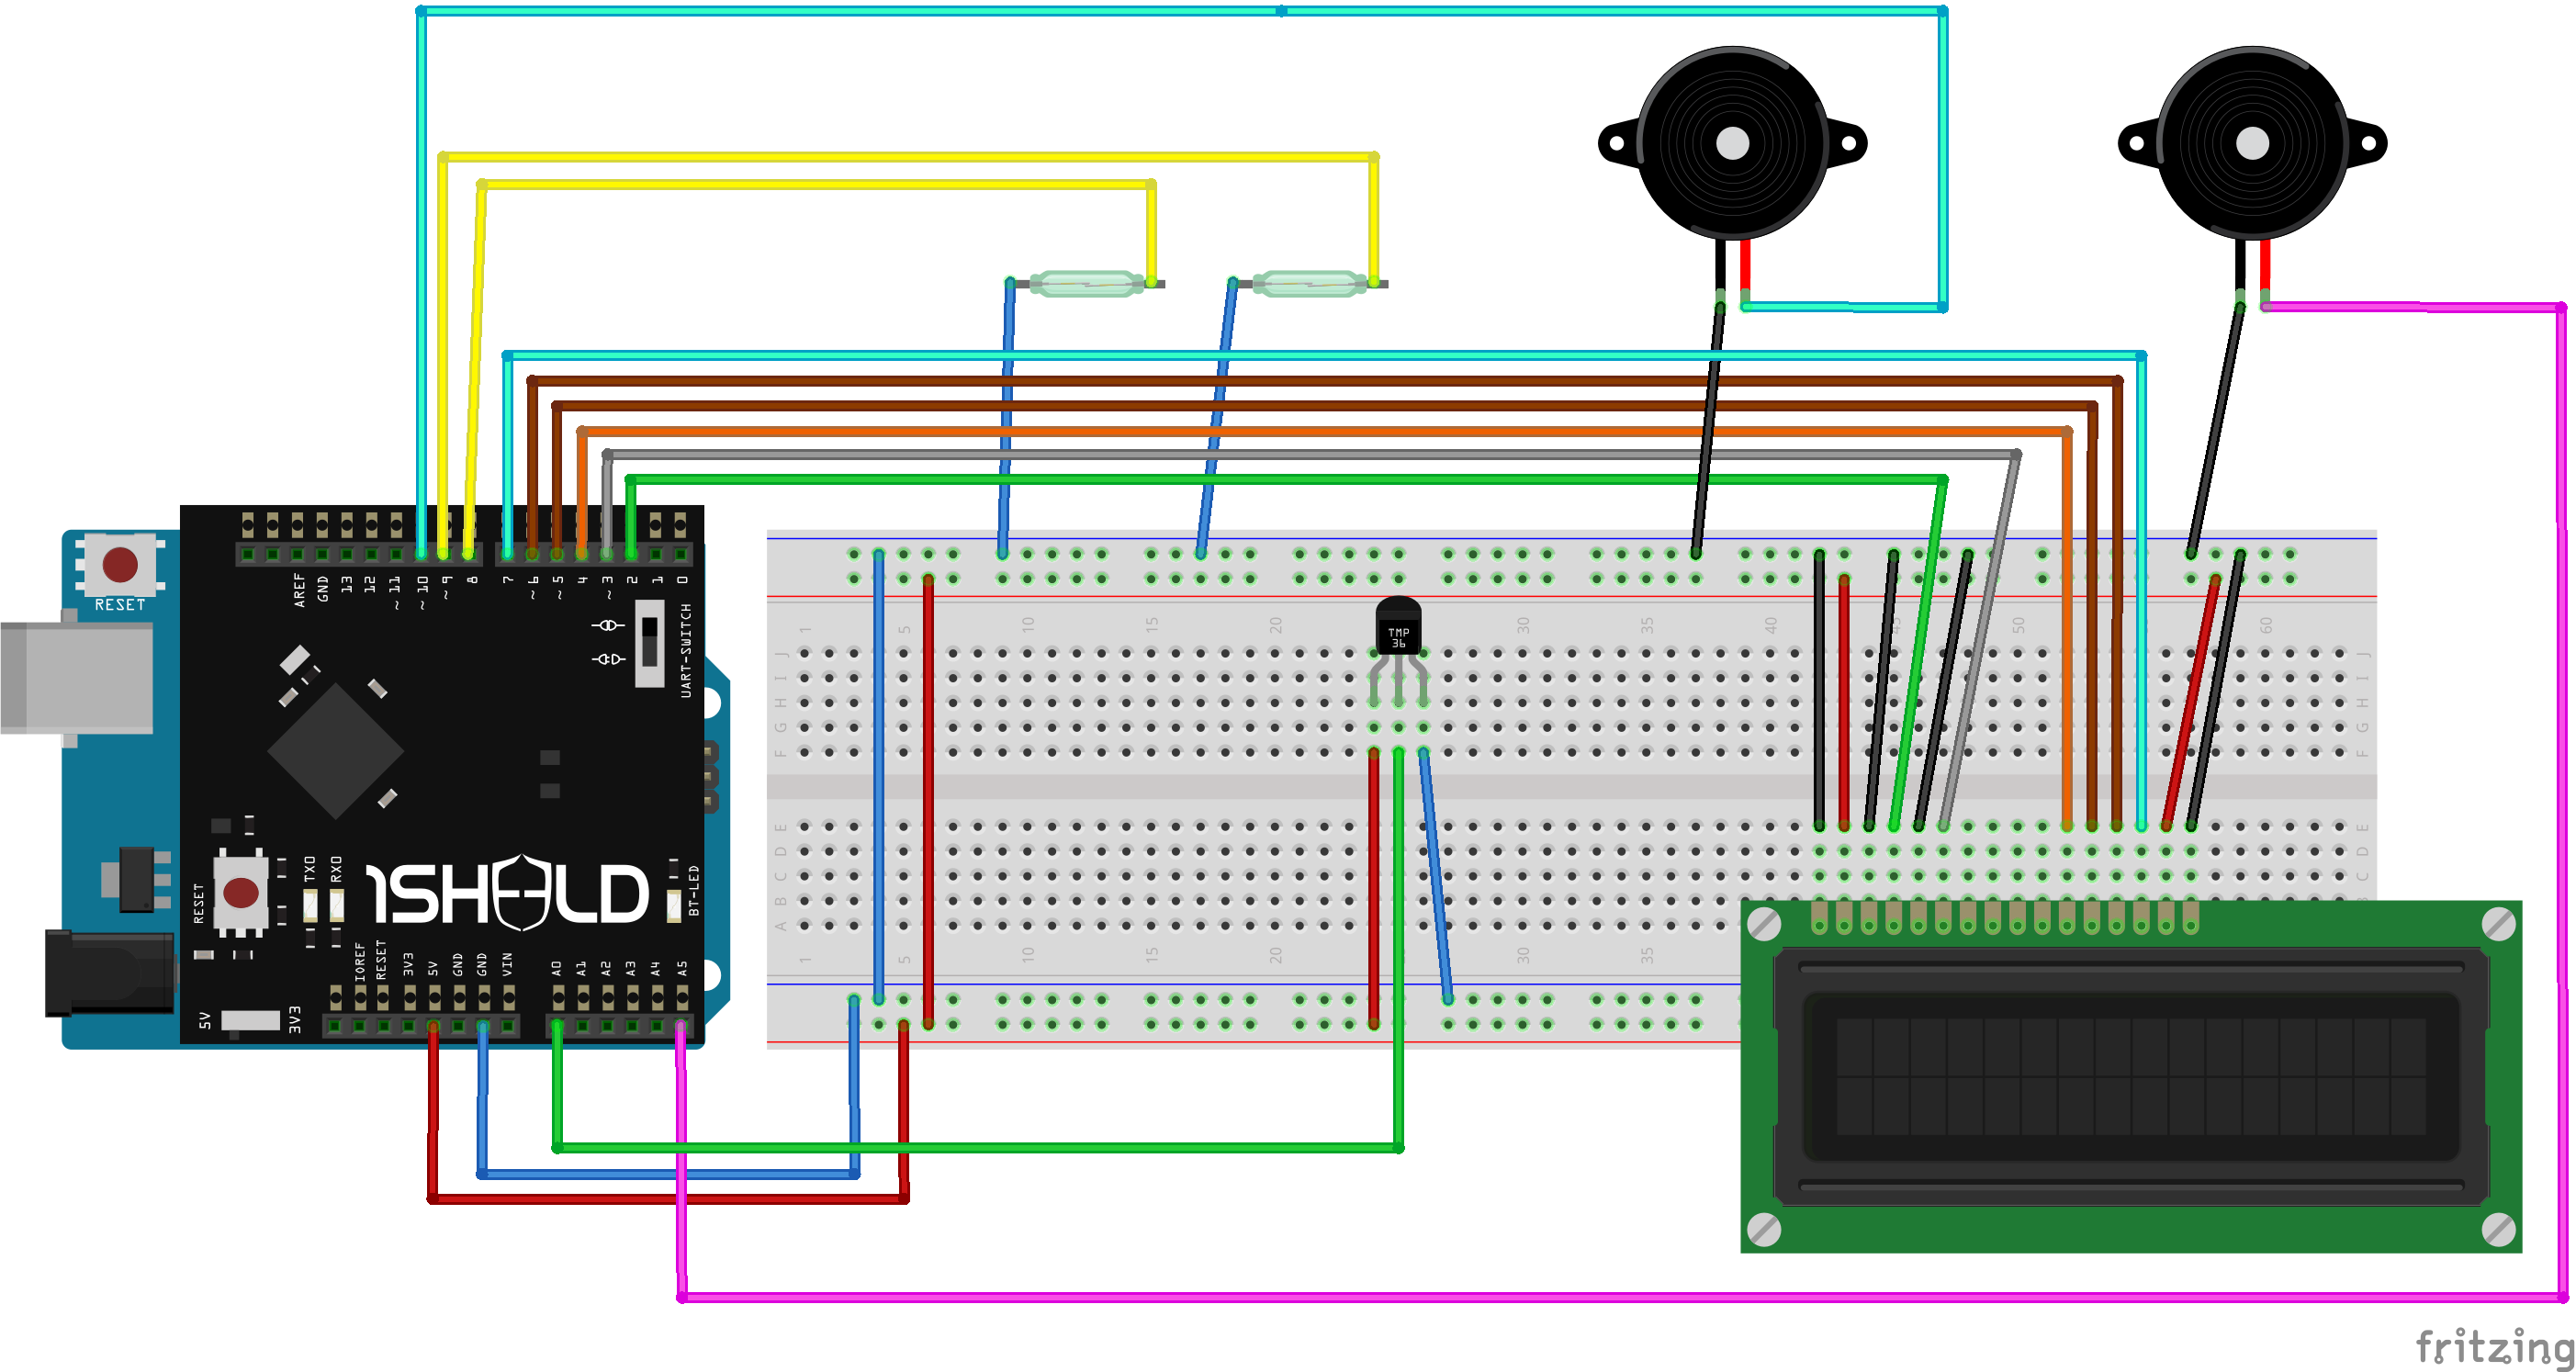
- Kemudian Anda Perlu Meletakkan Sensor Saklar Magnet Pintu Di Pintu Anda Seperti Ini
- Ini Adalah Sensor Digital Jadi Akan Mengembalikan Nilai Digital 0 ATAU 1
- Anda Perlu Mengkalibrasi Sensor Anda Sebelum Menggunakannya Untuk Mengetahui Pembacaan Ketika Terbuka Dan Ketika Tertutup .
Lampu AC
- Kemudian Anda Perlu Memotong Dinding Untuk Meletakkan Lampu Di Tempat Tertentu .
- Hubungkan Semua Kabel Lampu Secara Parallel .
Sensor Suhu
- Saya Menggunakan LM35DZ Yang Punya 3 Kaki
- +V Terhubung Ke 5V Pada Arduino
- GND Ke Ground Pada Arduino
- OUTPUT Ke Pin A0 Pada Arduino Yang Akan Memberikan Kami Pembacaan
Cara menggunakan 1sheeld?
1- Tumpuk 1Sheeld di atas papan Arduino Anda, dan tulis kode menggunakan pustaka 1Sheeld.
2 - Unggah Kode Pada Arduino Menggunakan Arduino IDE ( Anda Bisa Unduh Arduino IDE Dari Sini )
3 - Catatan: Pastikan saklar UART berada pada mode Uploading.
4 - Setelah Selesai Mengunggah Kode Kembalikan Saklar Ke Mode Operasi
Catatan : Jangan lupa! Jika Anda tidak mengalihkan saklar UART kembali ke mode operasi proyek Anda tidak akan bekerja dengan benar karena Anda tidak akan memiliki komunikasi antara 1Sheeld dan papan Arduino.
Aplikasi 1Sheeld :
- Buka Aplikasi 1Sheeld Anda Bisa Unduh Dari Sini
- Kemudian Buka Aplikasi Anda Dan Hubungkan Dengan Papan Anda Anda akan diminta untuk memasukkan kode pairing (kode pairing default adalah 1234) dan terhubung ke 1Sheeld melalui bluetooth.
- Kemudian Pilih Shield Yang Kita Gunakan ( SMS , Voice Recognition , Text To Speech , Clock , Email ) .
- Sekarang Coba Kerja Anda :)
CATATAN : Kami Buat Jarvis Perempuan Kami Sendiri :D
Buat Jarvis Sendiri .
Kode
Smart Home Automation & Security SystemArduino
/* * Smart Home Automation And Security System Team SADEE * EMAIL : ahmedebrahemua@yahoo.com * For More Projects Like Our FB Page : https://www.facebook.com/Scientific-%D9%90Association-of-the-Department-of-Electrical-Engineering-At-ACU-260274217766395/ */ #define CUSTOM_SETTINGS //Used To Define A Specific Shields That We Will Work With To Save The Arduino memory #define INCLUDE_VOICE_RECOGNIZER_SHIELD //Help Us To Communicate With The 1 Sheeld Board With Voice Commands #define INCLUDE_TEXT_TO_SPEECH_SHIELD #define INCLUDE_CLOCK_SHIELD #define INCLUDE_SMS_SHIELD #define INCLUDE_EMAIL_SHIELD #include <LiquidCrystal.h> #include <OneSheeld.h> int minutes,hours; //Variables That Will Save The Hour And Minutes In It String strh; //Will Use This Line To Convert The Int Value That The Clock reads To String String strm; char h[4]; char m[4]; LiquidCrystal lcd(2,3,4,5,6,7); #define receptionLamp A1 // This IS The Reception Relay #define bedRoomLamp A2 // This Is The BedRoom #define pathRoomLamp A3 // This IS The Bathroom #define balaconyLamp A4 // This IS The Kitchen const char timeCommand[] = "what time is it"; //The Commands Which We Will Say To The 1Sheeld To Perform Its Task const char receptionCommandOn[] = "reception on"; const char receptionCommandOff[] = "reception of"; const char whatsUp[] = "good morning"; const char pathRoomCommandOn[] = "bathroom on"; const char pathRoomCommandOff[] = "bathroom off"; const char balaconyCommandOn[] = "kitchen on"; const char balaconyCommandOff[] = "kitchen off"; const char bedRoomCommandOn[] = "bedroom on"; const char bedRoomCommandOff[] = "bedroom off"; const char lightsOn[] = "on"; //This IS For SMS Shield When We Send An SMS Contains (Lights on) The Lights Will Turn On const char lightsOff[] = "off"; //This IS For SMS Shield When We Send An SMS Contains (Lights ooff) The Lights Will Turn off //******************************************************************************************************** const char securityModeOn[] = "security on"; //This Is For The Security System When We Say (Security on) Then We triggered The Security System Anyone Will Break The System The Alarm Will Work const char securityModeOff[] ="security off"; // Turning Off The Security System Anyone Breaks The Security System The Alarm Will Not Work //******************************************************************************************************** const char mainCommand[] = "jarvis"; //We Say jarvis Before Any Voice Command To Make The System Hearing me String noon; //#define tmp A0 //For The TMP Sensor We Use LM35DZ //int voltage,degree; //The Variables Which Will Contain The Different Voltages During The Changing Of Temperatures , And The Degree In Celisus After A Simple Mathematical EQ. byte smile[] = { //Making A Smile Symbol On The Liquid crystal Screen B00000, B01001, B01001, B00000, B00000, B10001, B01110, B00000, }; #define magneticReception 8 //The MAgnetic Switch For The Reception #define magneticBalacony 9 //The MAgnetic Switch For The Balacony int buzzer2 = 10; // This Buzzer iS for temperature sensor //D11 Was Free; int buzzer1 = A5; //This Buzzer Is For The Magnetic Switches If Someone Breaks The Security System This Will Buzzer Will Work int magneticReceptionState; //Variable Will Contain The Reading Of The MAgnetic Switch If It Was 1 Or 0 int magneticBalaconyState; int state =0; // This For Jarvis bool security; // This For the Security System void setup() { noTone(buzzer1); noTone(buzzer2); //analogReference(INTERNAL); //Reference For The TMP Sensor To Be Accurate 1.1 Voltage digitalWrite(receptionLamp,HIGH); digitalWrite(bedRoomLamp,HIGH); digitalWrite(pathRoomLamp,HIGH); digitalWrite(balaconyLamp,HIGH); //passState = false; lcd.begin(16,2); //Begin The LCD OneSheeld.begin(); //Begin the OneSheeld Board pinMode(receptionLamp,OUTPUT); pinMode(bedRoomLamp,OUTPUT); pinMode(balaconyLamp,OUTPUT); pinMode(pathRoomLamp,OUTPUT); pinMode(buzzer1,OUTPUT); //for magnetic switch pinMode(magneticReception,INPUT_PULLUP); //We Use The PULLUP Resistor Which Builtin In The Board pinMode(magneticBalacony,INPUT_PULLUP); //pinMode(tmp,INPUT); pinMode(buzzer2,OUTPUT); //for temperature sensor lcd.createChar(0,smile); lcd.clear(); lcd.setCursor(0,0); lcd.print("Welcome To The "); delay(4000); lcd.clear(); lcd.setCursor(0,0); lcd.print("Smart Home"); lcd.setCursor(0,1); lcd.print("Automation And "); delay(4000); lcd.clear(); lcd.setCursor(0,0); lcd.print("Security System"); delay(4000); lcd.clear(); lcd.setCursor(0,0); lcd.print("CALIBRATING...."); delay(10000); if(!VoiceRecognition.isNewCommandReceived()) //If there IS No Voice Commands Print This WOrds { lcd.clear(); lcd.setCursor(1,0); lcd.print("We Are Here To"); lcd.setCursor(4,1); lcd.print("HELP You"); } security =false; } void loop() { Clock.queryDateAndTime(); //This Function for Quering The Date And Time USing The Clock Shield On The OneSheeld Board SMS.setOnSmsReceive(&MyFunction); //This Function For The SMS minutes = Clock.getMinutes(); hours = Clock.getHours(); if(hours>12) //We Doing This To Change The Time from 24 Hours System to 12 Hours System And To know Is It AM Or PM { hours-=12; noon="P M"; } else { noon="A M"; } strh = String(hours); strm = String(minutes); strh.toCharArray(h,4); //Converting The Hours Which We Convert To String To be A Char Array strm.toCharArray(m,4); VoiceRecognition.start(); //Start The Voice Recognition Shield OneSheeld.delay(8000); //Delay To make The orders Then Start Agaim if(VoiceRecognition.isNewCommandReceived()) { if(!strcmp(mainCommand,VoiceRecognition.getLastCommand())) //Compare The Last Voice Command With The Main Command Which is "Alexa" { TextToSpeech.say("yes sir"); //This Function Is To Order The Text To Speech Shield To Perform Its Task lcd.clear(); lcd.setCursor(8,0); lcd.write(byte(0)); state = 1; } if(!strcmp(receptionCommandOn,VoiceRecognition.getLastCommand())&&state==1) //Compare The Two Strings The Last Command Received And The String That I made Before { TextToSpeech.say("ok sir lamp in the reception is on"); OneSheeld.delay(2500); digitalWrite(receptionLamp,LOW); lcd.clear(); lcd.setCursor(0,0); lcd.print("The Hall Lamp Is"); lcd.setCursor(8,1); lcd.print("ON"); state =0; } else if (!strcmp(receptionCommandOff,VoiceRecognition.getLastCommand())&&state==1) { TextToSpeech.say("ok sir lamp in the reception is off"); OneSheeld.delay(2500); digitalWrite(receptionLamp,HIGH); lcd.clear(); lcd.setCursor(0,0); lcd.print("The Hall Lamp Is"); lcd.setCursor(7,1); lcd.print("OFF"); state =0; } else if (!strcmp(bedRoomCommandOn,VoiceRecognition.getLastCommand())&&state==1) { TextToSpeech.say("ok sir lamp in the bedRoom is on"); OneSheeld.delay(2500); digitalWrite(bedRoomLamp,LOW); lcd.clear(); lcd.setCursor(0,0); lcd.print("The BedRoom"); lcd.setCursor(0,1); lcd.print("lamp Is: ON"); state =0; } else if (!strcmp(bedRoomCommandOff,VoiceRecognition.getLastCommand())&&state==1) { TextToSpeech.say("ok sir lamp in the bedroom is off"); OneSheeld.delay(2500); digitalWrite(bedRoomLamp,HIGH); lcd.clear(); lcd.setCursor(0,0); lcd.print("The Bedroom"); lcd.setCursor(0,1); lcd.print("lamp Is: OFF"); state=0; } else if (!strcmp(pathRoomCommandOn,VoiceRecognition.getLastCommand())&&state==1) { TextToSpeech.say("ok sir lamp in the bathroom is on"); OneSheeld.delay(2500); digitalWrite(pathRoomLamp,LOW); lcd.clear(); lcd.setCursor(0,0); lcd.print("The Bathroom"); lcd.setCursor(0,1); lcd.print("lamp Is: ON"); state=0; } else if (!strcmp(pathRoomCommandOff,VoiceRecognition.getLastCommand())&&state==1) { TextToSpeech.say("ok sir lamp in the bathroom is off"); OneSheeld.delay(2500); digitalWrite(pathRoomLamp,HIGH); lcd.clear(); lcd.setCursor(0,0); lcd.print("The Bathroom"); lcd.setCursor(0,1); lcd.print("lamp Is: OFF"); } else if (!strcmp(balaconyCommandOn,VoiceRecognition.getLastCommand())&&state==1) { TextToSpeech.say("ok sir lamp in the kitchen is on"); OneSheeld.delay(2500); digitalWrite(balaconyLamp,LOW); lcd.clear(); lcd.setCursor(0,0); lcd.print("The Kitchen"); lcd.setCursor(0,1); lcd.print("Lamp Is: ON"); state=0; } else if (!strcmp(balaconyCommandOff,VoiceRecognition.getLastCommand())&&state==1) { TextToSpeech.say("ok sir lamp in the kitchen is off"); OneSheeld.delay(2500); digitalWrite(balaconyLamp,HIGH); lcd.clear(); lcd.setCursor(0,0); lcd.print("The Kitchen"); lcd.setCursor(0,1); lcd.print("Lamp Is: OFF"); state=0; } else if(!strcmp(whatsUp,VoiceRecognition.getLastCommand())&&state==1) { lcd.clear(); lcd.setCursor(0,0); lcd.print("Good Morning :)"); lcd.setCursor(0,1); lcd.print("Its A Good Day"); TextToSpeech.say("good morning sir"); OneSheeld.delay(1500); TextToSpeech.say("time in cairo is"); OneSheeld.delay(1500); TextToSpeech.say(h); OneSheeld.delay(1000); TextToSpeech.say(m); OneSheeld.delay(1000); TextToSpeech.say(noon); state=0; } else if(!strcmp(timeCommand,VoiceRecognition.getLastCommand())&&state==1) { lcd.clear(); lcd.setCursor(0,0); lcd.print("Time In Cairo Is"); lcd.setCursor(0,1); lcd.print(h); lcd.print(":"); lcd.print(m); lcd.print(" "); lcd.print(noon); TextToSpeech.say("time in cairo is"); OneSheeld.delay(1500); TextToSpeech.say(h); OneSheeld.delay(1000); TextToSpeech.say(m); OneSheeld.delay(1000); TextToSpeech.say(noon); state=0; } //************************************************************************************************ else if (!strcmp(securityModeOn,VoiceRecognition.getLastCommand())&&state==1) { lcd.clear(); lcd.setCursor(0,0); lcd.write("Ok,Sir Feel Safe"); lcd.setCursor(0,1); lcd.write("Security Mode"); delay(200); TextToSpeech.say("security system was triggered"); security=true; state=0; } else if (!strcmp(securityModeOff,VoiceRecognition.getLastCommand())&&state==1) { lcd.clear(); lcd.setCursor(0,0); lcd.write("Ok,Sir Security"); lcd.setCursor(0,1); lcd.write("is OFF"); delay(200); TextToSpeech.say("security system was turned off"); security=false; state=0; } } //**********************************************************Security System *********************************************************** magneticReceptionState = digitalRead(magneticReception); magneticBalaconyState = digitalRead(magneticBalacony); if(security == true) { if(magneticReceptionState == HIGH || magneticBalaconyState == HIGH) //If Someone Opens The Door While The Security System Was Working It Will Alarm { tone(buzzer1 ,1500); Email.send("ahmedebrahemua@yahoo.com","Home Security System","Someone Entered Your Home , Be Carefull"); OneSheeld.delay(3500); } else if (magneticReceptionState == LOW || magneticBalaconyState == LOW) { noTone(buzzer1); } } else if (security == false) { noTone(buzzer1); } /*voltage = analogRead(tmp); voltage = voltage * 1100 / 1024; degree = voltage / 10; if(degree >= 35) { tone(buzzer2,1500); Email.send("ahmedebrahemua@yahoo.com","Home Security System","The Temperature In The Kitchen IS Higher Than 45 , Be Carefull"); OneSheeld.delay(5000); } else if (degree<25) { noTone(buzzer2); }*/ } //******************************************************************************************************************************* void MyFunction(char* phoneNumber , char* messageBody) // SMS Function () { if(!strcmp(lightsOn,messageBody)) //If We Send "lights on" As SMS All the Lights Will Turn On { digitalWrite(receptionLamp,LOW); delay(500); digitalWrite(pathRoomLamp,LOW); delay(500); digitalWrite(bedRoomLamp,LOW); delay(500); digitalWrite(balaconyLamp,LOW); delay(500); TextToSpeech.say("all lights was turned on"); lcd.clear(); lcd.setCursor(0,0); lcd.print("All Lights is ON"); delay(300); Email.send("ahmedebrahemua@yahoo.com","Home Security System"," all Lights Were Turned ON"); OneSheeld.delay(3500); } else if(!strcmp(lightsOff,messageBody)) //If We Send "lights off" As SMS All the Lights Will Turn Off { digitalWrite(receptionLamp,HIGH); delay(500); digitalWrite(pathRoomLamp,HIGH); delay(500); digitalWrite(bedRoomLamp,HIGH); delay(500); digitalWrite(balaconyLamp,HIGH); delay(500); TextToSpeech.say("all lights was turned off"); lcd.clear(); lcd.setCursor(0,0); lcd.print("All Lights Is OFF"); delay(300); Email.send("ahmedebrahemua@yahoo.com","Home Security System"," all Were Turned OFF "); OneSheeld.delay(3500); } }
Bagian Kustom dan Enclosure
drawing_lasser_cutting_lvvsN9X9Xg.dwg
Skematik