Kontrol Lengan Robot Arduino Anda melalui Aplikasi Android Khusus
Komponen dan Perlengkapan
LittleArm – 1 unit
Arduino UNO – 1 unit
Modul Bluetooth HC-05 – 1 unit
Perangkat Android – 1 unit
LittleArm - Full Kit – 1 unit
Aplikasi dan Layanan Online
Android
Arduino IDE
Tentang Proyek Ini
Tutorial ini didasarkan pada sumber daya dari halaman ini.
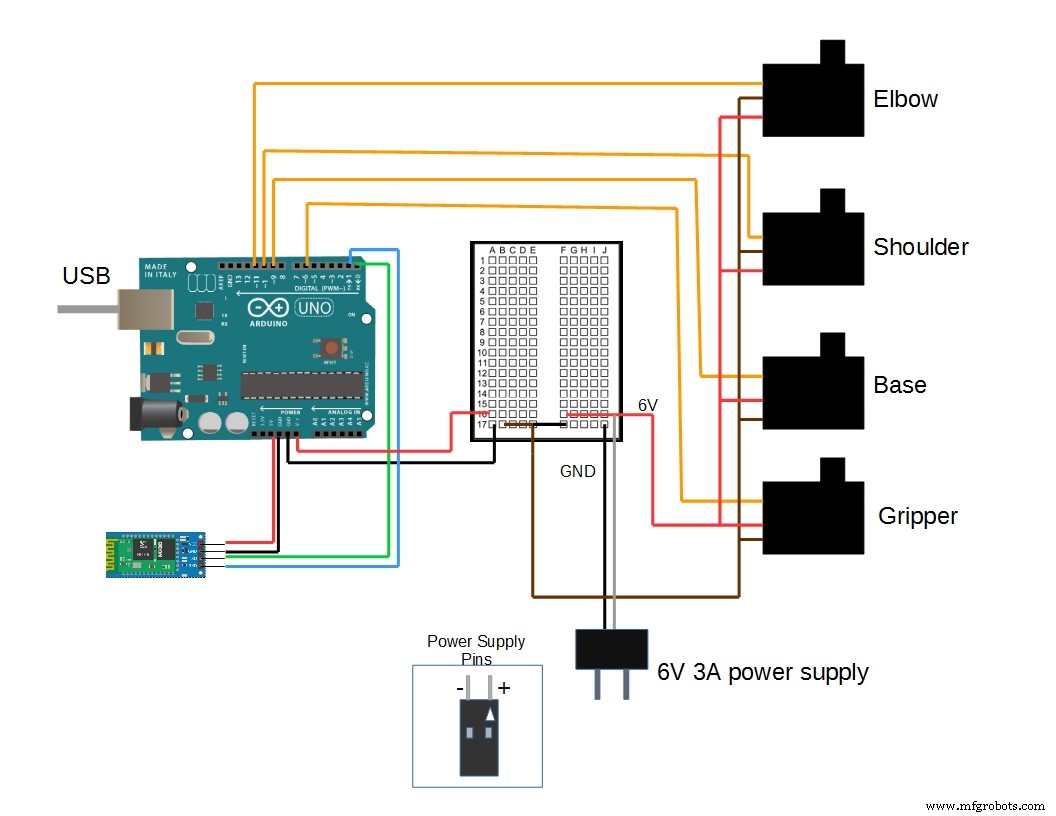
LittleArm secara tradisional dikontrol menggunakan aplikasi desktop gratis yang berjalan di Windows dan Linux. Namun ini memerlukan LittleArm terhubung ke komputer untuk dikontrol. Kami akhirnya menyelesaikan aplikasi untuk LittleArm sehingga Anda dapat mengontrol Arduino secara nirkabel dengan Bluetooth.
Aplikasi memungkinkan Anda mengontrol semua DOF dari LittleArm tetapi juga mencatat serangkaian perintah dan memutarnya kembali. Kode untuk Arduino tidak berubah dari kode tradisional kami dalam paket perangkat lunak dari sini.
Aplikasi LittleArm untuk proyek ini dapat diunduh di sini.
Kode
Kode ini dapat digunakan dengan aplikasi desktop atau android melalui bluetooth atau usb
#include <Servo.h> //arduino library #include <math.h> //standard c library #define PI 3.141 Servo baseServo; Servo shoulderServo; Servo elbowServo; Servo gripperServo; int command; struct jointAngle{ int base; int shoulder; int elbow; }; int desiredGrip; int gripperPos; int desiredDelay; int servoSpeed = 15; int ready = 0; struct jointAngle desiredAngle; //desired angles of the servos //+++++++++++++++FUNCTION DECLARATIONS+++++++++++++++++++++++++++ int servoParallelControl (int thePos, Servo theServo ); //+++++++++++++++++++++++++++++++++++++++++++++++++++++++++++ void setup() { Serial.begin(9600); baseServo.attach(9); // attaches the servo on pin 9 to the servo object shoulderServo.attach(10); elbowServo.attach(11); gripperServo.attach(6); Serial.setTimeout(50); //ensures the the arduino does not read serial for too long Serial.println("started"); baseServo.write(90); //intial positions of servos shoulderServo.write(150); elbowServo.write(110); ready = 0; } //primary arduino loop void loop() { if (Serial.available()){ ready = 1; desiredAngle.base = Serial.parseInt(); desiredAngle.shoulder = Serial.parseInt(); desiredAngle.elbow = Serial.parseInt(); desiredGrip = Serial.parseInt(); desiredDelay = Serial.parseInt(); if(Serial.read() == '\n'){ // if the last byte is 'd' then stop reading and execute command 'd' stands for 'done' Serial.flush(); //clear all other commands piled in the buffer //send completion of the command Serial.print('d'); } } int status1 = 0; int status2 = 0; int status3 = 0; int status4 = 0; int done = 0 ; while(done == 0 && ready == 1){ //move the servo to the desired position status1 = servoParallelControl(desiredAngle.base, baseServo, desiredDelay); status2 = servoParallelControl(desiredAngle.shoulder, shoulderServo, desiredDelay); status3 = servoParallelControl(desiredAngle.elbow, elbowServo, desiredDelay); status4 = servoParallelControl(desiredGrip, gripperServo, desiredDelay); if (status1 == 1 & status2 == 1 & status3 == 1 & status4 == 1){ done = 1; } }// end of while } //++++++++++++++++++++++++++++++FUNCTION DEFITNITIONS++++++++++++++++++++++++++++++++++++++++++ int servoParallelControl (int thePos, Servo theServo, int theSpeed ){ int startPos = theServo.read(); //read the current pos int newPos = startPos; //int theSpeed = speed; //define where the pos is with respect to the command // if the current position is less that the actual move up if (startPos < (thePos-5)){ newPos = newPos + 1; theServo.write(newPos); delay(theSpeed); return 0; } else if (newPos > (thePos + 5)){ newPos = newPos - 1; theServo.write(newPos); delay(theSpeed); return 0; } else { return 1; } }