Buat Detektor Logam Arduino Sensitif dengan Diskriminasi Logam Besi/Non-Besi
Komponen dan Perlengkapan
Arduino Nano R3
×
1
LCD Standar Adafruit - 16x2 Putih pada Biru
×
1
IC Operational Amplifier TL081
×
1
Speaker: 0.25W, 8 ohm
×
1
Transistor NPN Umum
×
1
Coil Pencarian
×
2
Resistor, Kapasitor
×
1
Aplikasi dan Layanan Online
Arduino IDE
Tentang Proyek Ini
Kali ini saya akan menunjukkan kepada Anda cara membuat detektor logam sensitif yang juga mampu membedakan antara material ferrous dan nonferrous. Sensitivitasnya memuaskan, mengingat ini adalah perangkat yang relatif sederhana.
Ini adalah lanjutan dari proyek David Crocker yang disajikan di Arduino CC Forum pada 2013. Saya memutuskan untuk menguji kodenya karena saya tidak menemukan bukti (gambar atau video) bahwa detektor logam ini telah dibuat oleh siapa pun dan berfungsi dengan baik.
Pertama saya membuat versi dasar dengan kode yang disajikan di GitHub, untuk memastikan fungsionalitas perangkat dan kemudian saya tingkatkan kodenya sehingga memiliki sinyal dengar, dan pada layar LCD 16x2 informasi visual tentang jenis objek yang terdeteksi (material ferrous atau nonferrous) dan bar grafik LCD untuk kedekatan objek yang terdeteksi.
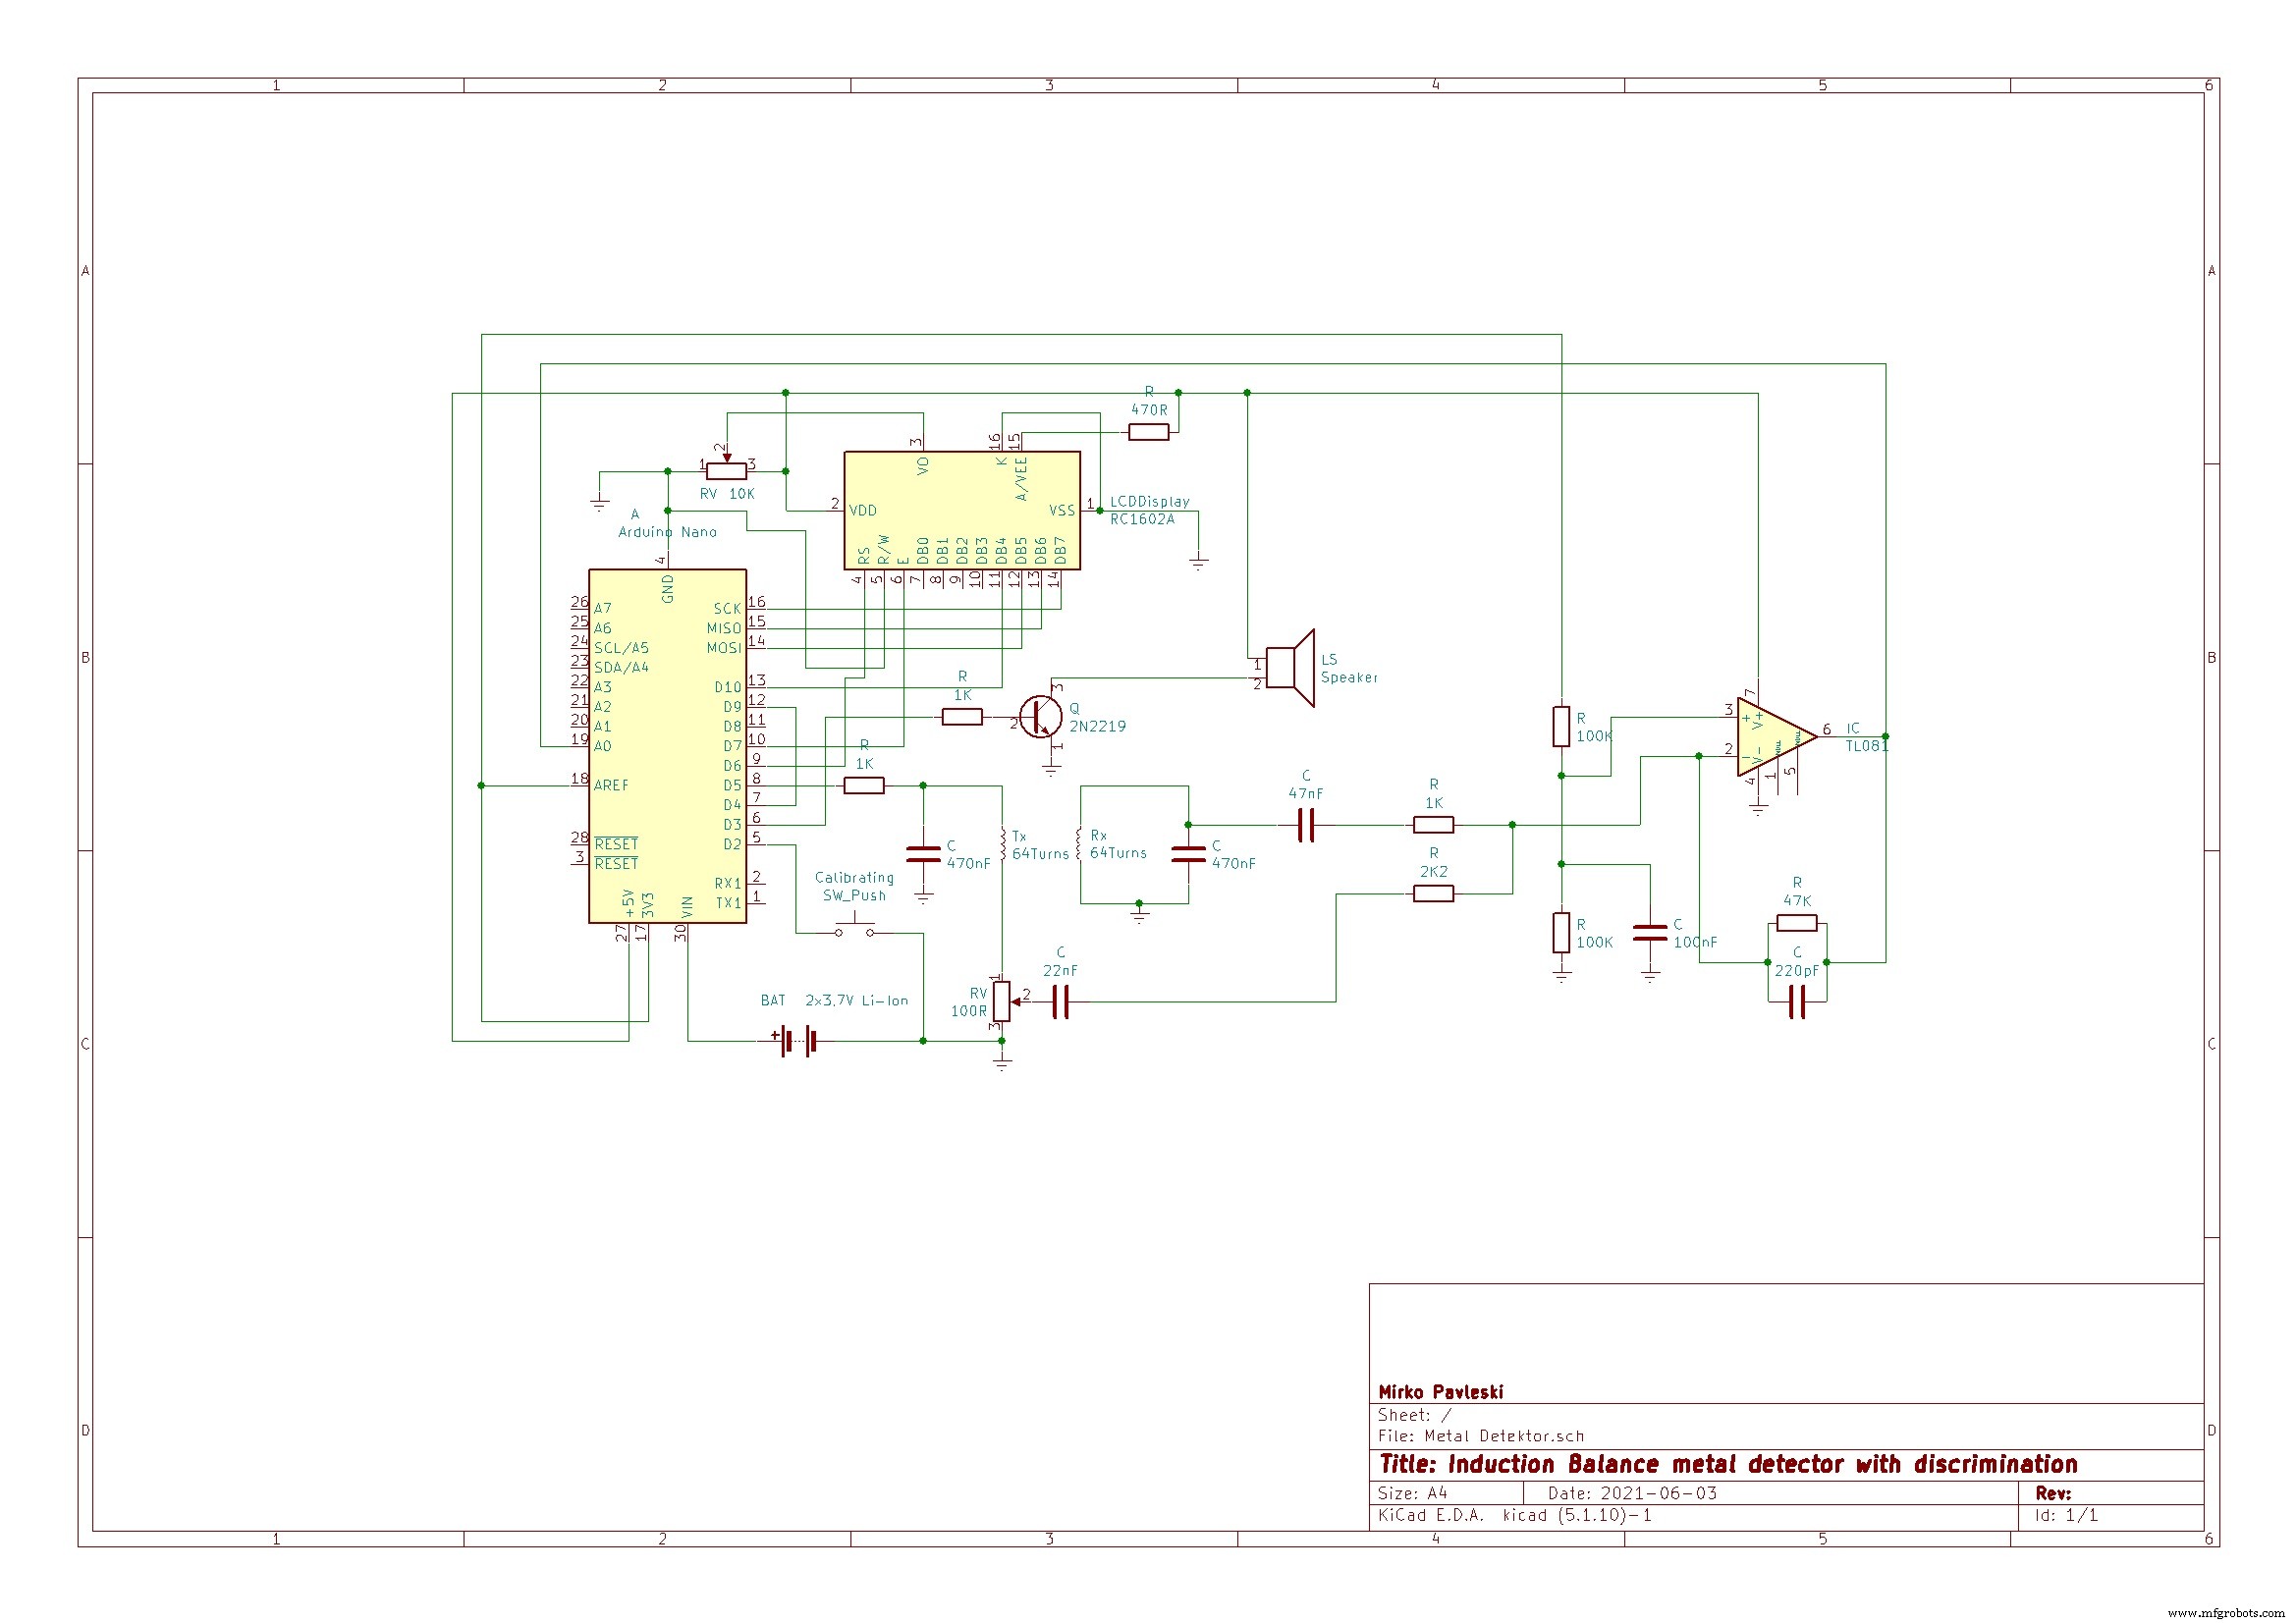
Perangkat ini sangat mudah dibuat dan terdiri dari hanya beberapa komponen:
- Mikrokontroler Arduino Nano
- Operational amplifier (dalam kasus saya LT1677, tetapi Anda dapat menggunakan TL081 atau 741)
- Beberapa resistor dan kapasitor
- Transistor kecil dan speaker
- Layar LCD
- 3 switch
- Potensiometer
- Baterai
- Dan coil pencarian
Ini adalah teknologi detektor Induksi Seimbang VLF (very low frequency) dan terdiri dari dua coil identik: coil transmitter dan coil receiver. Seperti pada semua detektor induksi seimbang, keseimbangan coil sangat kritis. Potensiometer digunakan untuk nolkan komponen 90 derajat keluar fasa yang kecil dari sinyal. (komponen dalam fasa dinolkan dengan menyesuaikan penempatan relatif coil dalam gaya detektor IB tipikal). Setiap coil digulung pada badan 11cm menggunakan 64 gulungan kawat tembaga enamel 0,5mm^2 dalam bentuk D, dilapisi pita di sekitarnya, dilapisi menggunakan foil aluminium yang diikat dengan kawat tembaga timah (dengan hati-hati untuk meninggalkan celah kecil sehingga layar tidak berperilaku seperti putaran pendek), dan diikat dengan tali kait pada papan plastik.
Pertama kita perlu menentukan frekuensi resonansi paralel dari rangkaian coil-kapasitor primer menggunakan salah satu dari banyak kalkulator online. Saya mengukurnya dengan osiloskop, tetapi jika Anda mematuhi dimensi yang diberikan di atas, itu akan tepat 7,64 kHz, jadi Anda dapat langsung memasukkan nilai yang diberikan dalam kode. Dalam kasus nilai frekuensi resonansi yang berbeda, kita perlu melakukan perubahan yang sesuai dalam kode dalam antrian:
#define TIMER1_TOP (249) // fine-tune the frequency
Seperti yang Anda lihat dalam video, hasilnya cukup baik. Tanpa kehadiran logam, perangkat sangat stabil. Rentangnya relatif besar dan misalnya, tutup logam dengan diameter 15 cm terdeteksi pada jarak lebih dari 30 cm. Objek logam yang lebih besar terdeteksi pada jarak lebih dari 40-50cm. Kita dapat mendeteksi koin kecil pada jarak 15cm di udara. Saya menggunakan dua baterai litium untuk sumber daya yang dihubungkan secara seri (7,4 volt) dan tegangan ini terhubung ke input Vin Arduino. Konsumsi tidak melebihi 20mA jadi baterai bertahan sangat lama. Video ini mendeskripsikan secara rinci pembangunan seluruh perangkat.
Ini hanya hasil awal. Ada kemungkinan untuk meningkatkan sensitivitas secara signifikan dengan memasukkan transistor MOSFET daya untuk menggerakkan coil Tx, tetapi saya akan menguji dan menyajikannya dalam salah satu video berikutnya.
Kode
Kode Arduino
Lib. LcdBarGraph
Kode ArduinoArduino
// Induction balance metal detector // We run the CPU at 16MHz and the ADC clock at 1MHz. ADC resolution is reduced to 8 bits at this speed. // Timer 1 is used to divide the system clock by about 256 to produce a 62.5kHz square wave. // This is used to drive timer 0 and also to trigger ADC conversions. // Timer 0 is used to divide the output of timer 1 by 8, giving a 7.8125kHz signal for driving the transmit coil. // This gives us 16 ADC clock cycles for each ADC conversion (it actually takes 13.5 cycles), and we take 8 samples per cycle of the coil drive voltage. // The ADC implements four phase-sensitive detectors at 45 degree intervals. Using 4 instead of just 2 allows us to cancel the third harmonic of the // coil frequency. // Timer 2 will be used to generate a tone for the earpiece or headset. // Other division ratios for timer 1 are possible, from about 235 upwards. // Wiring: // Connect digital pin 4 (alias T0) to digital pin 9 // Connect digital pin 5 through resistor to primary coil and tuning capacitor // Connect output from receive amplifier to analog pin 0. Output of receive amplifier should be biased to about half of the analog reference. // When using USB power, change analog reference to the 3.3V pin, because there is too much noise on the +5V rail to get good sensitivity. #include <LiquidCrystal.h> #include <LcdBarGraph.h> #define max_ampAverage 200 LiquidCrystal lcd(6, 7, 10, 11, 12, 13); LcdBarGraph lbg(&lcd, 16, 0, 1); #define TIMER1_TOP (259) // can adjust this to fine-tune the frequency to get the coil tuned (see above) #define USE_3V3_AREF (1) // set to 1 of running on an Arduino with USB power, 0 for an embedded atmega28p with no 3.3V supply available // Digital pin definitions // Digital pin 0 not used, however if we are using the serial port for debugging then it's serial input const int debugTxPin = 1; // transmit pin reserved for debugging const int encoderButtonPin = 2; // encoder button, also IN0 for waking up from sleep mode const int earpiecePin = 3; // earpiece, aka OCR2B for tone generation const int T0InputPin = 4; const int coilDrivePin = 5; const int LcdRsPin = 6; const int LcdEnPin = 7; const int LcdPowerPin = 8; // LCD power and backlight enable const int T0OutputPin = 9; const int lcdD4Pin = 10; const int lcdD5Pin = 11; // pins 11-13 also used for ICSP const int LcdD6Pin = 12; const int LcdD7Pin = 13; // Analog pin definitions const int receiverInputPin = 0; const int encoderAPin = A1; const int encoderBpin = A2; // Analog pins 3-5 not used // Variables used only by the ISR int16_t bins[4]; // bins used to accumulate ADC readings, one for each of the 4 phases uint16_t numSamples = 0; const uint16_t numSamplesToAverage = 1024; // Variables used by the ISR and outside it volatile int16_t averages[4]; // when we've accumulated enough readings in the bins, the ISR copies them to here and starts again volatile uint32_t ticks = 0; // system tick counter for timekeeping volatile bool sampleReady = false; // indicates that the averages array has been updated // Variables used only outside the ISR int16_t calib[4]; // values (set during calibration) that we subtract from the averages volatile uint8_t lastctr; volatile uint16_t misses = 0; // this counts how many times the ISR has been executed too late. Should remain at zero if everything is working properly. const double halfRoot2 = sqrt(0.5); const double quarterPi = 3.1415927/4.0; const double radiansToDegrees = 180.0/3.1415927; // The ADC sample and hold occurs 2 ADC clocks (= 32 system clocks) after the timer 1 overflow flag is set. // This introduces a slight phase error, which we adjust for in the calculations. const float phaseAdjust = (45.0 * 32.0)/(float)(TIMER1_TOP + 1); float threshold = 5.0; // lower = greater sensitivity. 10 is just about usable with a well-balanced coil. // The user will be able to adjust this via a pot or rotary encoder. void setup() { lcd.begin(16, 2);// LCD 16X2 pinMode(encoderButtonPin, INPUT_PULLUP); digitalWrite(T0OutputPin, LOW); pinMode(T0OutputPin, OUTPUT); // pulse pin from timer 1 used to feed timer 0 digitalWrite(coilDrivePin, LOW); pinMode(coilDrivePin, OUTPUT); // timer 0 output, square wave to drive transmit coil cli(); // Stop timer 0 which was set up by the Arduino core TCCR0B = 0; // stop the timer TIMSK0 = 0; // disable interrupt TIFR0 = 0x07; // clear any pending interrupt // Set up ADC to trigger and read channel 0 on timer 1 overflow #if USE_3V3_AREF ADMUX = (1 << ADLAR); // use AREF pin (connected to 3.3V) as voltage reference, read pin A0, left-adjust result #else ADMUX = (1 << REFS0) | (1 << ADLAR); // use Avcc as voltage reference, read pin A0, left-adjust result #endif ADCSRB = (1 << ADTS2) | (1 << ADTS1); // auto-trigger ADC on timer/counter 1 overflow ADCSRA = (1 << ADEN) | (1 << ADSC) | (1 << ADATE) | (1 << ADPS2); // enable adc, enable auto-trigger, prescaler = 16 (1MHz ADC clock) DIDR0 = 1; // Set up timer 1. // Prescaler = 1, phase correct PWM mode, TOP = ICR1A TCCR1A = (1 << COM1A1) | (1 << WGM11); TCCR1B = (1 << WGM12) | (1 << WGM13) | (1 << CS10); // CTC mode, prescaler = 1 TCCR1C = 0; OCR1AH = (TIMER1_TOP/2 >> 8); OCR1AL = (TIMER1_TOP/2 & 0xFF); ICR1H = (TIMER1_TOP >> 8); ICR1L = (TIMER1_TOP & 0xFF); TCNT1H = 0; TCNT1L = 0; TIFR1 = 0x07; // clear any pending interrupt TIMSK1 = (1 << TOIE1); // Set up timer 0 // Clock source = T0, fast PWM mode, TOP (OCR0A) = 7, PWM output on OC0B TCCR0A = (1 << COM0B1) | (1 << WGM01) | (1 << WGM00); TCCR0B = (1 << CS00) | (1 << CS01) | (1 << CS02) | (1 << WGM02); OCR0A = 7; OCR0B = 3; TCNT0 = 0; sei(); while (!sampleReady) {} // discard the first sample misses = 0; sampleReady = false; Serial.begin(19200); } // Timer 0 overflow interrupt. This serves 2 purposes: // 1. It clears the timer 0 overflow flag. If we don't do this, the ADC will not see any more Timer 0 overflows and we will not get any more conversions. // 2. It increments the tick counter, allowing is to do timekeeping. We get 62500 ticks/second. // We now read the ADC in the timer interrupt routine instead of having a separate comversion complete interrupt. ISR(TIMER1_OVF_vect) { ++ticks; uint8_t ctr = TCNT0; int16_t val = (int16_t)(uint16_t)ADCH; // only need to read most significant 8 bits if (ctr != ((lastctr + 1) & 7)) { ++misses; } lastctr = ctr; int16_t *p = &bins[ctr & 3]; if (ctr < 4) { *p += (val); if (*p > 15000) *p = 15000; } else { *p -= val; if (*p < -15000) *p = -15000; } if (ctr == 7) { ++numSamples; if (numSamples == numSamplesToAverage) { numSamples = 0; if (!sampleReady) // if previous sample has been consumed { memcpy((void*)averages, bins, sizeof(averages)); sampleReady = true; } memset(bins, 0, sizeof(bins)); } } } void loop() { while (!sampleReady) {} uint32_t oldTicks = ticks; if (digitalRead(encoderButtonPin) == LOW) { // Calibrate button pressed. We save the current phase detector outputs and subtract them from future results. // This lets us use the detector if the coil is slightly off-balance. // It would be better to everage several samples instead of taking just one. for (int i = 0; i < 4; ++i) { calib[i] = averages[i]; } sampleReady = false; Serial.print("Calibrated: "); lcd.setCursor(0,0); lcd.print("Calibrating... "); for (int i = 0; i < 4; ++i) { Serial.write(' '); Serial.print(calib[i]); lcd.setCursor(0,1); lcd.print(' '); lcd.print(calib[4]); lcd.print(" "); } Serial.println(); } else { for (int i = 0; i < 4; ++i) { averages[i] -= calib[i]; } const double f = 200.0; // Massage the results to eliminate sensitivity to the 3rd harmonic, and divide by 200 double bin0 = (averages[0] + halfRoot2 * (averages[1] - averages[3]))/f; double bin1 = (averages[1] + halfRoot2 * (averages[0] + averages[2]))/f; double bin2 = (averages[2] + halfRoot2 * (averages[1] + averages[3]))/f; double bin3 = (averages[3] + halfRoot2 * (averages[2] - averages[0]))/f; sampleReady = false; // we've finished reading the averages, so the ISR is free to overwrite them again double amp1 = sqrt((bin0 * bin0) + (bin2 * bin2)); double amp2 = sqrt((bin1 * bin1) + (bin3 * bin3)); double ampAverage = (amp1 + amp2)/2.0; // The ADC sample/hold takes place 2 clocks after the timer overflow double phase1 = atan2(bin0, bin2) * radiansToDegrees + 45.0; double phase2 = atan2(bin1, bin3) * radiansToDegrees; if (phase1 > phase2) { double temp = phase1; phase1 = phase2; phase2 = temp; } double phaseAverage = ((phase1 + phase2)/2.0) - phaseAdjust; if (phase2 - phase1 > 180.0) { if (phaseAverage < 0.0) { phaseAverage += 180.0; } else { phaseAverage -= 180.0; } } // For diagnostic purposes, print the individual bin counts and the 2 indepedently-calculated gains and phases Serial.print(misses); Serial.write(' '); if (bin0 >= 0.0) Serial.write(' '); Serial.print(bin0, 2); Serial.write(' '); if (bin1 >= 0.0) Serial.write(' '); Serial.print(bin1, 2); Serial.write(' '); if (bin2 >= 0.0) Serial.write(' '); Serial.print(bin2, 2); Serial.write(' '); if (bin3 >= 0.0) Serial.write(' '); Serial.print(bin3, 2); Serial.print(" "); Serial.print(amp1, 2); Serial.write(' '); Serial.print(amp2, 2); Serial.write(' '); if (phase1 >= 0.0) Serial.write(' '); Serial.print(phase1, 2); Serial.write(' '); if (phase2 >= 0.0) Serial.write(' '); Serial.print(phase2, 2); Serial.print(" "); // Print the final amplitude and phase, which we use to decide what (if anything) we have found) if (ampAverage >= 0.0) Serial.write(' '); Serial.print(ampAverage, 1); Serial.write(' '); lcd.setCursor(0,0); lcd.print(" "); lcd.print(ampAverage); lcd.setCursor(0,1); lbg.drawValue(ampAverage, max_ampAverage); if (phaseAverage >= 0.0) Serial.write(' '); Serial.print((int)phaseAverage); // Decide what we have found and tell the user if (ampAverage >= threshold) { // When held in line with the centre of the coil: // - non-ferrous metals give a negative phase shift, e.g. -90deg for thick copper or aluminium, a copper olive, -30deg for thin alumimium. // Ferrous metals give zero phase shift or a small positive phase shift. // So we'll say that anything with a phase shift below -20deg is non-ferrous. if (phaseAverage < -20.0) { Serial.print(" Non-ferrous"); lcd.setCursor(0,0); lcd.print("NonFerous "); } else { Serial.print(" Ferrous"); lcd.setCursor(0,0); lcd.print("Ferrous "); } float temp = ampAverage; int thisPitch = map (temp, 10, 200, 100, 1500); tone(3, thisPitch,120); while (temp > threshold) { Serial.write('!'); temp -= (threshold/2); } } Serial.println(); } while (ticks - oldTicks < 8000) { } }