Pemutar MP3 Serial Catalex untuk Arduino UNO – Pengaturan & Kontrol Mudah
Komponen dan Perlengkapan
Arduino UNO
×
1
Serial MP3 player from catalex
×
1
Some nice funk music
×
1
Aplikasi dan Layanan Online
Arduino IDE
Tentang Proyek Ini
Cara Menggunakan SERIAL MP3 PLAYER V1.0 dari CATALEX:
Pertama, unduh pustaka seperti biasa:
#include <SoftwareSerial.h>
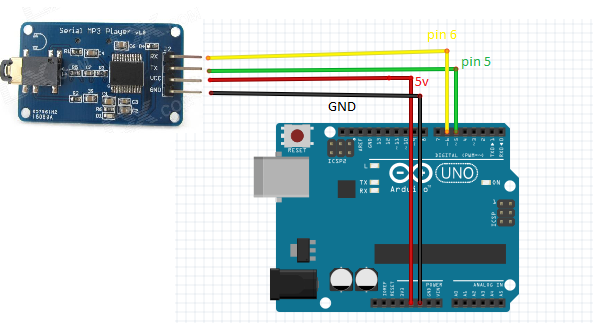
Sekarang kita memilih pin Arduino mana yang akan dipasang ke pemutar MP3 dan menginisialisasi protokol serial.
#define ARDUINO_RX 5//should connect to TX of the Serial MP3 Player module #define ARDUINO_TX 6//connect to RX of the module SoftwareSerial mySerial(ARDUINO_RX, ARDUINO_TX);//init the serial protocol, tell to myserial wich pins are TX and RX
Di sini saya hanya menerjemahkan ke #define hal-hal dari datasheet:
//////////////////////////////////////////////////////////////////////////////////// //all the commands needed in the datasheet(https://geekmatic.in.ua/pdf/Catalex_MP3_board.pdf) static int8_t Send_buf[8] = {0} ;//The MP3 player undestands orders in a 8 int string //0X7E FF 06 command 00 00 00 EF;(if command =01 next song order) #define NEXT_SONG 0X01 #define PREV_SONG 0X02 #define CMD_PLAY_W_INDEX 0X03 //DATA IS REQUIRED (number of song) #define VOLUME_UP_ONE 0X04 #define VOLUME_DOWN_ONE 0X05 #define CMD_SET_VOLUME 0X06//DATA IS REQUIRED (number of volume from 0 up to 30(0x1E)) #define SET_DAC 0X17 #define CMD_PLAY_WITHVOLUME 0X22 //data is needed 0x7E 06 22 00 xx yy EF;(xx volume)(yy number of song) #define CMD_SEL_DEV 0X09 //SELECT STORAGE DEVICE, DATA IS REQUIRED #define DEV_TF 0X02 //HELLO,IM THE DATA REQUIRED #define SLEEP_MODE_START 0X0A #define SLEEP_MODE_WAKEUP 0X0B #define CMD_RESET 0X0C//CHIP RESET #define CMD_PLAY 0X0D //RESUME PLAYBACK #define CMD_PAUSE 0X0E //PLAYBACK IS PAUSED #define CMD_PLAY_WITHFOLDER 0X0F//DATA IS NEEDED, 0x7E 06 0F 00 01 02 EF;(play the song with the directory \01\002xxxxxx.mp3 #define STOP_PLAY 0X16 #define PLAY_FOLDER 0X17// data is needed 0x7E 06 17 00 01 XX EF;(play the 01 folder)(value xx we dont care) #define SET_CYCLEPLAY 0X19//data is needed 00 start; 01 close #define SET_DAC 0X17//data is needed 00 start DAC OUTPUT;01 DAC no output ////////////////////////////////////////////////////////////////////////////////////
Chip MP3 memahami perintah yang terdiri dari int array[8] dengan format ini
0x7E FF aa bb 00 xx yy EF
Dimana:
int pertama dan terakhir tetap dengan nilai 0x7E dan 0xEF
aa adalah nomor versi, cukup masukkan 0x06;
bb adalah perintah kontrol sebenarnya yang tercantum di poin sebelumnya
xx adalah int data pertama
yy adalah int data kedua
Dan ini adalah fungsi sebenarnya yang membangun array. Kita hanya perlu memilih salah satu perintah #defined dan memasukkan nilai data.
void sendCommand(int8_t command, int16_t dat) { delay(20); Send_buf[0] = 0x7e; //starting byte Send_buf[1] = 0xff; //version Send_buf[2] = 0x06; //the number of bytes of the command without starting byte and ending byte Send_buf[3] = command; // Send_buf[4] = 0x00;//0x00 = no feedback, 0x01 = feedback Send_buf[5] = (int8_t)(dat >> 8);//datah Send_buf[6] = (int8_t)(dat); //datal Send_buf[7] = 0xef; //ending byte for(uint8_t i=0; i<8; i++)// { mySerial.write(Send_buf[i]) ; } }
Di dalam fungsi setup kita perlu memilih perangkat yang tepat untuk TF dan memberinya waktu untuk menyetel (proses asinkron ajaib):
void setup() { mySerial.begin(9600);//Start our Serial coms for our serial monitor! delay(500);//Wait chip initialization is complete sendCommand(CMD_SEL_DEV, DEV_TF);//select the TF card delay(200);//wait for 200ms }
Dalam loop, saya melakukan play sederhana lagu yang ditandai sebagai 001:
void loop() { sendCommand(CMD_PLAY_WITHVOLUME, 0X0F01);//play the first song with volume 15 class delay(1000000);//the programm will send the play option each 100 seconds to the catalex chip }
Cara mengunggah lagu ke kartu SD:
Seperti yang dikatakan dalam datasheet dengan bahasa Inggris yang benar-benar buruk:
Chip MP3 membaca .mp3 atau .wav secara alfabetis terindeks, jadi jika kita membuat folder dengan nama 01, 02. Dan lagu dengan nama 001xxxxx.mp3, 002xxxx.mp3. Kami dapat yakin tentang lagu/folder yang digunakan.
Di sini Anda memiliki perpustakaan suara gratis.
HAPPY HACKING!
EXTRA: kode yang sama tetapi menggunakan hardware serial (saya harus untuk papan STM32 saya)
Kode
TEST the device
TEST the deviceArduino
initialice and play one song with volume 30
//code rearranged by Javier Muñoz 10/11/2016 ask me at javimusama@hotmail.com #include <SoftwareSerial.h> #define ARDUINO_RX 5//should connect to TX of the Serial MP3 Player module #define ARDUINO_TX 6//connect to RX of the module SoftwareSerial mySerial(ARDUINO_RX, ARDUINO_TX);//init the serial protocol, tell to myserial wich pins are TX and RX //////////////////////////////////////////////////////////////////////////////////// //all the commands needed in the datasheet(https://geekmatic.in.ua/pdf/Catalex_MP3_board.pdf) static int8_t Send_buf[8] = {0} ;//The MP3 player undestands orders in a 8 int string //0X7E FF 06 command 00 00 00 EF;(if command =01 next song order) #define NEXT_SONG 0X01 #define PREV_SONG 0X02 #define CMD_PLAY_W_INDEX 0X03 //DATA IS REQUIRED (number of song) #define VOLUME_UP_ONE 0X04 #define VOLUME_DOWN_ONE 0X05 #define CMD_SET_VOLUME 0X06//DATA IS REQUIRED (number of volume from 0 up to 30(0x1E)) #define SET_DAC 0X17 #define CMD_PLAY_WITHVOLUME 0X22 //data is needed 0x7E 06 22 00 xx yy EF;(xx volume)(yy number of song) #define CMD_SEL_DEV 0X09 //SELECT STORAGE DEVICE, DATA IS REQUIRED #define DEV_TF 0X02 //HELLO,IM THE DATA REQUIRED #define SLEEP_MODE_START 0X0A #define SLEEP_MODE_WAKEUP 0X0B #define CMD_RESET 0X0C//CHIP RESET #define CMD_PLAY 0X0D //RESUME PLAYBACK #define CMD_PAUSE 0X0E //PLAYBACK IS PAUSED #define CMD_PLAY_WITHFOLDER 0X0F//DATA IS NEEDED, 0x7E 06 0F 00 01 02 EF;(play the song with the directory \01\002xxxxxx.mp3 #define STOP_PLAY 0X16 #define PLAY_FOLDER 0X17// data is needed 0x7E 06 17 00 01 XX EF;(play the 01 folder)(value xx we dont care) #define SET_CYCLEPLAY 0X19//data is needed 00 start; 01 close #define SET_DAC 0X17//data is needed 00 start DAC OUTPUT;01 DAC no output //////////////////////////////////////////////////////////////////////////////////// void setup() { Serial.begin(9600);//Start our Serial coms for serial monitor in our pc mySerial.begin(9600);//Start our Serial coms for THE MP3 delay(500);//Wait chip initialization is complete sendCommand(CMD_SEL_DEV, DEV_TF);//select the TF card delay(200);//wait for 200ms } void loop() { sendCommand(CMD_PLAY_WITHVOLUME, 0X0F01);//play the first song with volume 15 class delay(1000000);//the programm will send the play option each 100 seconds to the catalex chip } void sendCommand(int8_t command, int16_t dat) { delay(20); Send_buf[0] = 0x7e; //starting byte Send_buf[1] = 0xff; //version Send_buf[2] = 0x06; //the number of bytes of the command without starting byte and ending byte Send_buf[3] = command; // Send_buf[4] = 0x00;//0x00 = no feedback, 0x01 = feedback Send_buf[5] = (int8_t)(dat >> 8);//datah Send_buf[6] = (int8_t)(dat); //datal Send_buf[7] = 0xef; //ending byte for(uint8_t i=0; i<8; i++)// { mySerial.write(Send_buf[i]) ;//send bit to serial mp3 Serial.print(Send_buf[i],HEX);//send bit to serial monitor in pc } Serial.println(); }
Skematik
Pada datasheet kita dapat melihat supply daya dapat bervariasi 3,2 hingga 5v dengan konsumsi 200mA