Pengontrol CNC Pendant Arduino HID Kustom – DIY, Hemat Biaya
Komponen dan Perlengkapan
Berikut adalah komponen yang diperlukan untuk membangun pengontrol CNC pendant ini:
- Arduino Leonardo – 1 unit
- Pushbutton momentary (dapat dilengkapi dengan label dan lampu indikator) – 1 set
Tentang Proyek Ini
Terakhir diperbarui:
31 Juli 2018: file CAD ditambahkan
24 Juli 2018: skema dan bagian pemrograman ditambahkan
Mengapa Proyek Ini Dibuat?
Anda dapat membeli pendant untuk mesin CNC Anda, tetapi karena saya sendiri membangun mesin kayu CNC, mengapa tidak membuat pendant sendiri?
Selain itu, pendant standar untuk papan kontrol saya akan berupa 100 euro dan hanya memiliki 2 tombol serta sebuah roda tangan (handwheel).
Pendant saya memiliki 23 tombol dengan maksimal 6 fungsi per tombol dan satu roda tangan.
Satu komentar mungkin adalah, "itu besar dan berat!" Namun dalam praktiknya, ternyata sangat nyaman memiliki pendant yang tetap diam saat memutar roda tangan...
Bagaimana Cara Kerjanya?
Keunikan Arduino dengan chip 32u4 (tidak semua model memiliki chip ini) adalah kemampuan untuk mensimulasikan keyboard dan/atau mouse. Saat Anda menghubungkan Leonardo ke komputer, komputer akan 'melihatnya' sebagai keyboard. Luar biasa!
Jadi saat Anda memprogram Arduino, menambahkan beberapa saklar, dan menghubungkannya ke PC atau Mac, Anda dapat mengirim (beberapa) klik tombol/gerakan mouse ke komputer dengan menekan tombol. Seperti yang saya sebutkan, 23 tombol/6 fungsi per tombol = banyak opsi..
Semua ini tergantung pada penggunaan perpustakaan (library) yang tepat untuk sketsa Arduino! Setelah mencari selama berjam-jam, saya akhirnya menemukan perpustakaan yang hebat yang saya sertakan di halaman ini: Clickbutton.
Dengan perpustakaan ini, Anda mendapatkan kemungkinan berikut untuk setiap (momentary!) tombol:
- Klik tunggal
- Klik ganda
- Klik tiga kali
- Klik tunggal dan tahan
- Klik ganda dan tahan
- Klik tiga kali dan tahan
Anda juga mendapatkan fungsi debounce dalam perpustakaan Clickbutton yang sangat penting.
Anda dapat menyesuaikan waktu untuk setiap tombol, tetapi waktu standar adalah >= 250ms untuk mengenali klik dan >= 1000ms untuk mengenali tombol yang ditekan tahan.
Hanya cuplikan dari sketsa saya untuk tombol 3 fungsi sumbu X (tombol 13):
if (button[13].clicks != 0)
 {
 switch (button[13].clicks)
 {
 case 1: // Single click
 // Handwheel on X
 shortcut_HANDWHEEL_X();
 break;
 case 2: // Double click
 // Zero X
 shortcut_ZERO_X();
 break;
 case 3: // Triple click
 break;
 case -1: // Single Click and Hold
 // USER MACRO 18: X-axis: goto work zero position G0 X0.0000
 press_ESC();
 goto_MAIN_MENU();
 user_MACRO_18();
 break;
 case -2: // Double Click and Hold
 break;
 case -3: // Triple Click and Hold
 break;
 }
 }
Kotak Perabot (Enclosure)
Saya memilih menggunakan kayu mahoni untuk kotak pendant. Saya suka bekerja dengan kayu dan tampilan serta sensasinya luar biasa. Dengan cara ini, saya dapat membuat kotak yang benar-benar kustom yang tidak selalu mungkin dengan kotak ABS jadi yang dapat Anda beli dengan harga 20-50 euro.
Gambar dibuat dengan perangkat lunak Vectric Cut2D. Saya senang telah berinvestasi pada paket perangkat lunak ini karena membuat kurva pembelajaran CNC menjadi kurang curam dan lebih menyenangkan. Ini juga membantu Anda merancang pekerjaan dua sisi dengan sangat mudah.
Setelah sedikit dijatah, kayu dilapisi banyak lapisan vernir jernih.
Saklar (The Switches)
Saklar-saklar ini hebat. Mereka adalah tipe momentary, kecuali saklar yang saya gunakan untuk menyalakan/mematikan LED. Anda dapat menempelkan label di balik tutup atas yang transparan dan jika ingin, Anda dapat menyalakan saklar dengan LED bawaan.
Saya menggunakan resistor 1KΩ per saklar, menggunakan 2mA pada 5Volt.
Berikut adalah video dengan audio bahasa Indonesia, hanya untuk mendengarkan suara yang dihasilkan oleh saklar. Komentar saya tidak penting. Saya bilang bahwa saklar agak keras namun setidaknya Anda tahu kapan telah menekannya ;)
Salah satu kelemahan menggunakan saklar ini adalah mereka memerlukan kotak yang cukup tinggi atau 'tebal'. Ketebalan kayu adalah 21mm (0.82 inci atau 53/64 inci) untuk bagian atas DAN bawah. Setelah pemesinan, ketebalan total pendant adalah 36,5 mm (14,37 atau 14 3/8 inci)
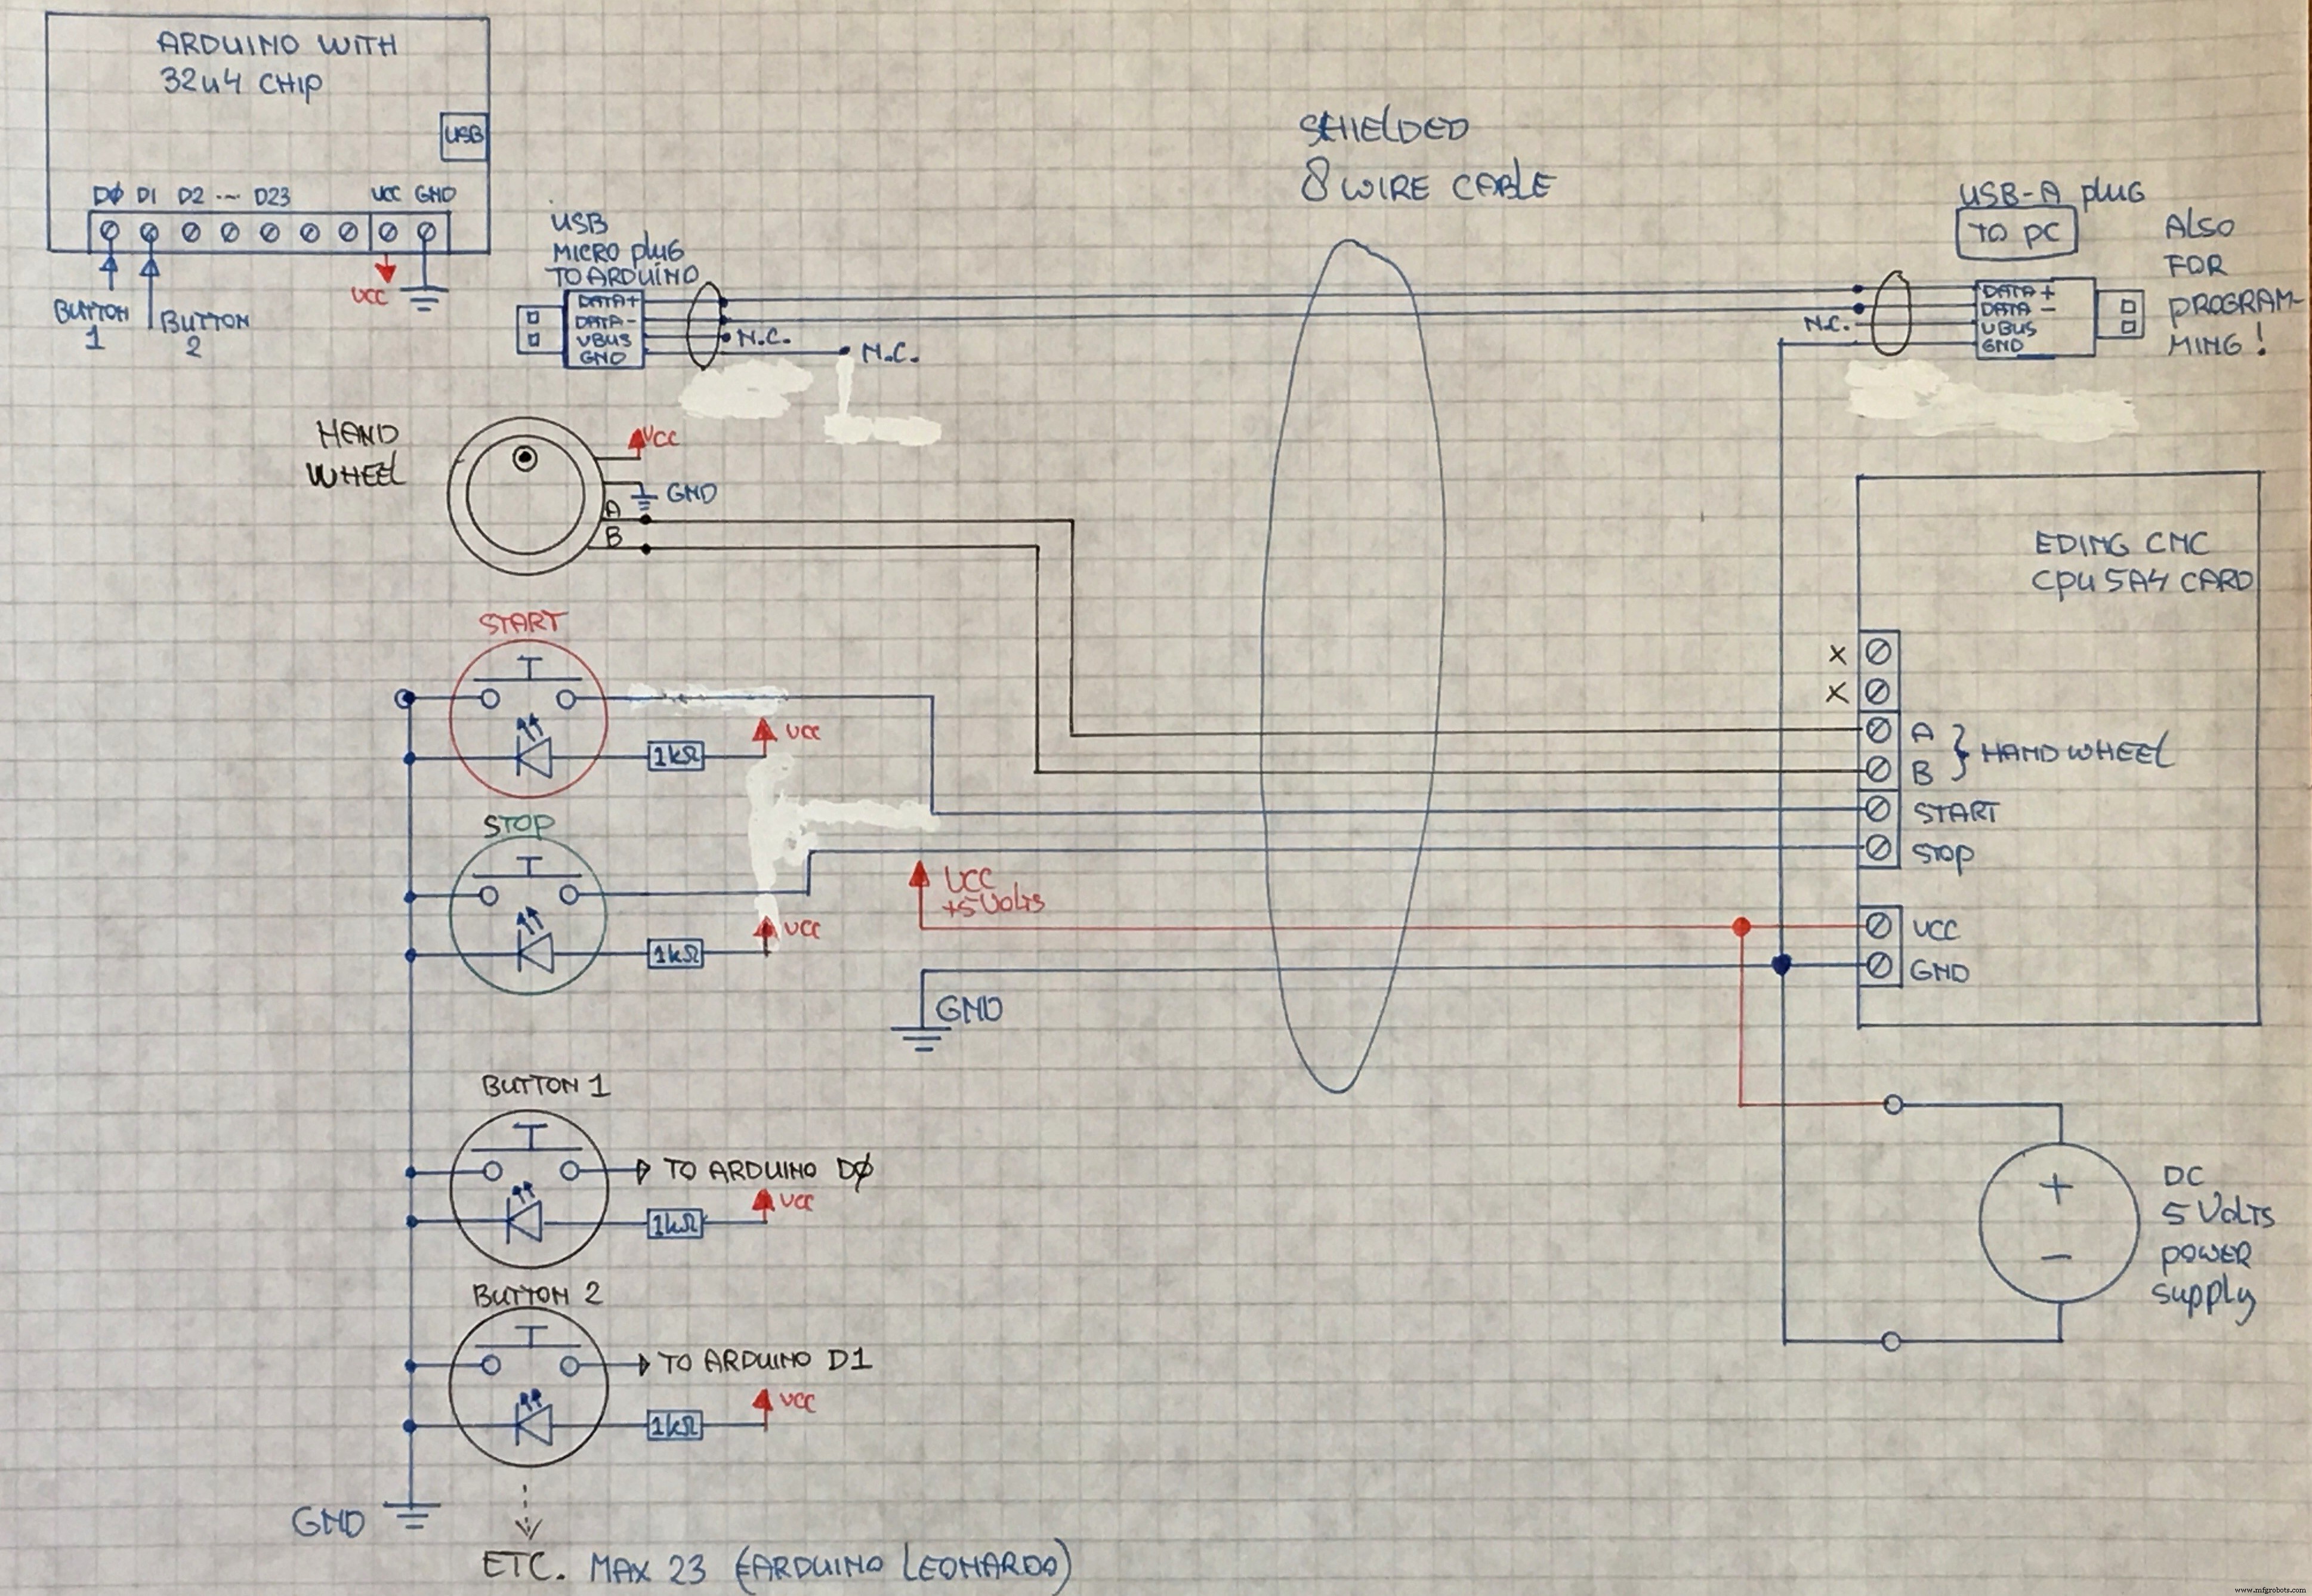
Menghubungkan saklar sangat mudah... Saya menggunakan resistor pull-up bawaan Arduino jadi semua yang perlu Anda lakukan adalah menghubungkan satu sisi semua saklar ke ground dan sisi lain ke input Arduino.
Label Saklar (The Switch Labels)
Untuk melabeli saklar, saya menggunakan stiker Poly-Vinyl berkualitas tinggi untuk printer laser warna saya. (Tersedia juga untuk printer injek tinta). Mencetak pada kertas biasa bukan opsi karena Anda akan melihat struktur kertas dengan jelas saat dihidupkan.
Kemudian saya melepas tutup transparan dari saklar dan menempelkan label pada potongan plastik di bawahnya.
Ikon sama dengan yang digunakan dalam perangkat lunak Eding CNC yang disertakan dengan perangkat saat Anda membelinya. Saya hanya menyalin ikon JPEG dari direktori perangkat lunak dan mengubah beberapa dalam program grafik untuk menyesuaikan dengan kebutuhan saya.
Roda Tangan (The Handwheel)
Ini adalah roda tangan elektronik CNC standar 60mm 100PPR 6 Terminal
Jadi 100 pulsa per putaran, dalam sebagian besar perangkat lunak CNC Anda dapat mengedit nilai ini.
Elektronik (The Electronics)
Sebagai HID (Human Interface Device), saya menggunakan mikrokontroler Arduino Leonardo.
Papan mikrokontroler ini telah dihentikan produksi namun saya dapat membelinya di beberapa toko online. Sebagai alternatif, Anda dapat menggunakan Arduino Micro yang menggunakan chip 32u4 yang sama.
Dengan cara ini, saya dapat meniru sentuhan keyboard dan mengontrol banyak fungsi perangkat lunak pemesinan CNC, dalam hal ini Eding CNC.
Arduino Leonardo memiliki 23 pin input yang lebih dari cukup. Seperti yang disebutkan, Anda dapat menetapkan 6 fungsi per tombol.
Konsumsi daya total adalah 150mA dengan LED tombol menyala.
Memprogram Mikrokontroler Arduino
Untuk memprogram Arduino, Anda perlu meninggalkan pendant terhubung ke suplai daya CNC dan mengunggah sketsa baru menggunakan perangkat lunak Arduino IDE. (Lihat catatan di bawah) Jadi tentu Anda menggunakan soket USB yang sama yang digunakan untuk mensimulasikan keyboard.
Jika Anda ingin menggunakan PC (laptop) lain untuk pemrograman, cukup colokkan soket USB ke PC lain dan program Arduino, lagi-lagi sambil meninggalkan pendant terhubung dan diberi daya oleh suplai daya CNC
Selamat membuat pendant Anda sendiri!
Kode
Kode CNC PendantArduino
/* This sketch is to use a Leanardo as a HID for in this case an Eding CNC Pendant The beauty of using a Leonardo is that you are so flexible! I have 20 keys on my Pendant but per key you can use 6 different functions. Way too much but I do use on some keys 3 functions. Very convienient and easy to use and manage. */ #include "ClickButton.h" #include "Keyboard.h" long int aux1_delay = 0; // Nr. of buttons in the array const int buttons = 20; // the Button // buttonPin0 is a dummy because I want to start with '1' instead of '0' const int buttonPin0 = 0; // these are actually used const int buttonPin1 = 0; const int buttonPin2 = 1; const int buttonPin3 = 2; const int buttonPin4 = 3; const int buttonPin5 = 4; const int buttonPin6 = 5; const int buttonPin7 = 6; const int buttonPin8 = 7; const int buttonPin9 = 8; const int buttonPin10 = 9; const int buttonPin11 = 10; const int buttonPin12 = 11; const int buttonPin13 = 12; const int buttonPin14 = 13; const int buttonPin15 = A0; const int buttonPin16 = A1; const int buttonPin17 = A2; const int buttonPin18 = A3; const int buttonPin19 = A4; const int buttonPin20 = A5; // Instantiate ClickButton objects in an array ClickButton button[21] = { // dummy ClickButton (buttonPin0, LOW, CLICKBTN_PULLUP), // used instances of Clickbutton ClickButton (buttonPin1, LOW, CLICKBTN_PULLUP), ClickButton (buttonPin2, LOW, CLICKBTN_PULLUP), ClickButton (buttonPin3, LOW, CLICKBTN_PULLUP), ClickButton (buttonPin4, LOW, CLICKBTN_PULLUP), ClickButton (buttonPin5, LOW, CLICKBTN_PULLUP), ClickButton (buttonPin6, LOW, CLICKBTN_PULLUP), ClickButton (buttonPin7, LOW, CLICKBTN_PULLUP), ClickButton (buttonPin8, LOW, CLICKBTN_PULLUP), ClickButton (buttonPin9, LOW, CLICKBTN_PULLUP), ClickButton (buttonPin10, LOW, CLICKBTN_PULLUP), ClickButton (buttonPin11, LOW, CLICKBTN_PULLUP), ClickButton (buttonPin12, LOW, CLICKBTN_PULLUP), ClickButton (buttonPin13, LOW, CLICKBTN_PULLUP), ClickButton (buttonPin14, LOW, CLICKBTN_PULLUP), ClickButton (buttonPin15, LOW, CLICKBTN_PULLUP), ClickButton (buttonPin16, LOW, CLICKBTN_PULLUP), ClickButton (buttonPin17, LOW, CLICKBTN_PULLUP), ClickButton (buttonPin18, LOW, CLICKBTN_PULLUP), ClickButton (buttonPin19, LOW, CLICKBTN_PULLUP), ClickButton (buttonPin20, LOW, CLICKBTN_PULLUP), }; void setup() { // Setup button timers (all in milliseconds / ms) for (int i = 1; i <= buttons; i++) { button[i].debounceTime = 20; // Debounce timer in ms button[i].multiclickTime = 250; // Time limit for multi clicks button[i].longClickTime = 1000; // Time until long clicks register } } void loop() { // Update state of all the buttons in the array // NOTE: not started at '0' but '1' for (int i = 1; i <= buttons; i++) { // Update state of all buitton button[i].Update(); } // execute button presses if (button[1].clicks != 0) { switch (button[1].clicks) { case 1: // Single click // press the RESET button (F1) press_RESET(); break; case 2: // Double click press_ESC(); break; case 3: // Triple click break; case -1: // Single Click and Hold // TURN DRIVERS OFF press_ESC(); // get out of handwheel mode goto_MACHINE_IO_MENU(); press_F2(); goto_MAIN_MENU(); break; case -2: // Double Click and Hold break; case -3: // Triple Click and Hold break; } } if (button[2].clicks != 0) { switch (button[2].clicks) { case 1: // Single click // goto MAIN menu press_ESC(); // get out of handwheel mode goto_MAIN_MENU(); break; case 2: // Double click break; case 3: // Triple click break; case -1: // Single Click and Hold break; case -2: // Double Click and Hold break; case -3: // Triple Click and Hold break; } } if (button[3].clicks != 0) { switch (button[3].clicks) { case 1: // Single click break; case 2: // Double click break; case 3: // Triple click break; case -1: // Single Click and Hold // HOME all axes press_ESC(); // get out of handwheel mode goto_MAIN_MENU(); shortcut_HOME_ALL(); break; case -2: // Double Click and Hold break; case -3: // Triple Click and Hold break; } } if (button[4].clicks != 0) { switch (button[4].clicks) { case 1: // Single click // TOGGLE MDI shortcut_TOGGLE_MDI(); break; case 2: // Double click break; case 3: // Triple click break; case -1: // Single Click and Hold break; case -2: // Double Click and Hold break; case -3: // Triple Click and Hold break; } } if (button[5].clicks != 0) { switch (button[5].clicks) { case 1: // Single click // USER MACRO 1: SET Z HEIGHT press_ESC(); // get out of handwheel mode goto_AUTO_MENU(); user_MACRO_1(); // SET Z HEIGHT break; case 2: // Double click break; case 3: // Triple click break; case -1: // Single Click and Hold break; case -2: // Double Click and Hold break; case -3: // Triple Click and Hold break; } } if (button[6].clicks != 0) { switch (button[6].clicks) { case 1: // Single click // goto AUTO menu press_ESC(); // get out of handwheel mode goto_AUTO_MENU(); break; case 2: // Double click break; case 3: // Triple click break; case -1: // Single Click and Hold break; case -2: // Double Click and Hold break; case -3: // Triple Click and Hold break; } } if (button[7].clicks != 0) { switch (button[7].clicks) { case 1: // Single click // REDRAW GRAPHICS SCREEN press_ESC(); // get out of handwheel mode goto_AUTO_MENU(); press_F3(); // redraw break; case 2: // Double click break; case 3: // Triple click break; case -1: // Single Click and Hold break; case -2: // Double Click and Hold break; case -3: // Triple Click and Hold break; } } if (button[8].clicks != 0) { switch (button[8].clicks) { case 1: // Single click // LOAD FILE press_ESC(); // get out of handwheel mode goto_AUTO_MENU(); press_F2(); // load a file break; case 2: // Double click break; case 3: // Triple click break; case -1: // Single Click and Hold break; case -2: // Double Click and Hold break; case -3: // Triple Click and Hold break; } } if (button[9].clicks != 0) { switch (button[9].clicks) { case 1: // Single click // AUX1 TOGGLE (VACUUM CLEANER) // prevent switching to soon so only after // a delay of 1000ms if ( millis() - aux1_delay > 1000 ) { // toggle AUX1 on or off shortcut_TOGGLE_AUX1(); // start delay timer aux1 aux1_delay = millis(); } break; case 2: // Double click break; case 3: // Triple click break; case -1: // Single Click and Hold break; case -2: // Double Click and Hold break; case -3: // Triple Click and Hold break; } } if (button[10].clicks != 0) { switch (button[10].clicks) { case 1: // Single click // MIST TOGGLE (light) shortcut_TOGGLE_MIST(); break; case 2: // Double click break; case 3: // Triple click break; case -1: // Single Click and Hold break; case -2: // Double Click and Hold break; case -3: // Triple Click and Hold break; } } if (button[11].clicks != 0) { switch (button[11].clicks) { case 1: // Single click // Goto P1 (g28) - USER MENU OPTIE 16 press_ESC(); user_MACRO_16(); break; case 2: // Double click break; case 3: // Triple click break; case -1: // Single Click and Hold break; case -2: // Double Click and Hold break; case -3: // Triple Click and Hold break; } } if (button[12].clicks != 0) { switch (button[12].clicks) { case 1: // Single click // Goto P2 (g30) - USER MENU OPTIE 17 press_ESC(); user_MACRO_17(); break; case 2: // Double click break; case 3: // Triple click break; case -1: // Single Click and Hold break; case -2: // Double Click and Hold break; case -3: // Triple Click and Hold break; } } if (button[13].clicks != 0) { switch (button[13].clicks) { case 1: // Single click // Handwheel on X shortcut_HANDWHEEL_X(); break; case 2: // Double click // Zero X shortcut_ZERO_X(); break; case 3: // Triple click break; case -1: // Single Click and Hold // USER MACRO 18: X-axis: goto work zero position G0 X0.0000 press_ESC(); goto_MAIN_MENU(); user_MACRO_18(); break; case -2: // Double Click and Hold break; case -3: // Triple Click and Hold break; } } if (button[14].clicks != 0) { switch (button[14].clicks) { case 1: // Single click // Handwheel on Y shortcut_HANDWHEEL_Y(); break; case 2: // Double click // Zero Y shortcut_ZERO_Y(); break; case 3: // Triple click break; case -1: // Single Click and Hold // USER MACRO 19: Y-axis: goto work zero position G0 Y0.0000 press_ESC(); goto_MAIN_MENU(); user_MACRO_19(); break; case -2: // Double Click and Hold break; case -3: // Triple Click and Hold break; } } if (button[15].clicks != 0) { switch (button[15].clicks) { case 1: // Single click // Handwheel on Z shortcut_HANDWHEEL_Z(); break; case 2: // Double click // Zero Z shortcut_ZERO_Z(); break; case 3: // Triple click break; case -1: // Single Click and Hold // USER MACRO 20: Z-axis-goto MACHINE up position G53 G0 Z29.0000 press_ESC(); goto_MAIN_MENU(); user_MACRO_20(); break; case -2: // Double Click and Hold break; case -3: // Triple Click and Hold break; } } // A axis if (button[16].clicks != 0) { switch (button[16].clicks) { case 1: // Single click break; case 2: // Double click break; case 3: // Triple click break; case -1: // Single Click and Hold break; case -2: // Double Click and Hold break; case -3: // Triple Click and Hold break; } } if (button[17].clicks != 0) { switch (button[17].clicks) { case 1: // Single click // Handwheel speed 1x shortcut_HANDWHEEL_X1(); break; case 2: // Double click break; case 3: // Triple click break; case -1: // Single Click and Hold break; case -2: // Double Click and Hold break; case -3: // Triple Click and Hold break; } } if (button[18].clicks != 0) { switch (button[18].clicks) { case 1: // Single click // Handwheel speed 10x shortcut_HANDWHEEL_X10(); break; case 2: // Double click break; case 3: // Triple click break; case -1: // Single Click and Hold break; case -2: // Double Click and Hold break; case -3: // Triple Click and Hold break; } } if (button[19].clicks != 0) { switch (button[19].clicks) { case 1: // Single click // Handwheel speed 100x shortcut_HANDWHEEL_X100(); break; case 2: // Double click break; case 3: // Triple click break; case -1: // Single Click and Hold break; case -2: // Double Click and Hold break; case -3: // Triple Click and Hold break; } } if (button[20].clicks != 0) { switch (button[20].clicks) { case 1: // Single click shortcut_TOGGLE_MACHINE_COORDINATES(); break; case 2: // Double click break; case 3: // Triple click break; case -1: // Single Click and Hold break; case -2: // Double Click and Hold break; case -3: // Triple Click and Hold break; } } } /* Aduino website notes on using a Leonardo as HID: The keyboard functions enable a Leonardo, Micro, or Due to send keystrokes to an attached computer. Note: Not every possible ASCII character, particularly the non-printing ones, can be sent with the Keyboard library. The library supports the use of modifier keys. Modifier keys change the behavior of another key when pressed simultaneously. See here for additional information on supported keys and their use. Keyboard.begin() Keyboard.end() Keyboard.press() Keyboard.print() Keyboard.println() Keyboard.release() Keyboard.releaseAll() Keyboard.write() Reference Language | Libraries | Comparison | Changes Keyboard Modifiers The Keyboard.write() and Keyboard.press() and Keyboard.release() commands don’t work with every possible ASCII character, only those that correspond to a key on the keyboard. For example, backspace works, but many of the other non-printable characters produce unpredictable results. For capital letters (and other keys), what’s sent is shift plus the character (i.e. the equivalent of pressing both of those keys on the keyboard). A modifier key is a special key on a computer keyboard that modifies the normal action of another key when the two are pressed in combination. For more on ASCII values and the characters or functions they represent, see asciitable.com For multiple key presses use Keyboard.press() The Leonardo's definitions for modifier keys are listed below: Key Hexadecimal value Decimal value KEY_LEFT_CTRL 0x80 128 KEY_LEFT_SHIFT 0x81 129 KEY_LEFT_ALT 0x82 130 KEY_LEFT_GUI 0x83 131 KEY_RIGHT_CTRL 0x84 132 KEY_RIGHT_SHIFT 0x85 133 KEY_RIGHT_ALT 0x86 134 KEY_RIGHT_GUI 0x87 135 KEY_UP_ARROW 0xDA 218 KEY_DOWN_ARROW 0xD9 217 KEY_LEFT_ARROW 0xD8 216 KEY_RIGHT_ARROW 0xD7 215 KEY_BACKSPACE 0xB2 178 KEY_TAB 0xB3 179 KEY_RETURN 0xB0 176 KEY_ESC 0xB1 177 KEY_INSERT 0xD1 209 KEY_DELETE 0xD4 212 KEY_PAGE_UP 0xD3 211 KEY_PAGE_DOWN 0xD6 214 KEY_HOME 0xD2 210 KEY_END 0xD5 213 KEY_CAPS_LOCK 0xC1 193 KEY_F1 0xC2 194 KEY_F2 0xC3 195 KEY_F3 0xC4 196 KEY_F4 0xC5 197 KEY_F5 0xC6 198 KEY_F6 0xC7 199 KEY_F7 0xC8 200 KEY_F8 0xC9 201 KEY_F9 0xCA 202 KEY_F10 0xCB 203 KEY_F11 0xCC 204 KEY_F12 0xCD 205 */ void press_RESET() { Keyboard.begin(); Keyboard.press(KEY_F1); delay(100); Keyboard.releaseAll(); } void press_ESC() { Keyboard.begin(); Keyboard.press(KEY_ESC); delay(100); Keyboard.releaseAll(); } void press_F2() { Keyboard.begin(); Keyboard.press(KEY_F2); delay(100); Keyboard.releaseAll(); } void press_F3() { Keyboard.begin(); Keyboard.press(KEY_F3); delay(100); Keyboard.releaseAll(); } void press_F4() { Keyboard.begin(); Keyboard.press(KEY_F4); delay(100); Keyboard.releaseAll(); } void press_F5() { Keyboard.begin(); Keyboard.press(KEY_F5); delay(100); Keyboard.releaseAll(); } void press_F6() { Keyboard.begin(); Keyboard.press(KEY_F6); delay(100); Keyboard.releaseAll(); } void press_F7() { Keyboard.begin(); Keyboard.press(KEY_F7); delay(100); Keyboard.releaseAll(); } void press_F8() { Keyboard.begin(); Keyboard.press(KEY_F8); delay(100); Keyboard.releaseAll(); } void press_F9() { Keyboard.begin(); Keyboard.press(KEY_F9); delay(100); Keyboard.releaseAll(); } void press_F10() { Keyboard.begin(); Keyboard.press(KEY_F10); delay(100); Keyboard.releaseAll(); } void press_F11() { Keyboard.begin(); Keyboard.press(KEY_F11); delay(100); Keyboard.releaseAll(); } void press_F12() { Keyboard.begin(); Keyboard.press(KEY_F12); delay(100); Keyboard.releaseAll(); } void goto_MAIN_MENU() { Keyboard.begin(); Keyboard.press(KEY_LEFT_ALT); Keyboard.press(KEY_F1); delay(100); Keyboard.releaseAll(); } void goto_HOME_MENU() { Keyboard.begin(); Keyboard.press(KEY_LEFT_ALT); Keyboard.press(KEY_F2); delay(100); Keyboard.releaseAll(); } void goto_ZERO_MENU() { Keyboard.begin(); Keyboard.press(KEY_LEFT_ALT); Keyboard.press(KEY_F3); delay(100); Keyboard.releaseAll(); } void goto_AUTO_MENU() { Keyboard.begin(); Keyboard.press(KEY_LEFT_ALT); Keyboard.press(KEY_F4); delay(100); Keyboard.releaseAll(); } void goto_MACHINE_IO_MENU() { Keyboard.begin(); Keyboard.press(KEY_LEFT_ALT); Keyboard.press(KEY_F7); delay(100); Keyboard.releaseAll(); } void goto_GRAPHICS_MENU() { Keyboard.begin(); Keyboard.press(KEY_LEFT_ALT); Keyboard.press(KEY_F8); delay(100); Keyboard.releaseAll(); } void goto_JOG_MENU() { Keyboard.begin(); Keyboard.press(KEY_LEFT_ALT); Keyboard.press(KEY_F9); delay(100); Keyboard.releaseAll(); } void goto_JOG_PAD() { Keyboard.begin(); Keyboard.press(KEY_LEFT_ALT); Keyboard.press(KEY_F10); delay(100); Keyboard.releaseAll(); } void goto_USER1_MENU() { Keyboard.begin(); Keyboard.press(KEY_LEFT_ALT); Keyboard.press(KEY_F11); delay(100); Keyboard.releaseAll(); } void goto_USER2_MENU() { Keyboard.begin(); Keyboard.press(KEY_LEFT_ALT); Keyboard.press(KEY_F12); delay(100); Keyboard.releaseAll(); } void shortcut_HOME_ALL() { Keyboard.begin(); Keyboard.press(KEY_LEFT_CTRL); Keyboard.press('h'); delay(100); Keyboard.releaseAll(); } void shortcut_ZERO_X() { Keyboard.begin(); Keyboard.press(KEY_LEFT_CTRL); Keyboard.press('1'); delay(100); Keyboard.releaseAll(); } void shortcut_ZERO_Y() { Keyboard.begin(); Keyboard.press(KEY_LEFT_CTRL); Keyboard.press('2'); delay(100); Keyboard.releaseAll(); } void shortcut_ZERO_Z() { Keyboard.begin(); Keyboard.press(KEY_LEFT_CTRL); Keyboard.press('3'); delay(100); Keyboard.releaseAll(); } void shortcut_HANDWHEEL_X() { Keyboard.begin(); Keyboard.press(KEY_LEFT_CTRL); Keyboard.press(KEY_LEFT_SHIFT); Keyboard.press('x'); delay(100); Keyboard.releaseAll(); } void shortcut_HANDWHEEL_Y() { Keyboard.begin(); Keyboard.press(KEY_LEFT_CTRL); Keyboard.press(KEY_LEFT_SHIFT); Keyboard.press('y'); delay(100); Keyboard.releaseAll(); } void shortcut_HANDWHEEL_Z() { Keyboard.begin(); Keyboard.press(KEY_LEFT_CTRL); Keyboard.press(KEY_LEFT_SHIFT); Keyboard.press('z'); delay(100); Keyboard.releaseAll(); } void shortcut_HANDWHEEL_X1() { Keyboard.begin(); Keyboard.press(KEY_LEFT_CTRL); Keyboard.press('n'); delay(100); Keyboard.releaseAll(); } void shortcut_HANDWHEEL_X10() { Keyboard.begin(); Keyboard.press(KEY_LEFT_CTRL); Keyboard.press('o'); delay(100); Keyboard.releaseAll(); } void shortcut_HANDWHEEL_X100() { Keyboard.begin(); Keyboard.press(KEY_LEFT_CTRL); Keyboard.press('p'); delay(100); Keyboard.releaseAll(); } void shortcut_TOGGLE_MDI() { Keyboard.begin(); Keyboard.press(KEY_LEFT_CTRL); Keyboard.press(KEY_F6); delay(100); Keyboard.releaseAll(); } void shortcut_TOGGLE_MACHINE_COORDINATES() { Keyboard.begin(); // TOGGLE MACHINE/WORK COORDINATES Keyboard.press(KEY_LEFT_CTRL); Keyboard.press('w'); delay(100); Keyboard.releaseAll(); } void shortcut_TOGGLE_AUX1() { Keyboard.begin(); Keyboard.press(KEY_LEFT_CTRL); Keyboard.press('m'); delay(100); Keyboard.releaseAll(); } void shortcut_TOGGLE_MIST() { Keyboard.begin(); Keyboard.press(KEY_LEFT_CTRL); Keyboard.press('l'); delay(100); Keyboard.releaseAll(); } void shortcut_TOGGLE_FLOOD() { Keyboard.begin(); Keyboard.press(KEY_LEFT_CTRL); Keyboard.press('k'); delay(100); Keyboard.releaseAll(); } void user_MACRO_1() { Keyboard.begin(); Keyboard.press(KEY_LEFT_ALT); Keyboard.press('1'); delay(100); Keyboard.releaseAll(); } void user_MACRO_2() { Keyboard.begin(); Keyboard.press(KEY_LEFT_ALT); Keyboard.press('2'); delay(100); Keyboard.releaseAll(); } void user_MACRO_3() { Keyboard.begin(); Keyboard.press(KEY_LEFT_ALT); Keyboard.press('3'); delay(100); Keyboard.releaseAll(); } void user_MACRO_4() { Keyboard.begin(); Keyboard.press(KEY_LEFT_ALT); Keyboard.press('4'); delay(100); Keyboard.releaseAll(); } void user_MACRO_5() { Keyboard.begin(); Keyboard.press(KEY_LEFT_ALT); Keyboard.press('5'); delay(100); Keyboard.releaseAll(); ... This file has been truncated, please download it to see its full contents.
Bagian dan Kotak Kustom
Ini adalah perpustakaan terpenting yang Anda butuhkan untuk mendapatkan fungsi terbanyak per tombolclickbutton_hq5qeT4toX.zipcnc_pendant_SenmxC8UCj.zip
Skema
Skema yang kurang bagus namun akan menyelesaikan pekerjaan...