Mikrofusi dari komponen cetakan 3D dengan resin terbakar
Mikrofusi atau pengecoran lilin yang hilang adalah salah satumetode produksi yang paling banyak digunakan dalam industri perhiasan dan merupakan proses pengecoran tertua yang diketahui.
Pengecoran memungkinkan replika logam diperoleh melalui cetakan yang dibuat dari prototipe yang secara tradisional dimodelkan dalam lilin. Dalam hal ini, komponen cetak 3D dengan resin terbakar digunakan untuk menggantikan model lilin.
Perhiasan dapat dibuat dari berbagai logam, termasuk emas, platina, perak, dan kuningan , menggunakan proses pengecoran. Di bawah ini Anda dapat melihat proses fusi mikro untuk perhiasan dari cetakan 3D dengan resin terbakar:
1- pencetakan 3D bagian tersebut
Berdasarkan desain yang dibuat menggunakan perangkat lunak CAD, model yang diinginkan harus dicetak 3D. Saat ini ada sejumlah besar resin yang dapat dikalsinasi tersedia dari produsen yang berbeda. Penggunaan satu bahan atau lainnya bergantung pada printer 3D yang digunakan dan karakteristik yang diperlukan untuk komponen tersebut.
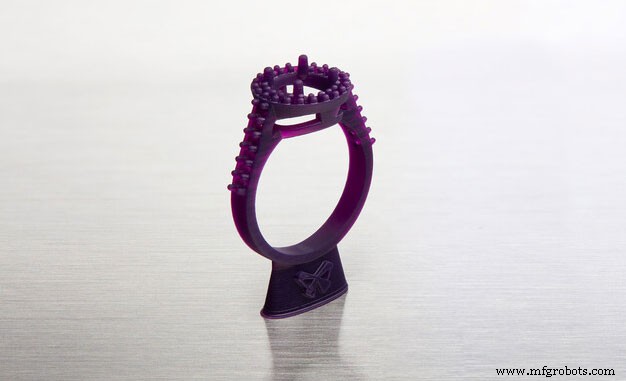
Gambar 1:Cincin cetak 3D dengan resin burn-out FormLabs. Sumber:FormLabs.
Salah satu printer 3D paling populer untuk pencetakan 3D di sektor perhiasan adalah Form3 dari pabrikan terkenal FormLabs. Printer 3D ini tidak memerlukan pengetahuan teknis lanjutan dan karenanya dapat digunakan tanpa kesulitan . Printer 3D Form3 membatasi penggunaannya hanya dengan bahan pendukung yang dikembangkan oleh produsen. Ini bisa menjadi keuntungan, karena tidak diperlukan pengaturan dan parameter konfigurasi serta nilai yang dapat dimodifikasi dikurangi seminimal mungkin, dengan hanya jenis material dan beberapa parameter dasar yang dipilih. Ini mengurangi margin kesalahan seminimal mungkin.
Tabel berikut menampilkan beberapa resin yang dapat dibakar paling populer dankompatibilitasnya dengan printer 3D:
| Resin | Produsen | Teknologi | Kompatibilitas |
|---|
| Castable Wax | FormLab | SLA | Formulir 2, Formulir 3, Formulir 3L, Formulir3+ |
| Castable Wax 40 | FormLab | SLA | Formulir 2, Formulir 3, Formulir 3L, Formulir3+ |
| zWax Amber | UniZ | LCD | Slash, Slash 2, Slash 2 Plus, Slash 2 Pro |
| zWax Purple | UniZ | LCD | Slash, Slash 2, Slash 2 Plus, Slash 2 Pro |
| Bluecast original | Zortrax | LCD | UniZ, WANHAO, zortrax, ANYCUBIC, ASIGA, B9 Creator, FLASH FORGE Moon Ray, Prusa. |
| Bluecast X5 | Zortrax | LCD | UniZ, WANHAO, zortrax, ANYCUBIC, ASIGA, B9 Creator, FLASH FORGE Moon Ray, Prusa. |
| Bluecast X10 | Zortrax | LCD | UniZ, WANHAO, zortrax, ANYCUBIC, ASIGA, B9 Creator, FLASH FORGE Moon Ray, Prusa. |
| Dental Cast | Harz Labs | LCD | Formlabs, PEOPOLY, UniZ, WANHAO, zortrax, ANYCUBIC, ASIGA, B9 Creator, FLASH FORGE Moon Ray, Prusa. |
Table 1:Burn-out resins and compatibility. Source:Filament2print.
Each material has different properties and requires different parameters. However, they all have a common characteristic:they have been developed to replace wax parts in the microfusion process, with a composition that achieves castings free of residues that could affect the final result of the parts.
Once the parts have been printed, they must be cured if the material requires it. This depends on the composition of the resin and the manufacturer's advice should always be followed to achieve an optimum result.
2- Wax tree
Once the parts are cured (in cases where this step is required), the removal of the backing can be carried out, always with great care. Sandpaper (400 grit or higher) or even a rotary tool with a polishing attachment can be used to achieve total removal of the support and a perfect finish.
To create the wax tree, a wax base is taken and attached to a rubber cover of the sprue. Small cylindrical wax rods are welded to the wax base using a heat tool. The 3D printed parts are welded to the other end of the bars.
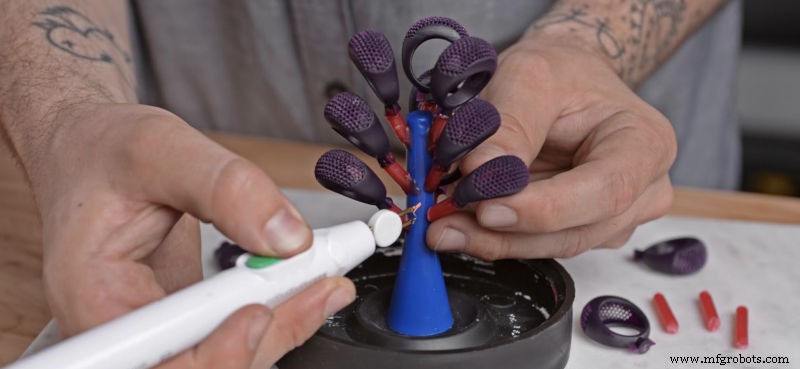
Image 2:Casting wax tree. Source:FormLabs.
This process is similar to that carried out in microfusion when casting traditionally carved wax pieces.
3- Mould preparation
The wax tree with the 3D printed parts in burn-out resin is to be placed inside a refractory steel cylinder, which is to be fitted into the rubber cylinder cover. In case the refractory steel cylinder has holes, these should be covered by wrapping the cylinder in adhesive tape.
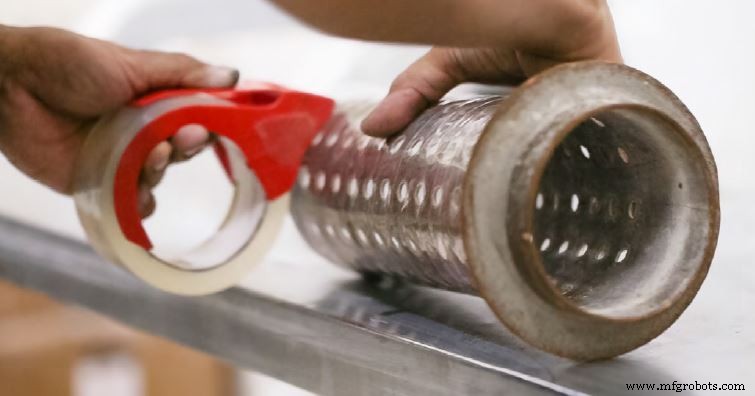
Image 3:Refractory steel cylinder shell. Source:Formlabs.
The casting must then be poured slowly, always from the side of the cylinder to avoid damaging the tree with the parts 3D printed with calcineable resin.
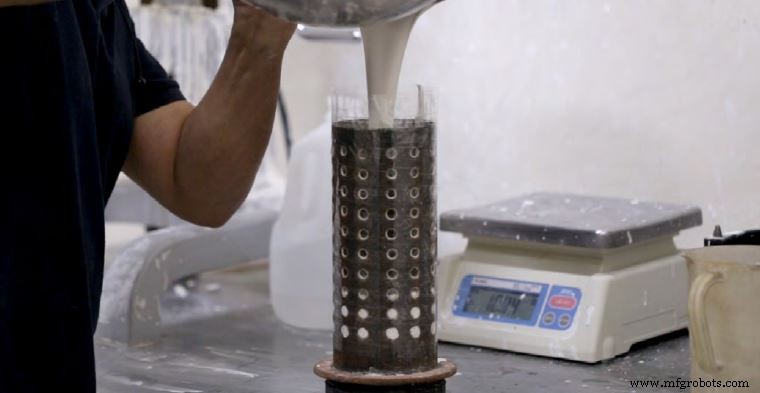
Image 4:Pouring of the casting into a refractory steel cylinder. Source:Formlabs.
When pouring the casting, it is possible that small air pockets may remain which can affect the quality of the final parts. For this reason, it is very important to carry out the degassing process in a vacuum chamber.
4- Burnout
The cylinder is placed in the oven following the time and temperature instructions recommended by the manufacturer. During this time, the wax will burn out without leaving residues, leaving the mould ready.
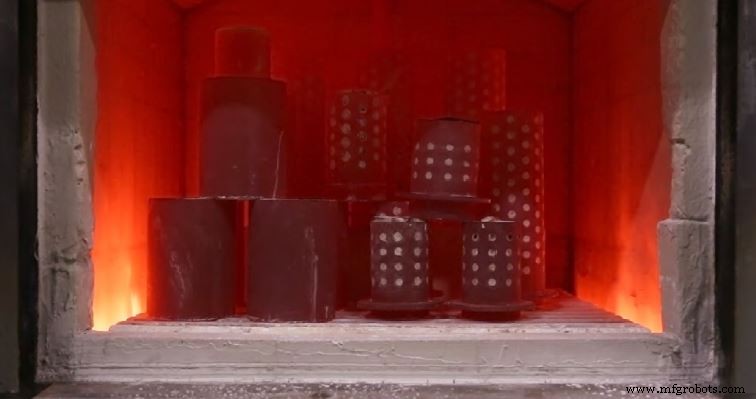
Image 5:Burnout process. Source:Formlabs.
The desired metal must then be poured into the mould to produce the final parts.
5- Washing and polishing
After casting, the mould is carefully removed from the furnace and immersed in water using tongs. During this process, the casting will melt, leaving the metal parts visible. Once washed, the metal parts are separated from the tree, polished and polished until the desired finish is achieved.
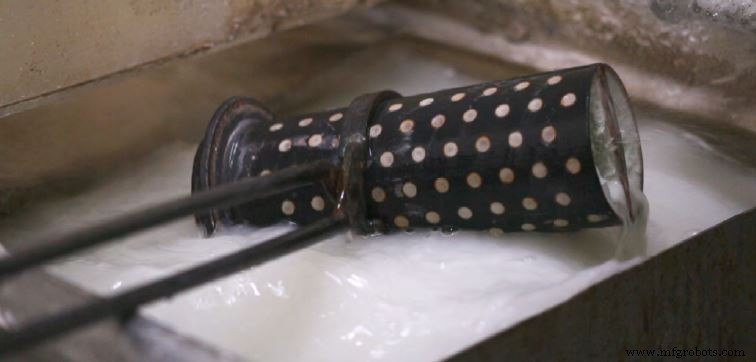
Image 6:Washing process. Source:Formlabs.
Once washed, the metal parts are separated from the tree, polished and polished to the desired finish.
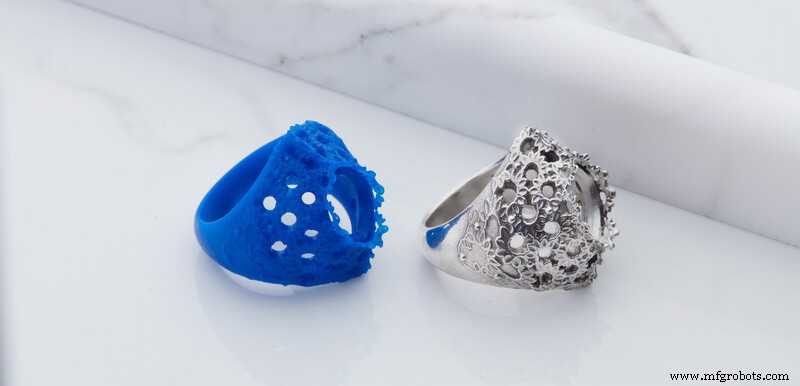
Image 7:3D printed ring with burn-out resin and silver ring after the microfusion process. Source:Formlabs.
The use of castable resins in the jewellery sector offers numerous advantages . Among others, it allows you to 3D print as many models as you want, quickly and with extreme precision . This results in a significant reduction in costs and production times.


